
All R boxer bikes after 12/1997 have twin radial seals with vent inbetween the seal. Pre 12/1997 bikes have a single seal.
My bike is 03/1998 so it has twin radial seals, inner and outer seal in the crankshaft output end. Decided to replace 'em before my big trip along with clutch and couple of other seals.
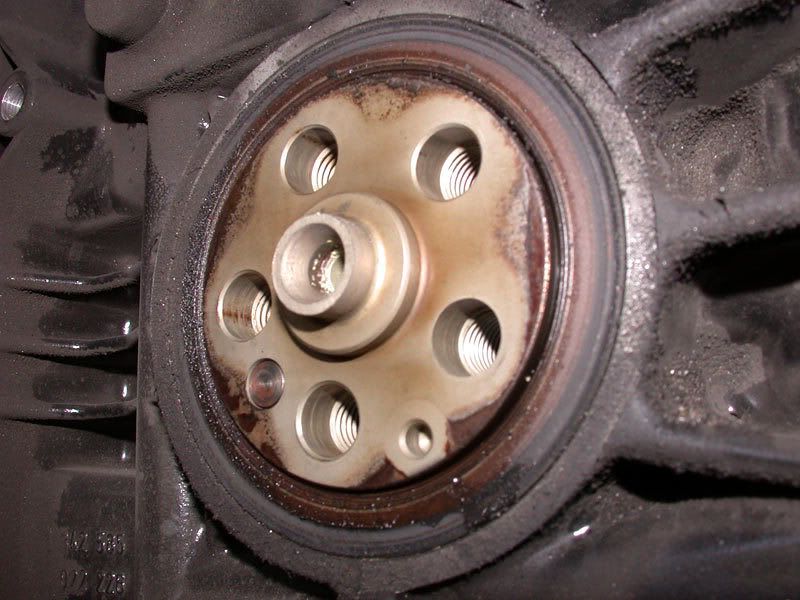
So here how it goes after you've taken your bike apart (rear up, airbox, gearbox+swingarm, clutch+flywheel removed):
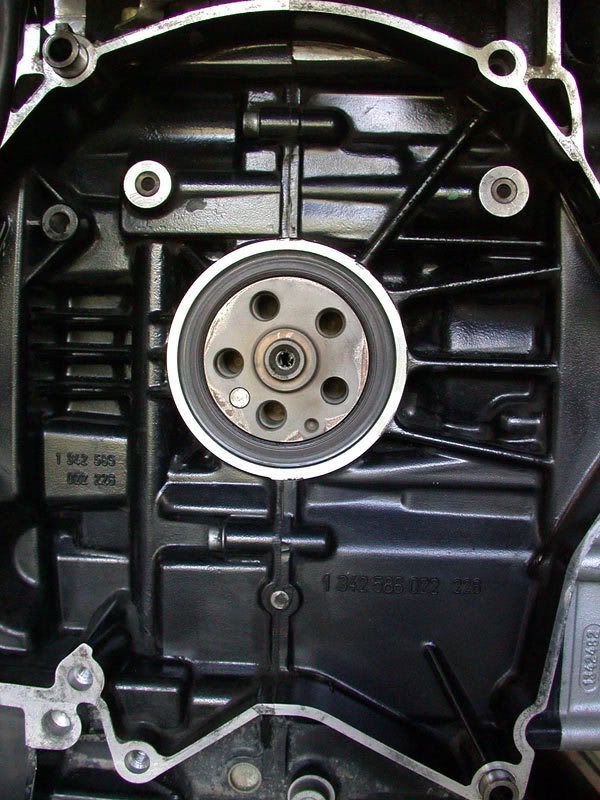
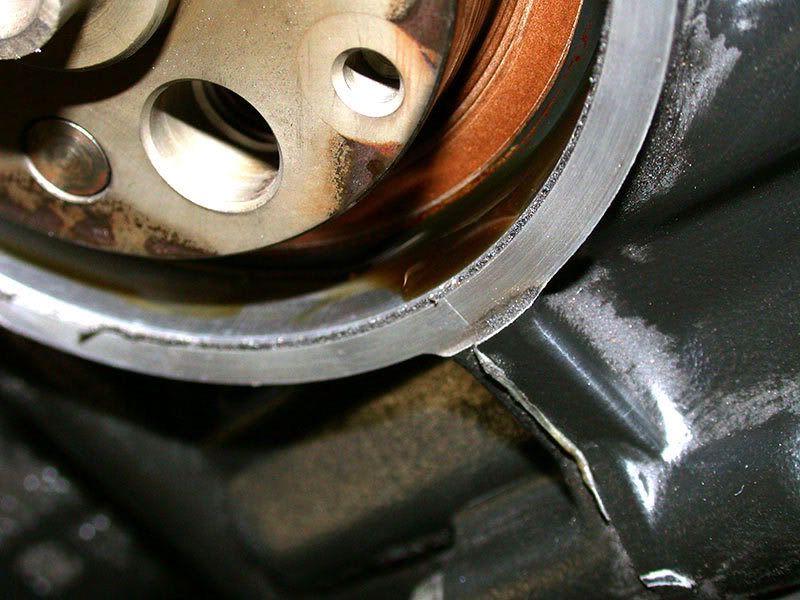
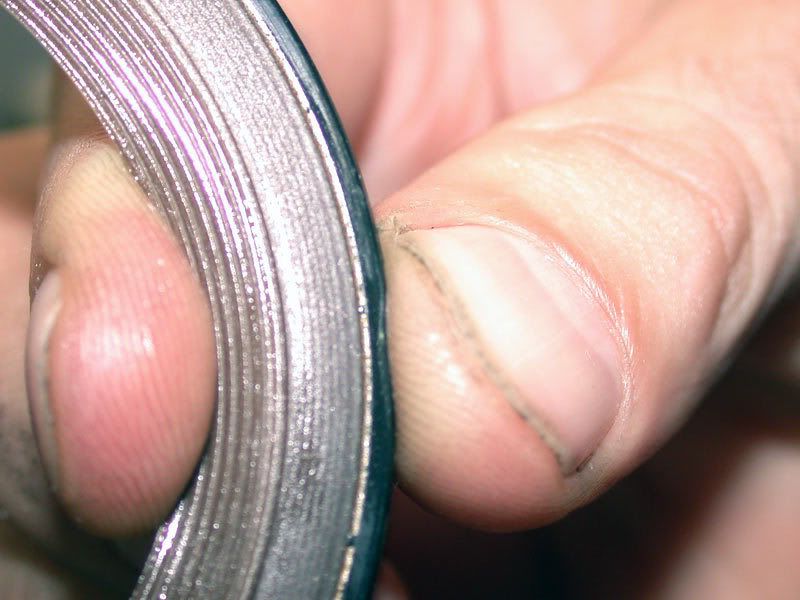
After opening up my old seal has had a slight leak per 81,000km:
So decision to replace the radial seals looked like obligatory, or my new clutch would be toasted soon with oil contamination.
Clean all the surfaces carefully, so you can do clean work on the sealing areas:
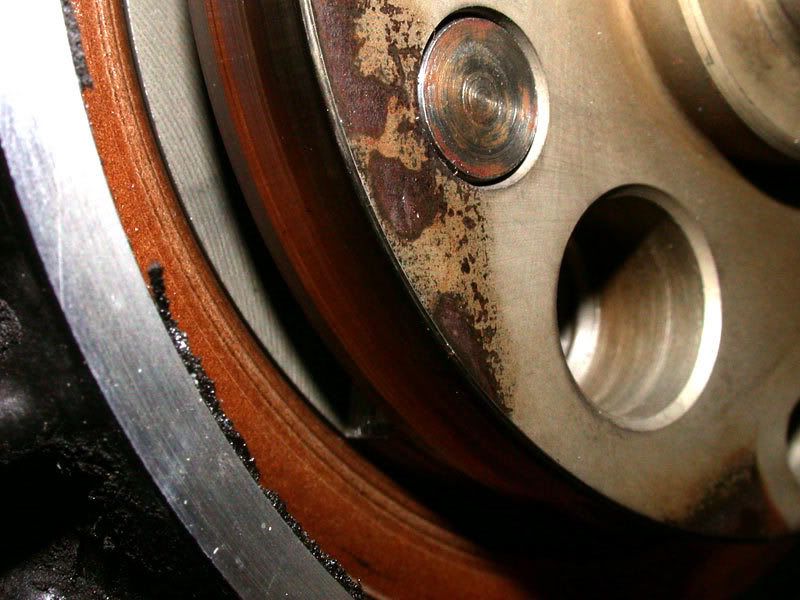
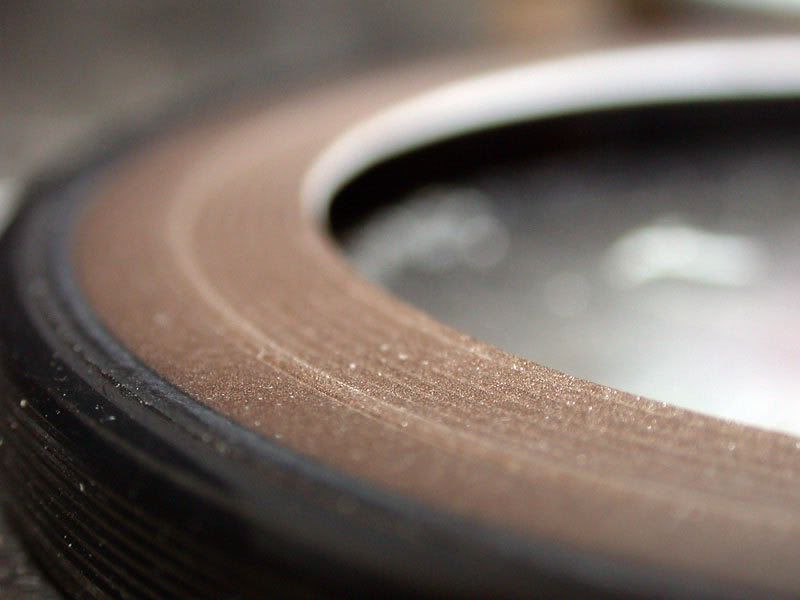
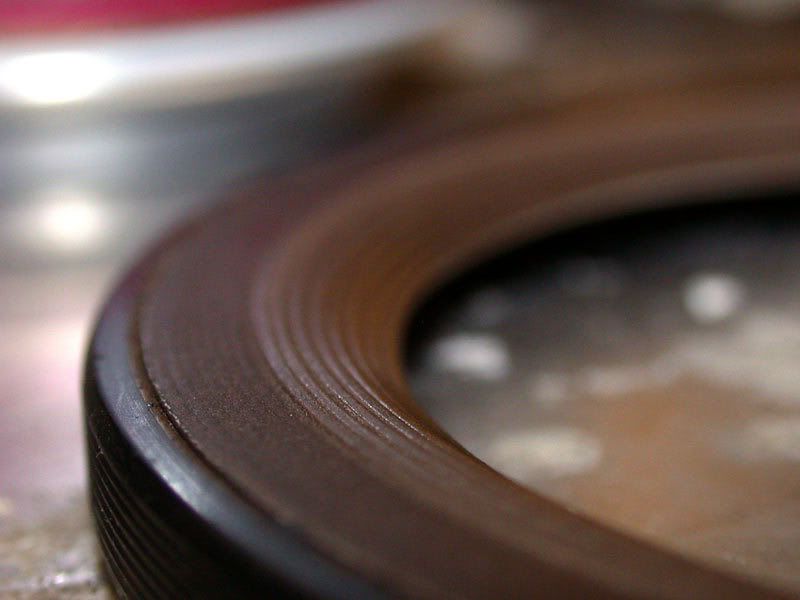
MEASURE the depth of outer seal. Mine was easy - it was exacly on the surface depth.
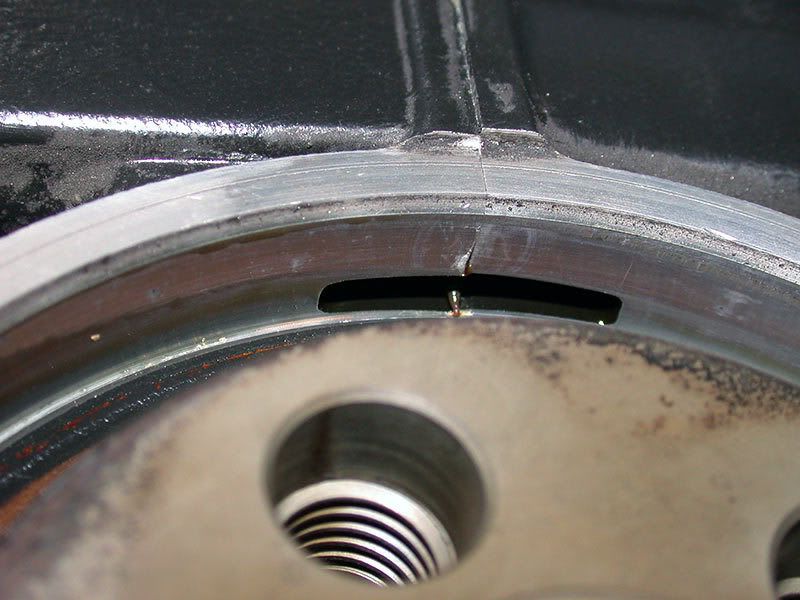
Drill two holed 180 degrees apart into the outer radial seal:
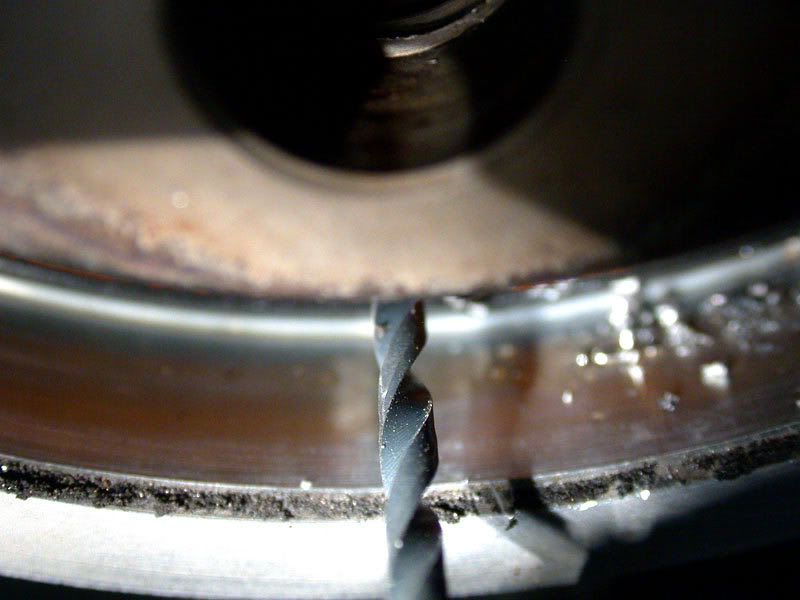
DO NOT damage any of the surfaces by doing so.
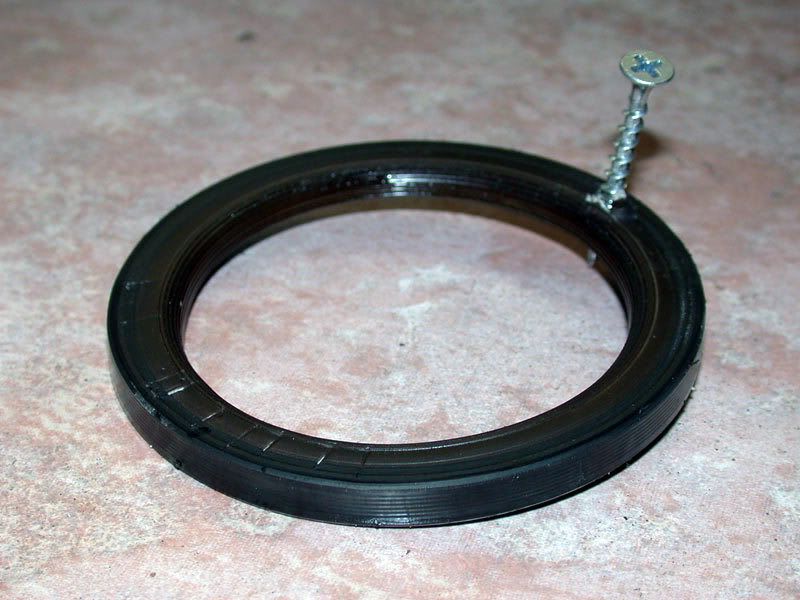
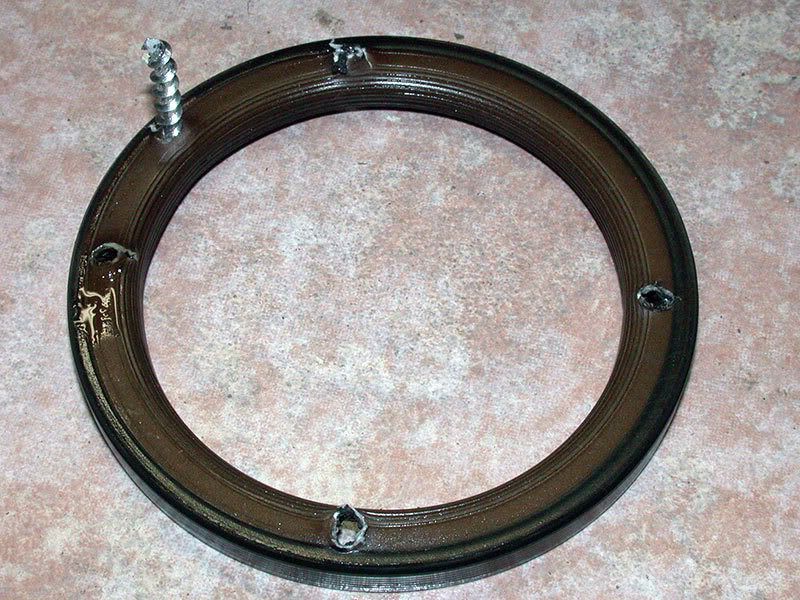
Screw suitable bolts into the holed and pull the seal out (this can be very hard job, like mine was, I needed to use excessive force and as you can see kicking one end with screwdriver and hoping the other end would pop up didn't work for me):
Outer radial seal out:
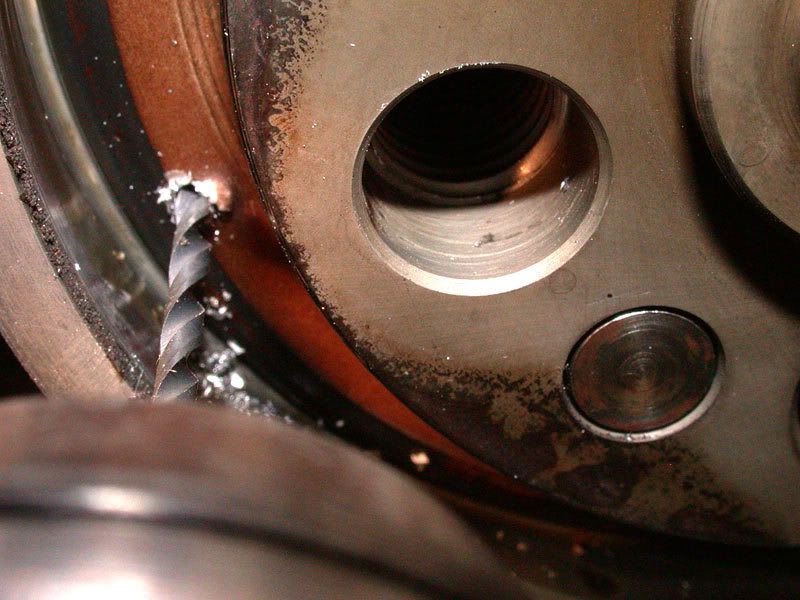
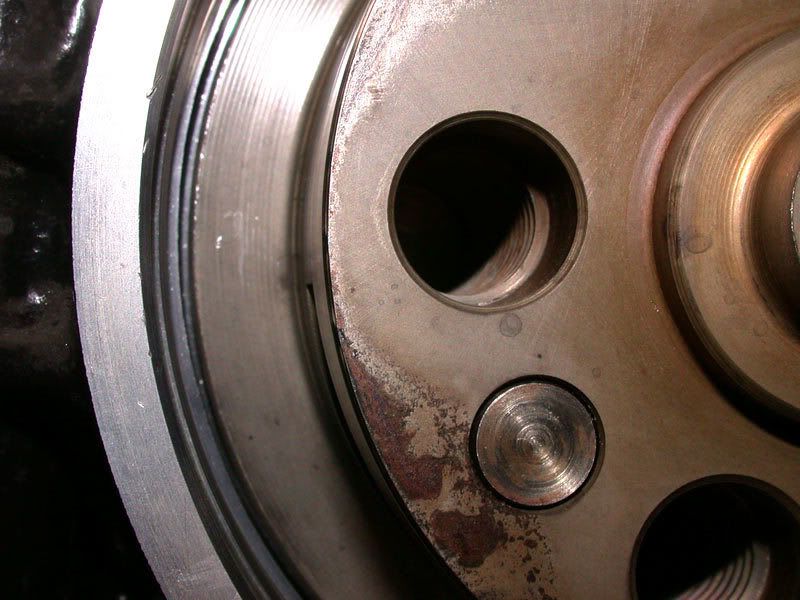
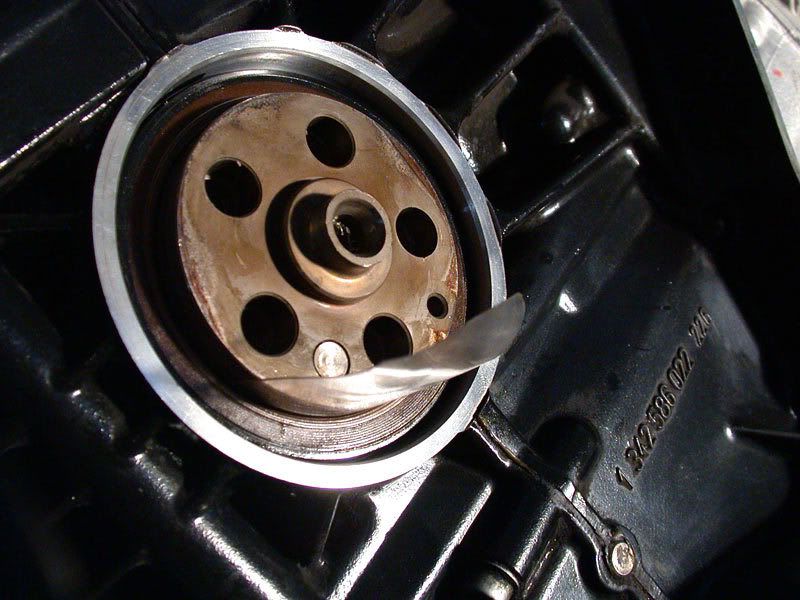
When you get it out you'll see crankshaft vent hole:
And crankcase side vent hole above (the inner radial seal is still in place):
Those holes will keep balanced pressure beteen the two radial seals to effectively avoid any potential leaks coming from high-pressure oil inside crankcase.
While effective this setup will create its unique set of mounting problems: you must first get the new inner-radial-seal over the vent hole w/o damaging the radial seal itself, and you must put the outer-radial-seal to a certain depth that it leaves the vent open and doesn't rach any of the hole's corners (or it'll be destroyed soon and leaks occur if you do so).
Now you know the theory remove the inner radial seal (prior you don't have to measure it's depth, since its mounted all the way in). Here you must drill holes inside, no other way geting it out.
I had to drill 5 (!) holes to get it out, since the holes kept collapsing on pulling the screws, but it got it out easily in the end since I destroyed the seal's metal ring's integrity (that pushes it agains the wall) with so many holes:
This done you'll see the metal end of crankshaft:
Now start preparing both radial seals by pre-forming them with your (fresh oily) fingers.
New seal is flat'n'clean:
Pre-forming with your finger and oil, going slowly w/o any excessive force first:
And after it starts to take shape add additional force with your fingers:
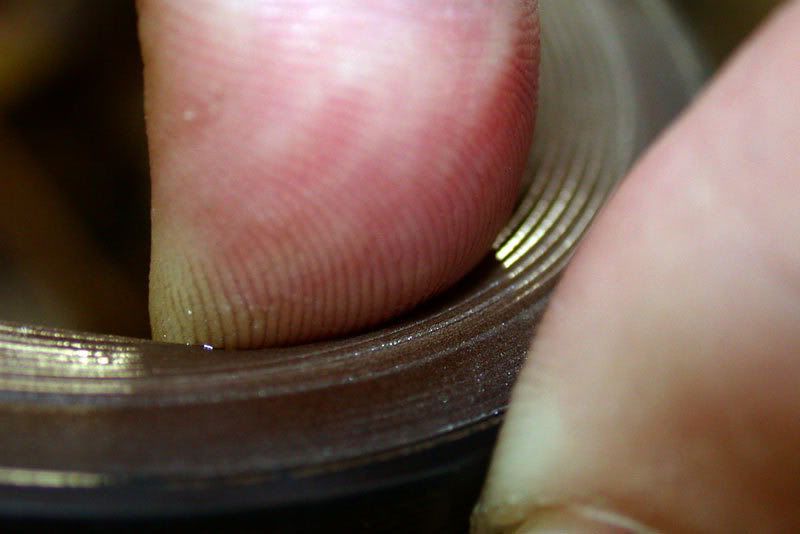
After it's pre-formed:
While well pre-formed it'll be still very hard to get it on the crankshaft w/o helping "tools":
So make a plastic helper sheet, I used it from plastic bottle:
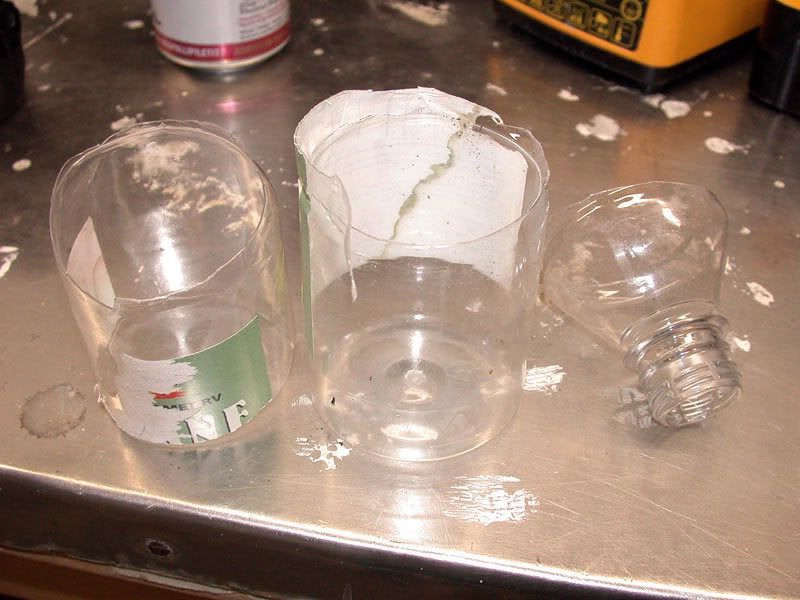
Cut all the sharp corners etc, and oil it well, so it doesn't damage the radial seal's fragile surfaces.
Oil both the radial surfaces and VERY little oil on the outer surfaces too to slightly aid going in.
I got it going making rounds with this oiled plastic sheet and smartly pushed the seal on the crankcase first, prior I fixed the crankshaft's vent hole position and then covered it with the sheet to get it safely over the vent hole into the hole:
You'd need a special BMW tool to mount it, but not neccesarily. I made myself a pusher tool out of cable-roll holder that had the required radius:
And with wood-block to additionally dampen hammer hits and even out the forces over the entire area, kick the inner seal all the way in:
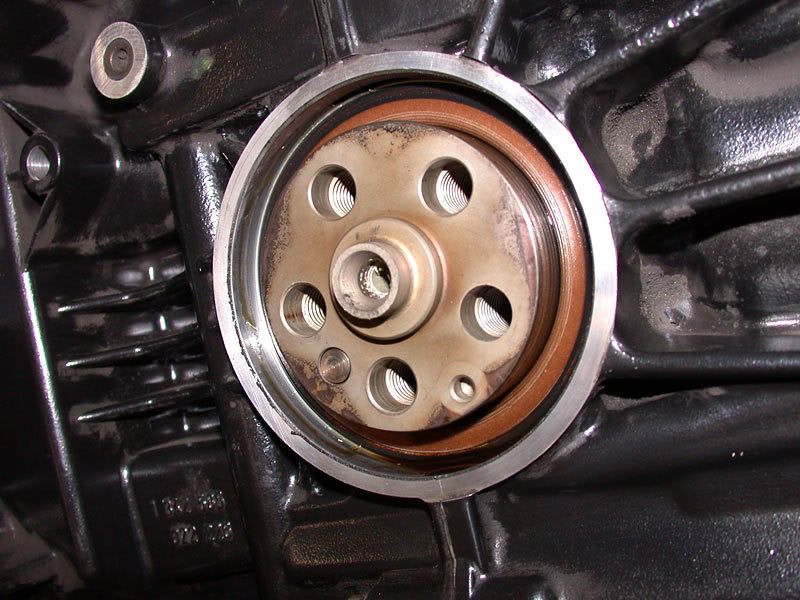
Inner radial seal now in place:
Now preform the outer seal and get it going on the crankshaft in the same way as outer seal with thin (but well supporting) plastic sheet. And add little oil on the outside surface too (not too much or it'll just pop out with crankcase pressure).
I just used small wooden blocks to kick the outer seal into the surface depth (half of the block supported itself on the seal, half on the crankcase when kicked in, and I did rounds around the seals to make sure it's evenly pushed in). Job done.
New radial seals fitted:
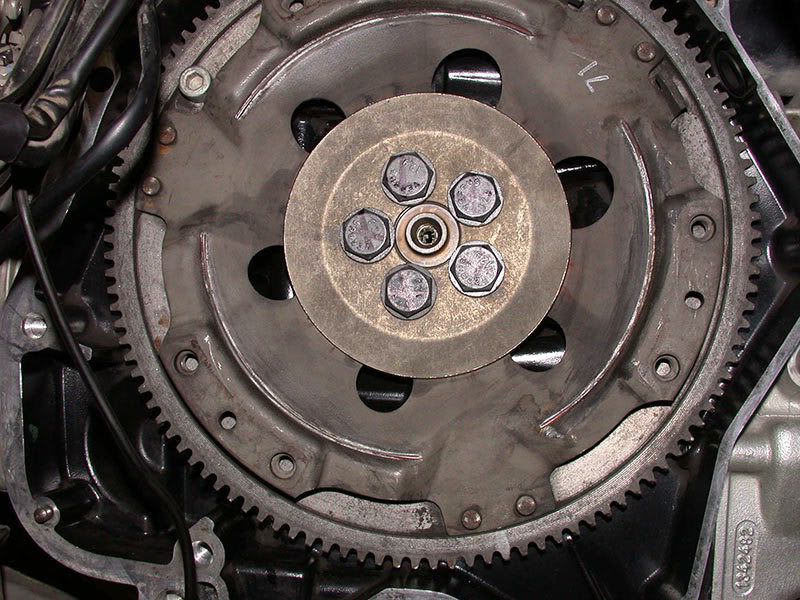
Now you need to put BRAND NEW flywheel bolts (bin the old ones, since they're "deforming" material type of bolts after they're mounted they're useless/dangerous in second-hand use).
Tighthem them in criss-cross pattern with 40Nm of torque first. Now you need to angle-tighten them to final 32-degrees.
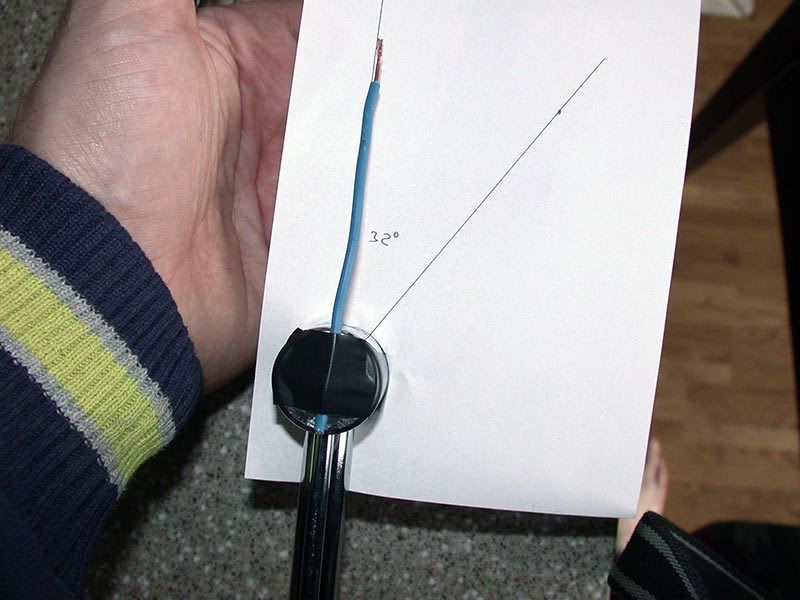
I made angle-tool myself. First I made line in computer application, rotated it 32-degrees, put white sheet on computer screen and copied the lines from there. And got perfect 32-degree angle. Cut hole in the centre of the crossing point of the two lines drawing the angle sector. Fix a wire on the wrench to point the angle. Here's your homemade angle-tool:
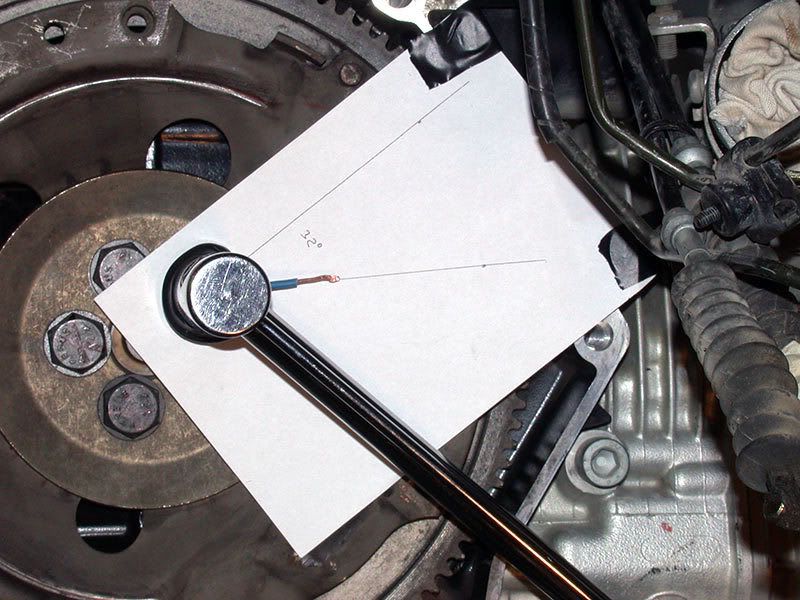
Zero out the reading by taping the paper in the correct position and in criss-cross pattern 32-degree final tighten each bolt (I marked each bolt after it's done not to confuse anything):
Job done.")
Hopefully this'll help somebody, Margus
My bike is 03/1998 so it has twin radial seals, inner and outer seal in the crankshaft output end. Decided to replace 'em before my big trip along with clutch and couple of other seals.
So here how it goes after you've taken your bike apart (rear up, airbox, gearbox+swingarm, clutch+flywheel removed):
After opening up my old seal has had a slight leak per 81,000km:
So decision to replace the radial seals looked like obligatory, or my new clutch would be toasted soon with oil contamination.
Clean all the surfaces carefully, so you can do clean work on the sealing areas:
MEASURE the depth of outer seal. Mine was easy - it was exacly on the surface depth.
Drill two holed 180 degrees apart into the outer radial seal:
DO NOT damage any of the surfaces by doing so.
Screw suitable bolts into the holed and pull the seal out (this can be very hard job, like mine was, I needed to use excessive force and as you can see kicking one end with screwdriver and hoping the other end would pop up didn't work for me):
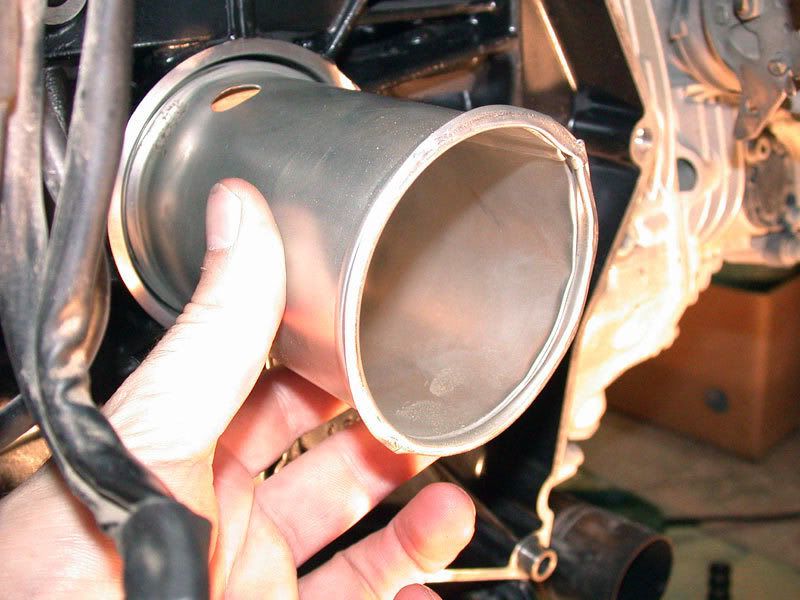
Outer radial seal out:
When you get it out you'll see crankshaft vent hole:
And crankcase side vent hole above (the inner radial seal is still in place):
Those holes will keep balanced pressure beteen the two radial seals to effectively avoid any potential leaks coming from high-pressure oil inside crankcase.
While effective this setup will create its unique set of mounting problems: you must first get the new inner-radial-seal over the vent hole w/o damaging the radial seal itself, and you must put the outer-radial-seal to a certain depth that it leaves the vent open and doesn't rach any of the hole's corners (or it'll be destroyed soon and leaks occur if you do so).
Now you know the theory remove the inner radial seal (prior you don't have to measure it's depth, since its mounted all the way in). Here you must drill holes inside, no other way geting it out.
I had to drill 5 (!) holes to get it out, since the holes kept collapsing on pulling the screws, but it got it out easily in the end since I destroyed the seal's metal ring's integrity (that pushes it agains the wall) with so many holes:
This done you'll see the metal end of crankshaft:
Now start preparing both radial seals by pre-forming them with your (fresh oily) fingers.
New seal is flat'n'clean:
Pre-forming with your finger and oil, going slowly w/o any excessive force first:
And after it starts to take shape add additional force with your fingers:
After it's pre-formed:
While well pre-formed it'll be still very hard to get it on the crankshaft w/o helping "tools":
So make a plastic helper sheet, I used it from plastic bottle:
Cut all the sharp corners etc, and oil it well, so it doesn't damage the radial seal's fragile surfaces.
Oil both the radial surfaces and VERY little oil on the outer surfaces too to slightly aid going in.
I got it going making rounds with this oiled plastic sheet and smartly pushed the seal on the crankcase first, prior I fixed the crankshaft's vent hole position and then covered it with the sheet to get it safely over the vent hole into the hole:
You'd need a special BMW tool to mount it, but not neccesarily. I made myself a pusher tool out of cable-roll holder that had the required radius:
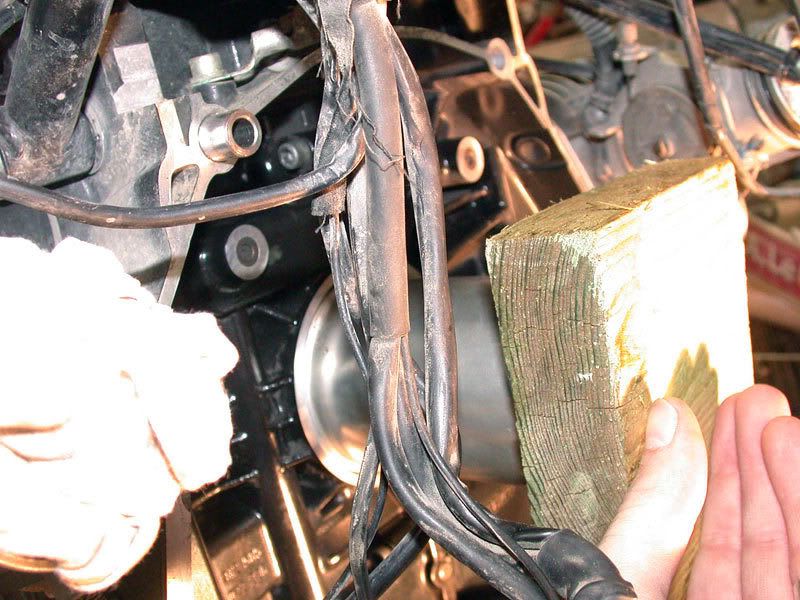
And with wood-block to additionally dampen hammer hits and even out the forces over the entire area, kick the inner seal all the way in:
Inner radial seal now in place:
Now preform the outer seal and get it going on the crankshaft in the same way as outer seal with thin (but well supporting) plastic sheet. And add little oil on the outside surface too (not too much or it'll just pop out with crankcase pressure).
I just used small wooden blocks to kick the outer seal into the surface depth (half of the block supported itself on the seal, half on the crankcase when kicked in, and I did rounds around the seals to make sure it's evenly pushed in). Job done.
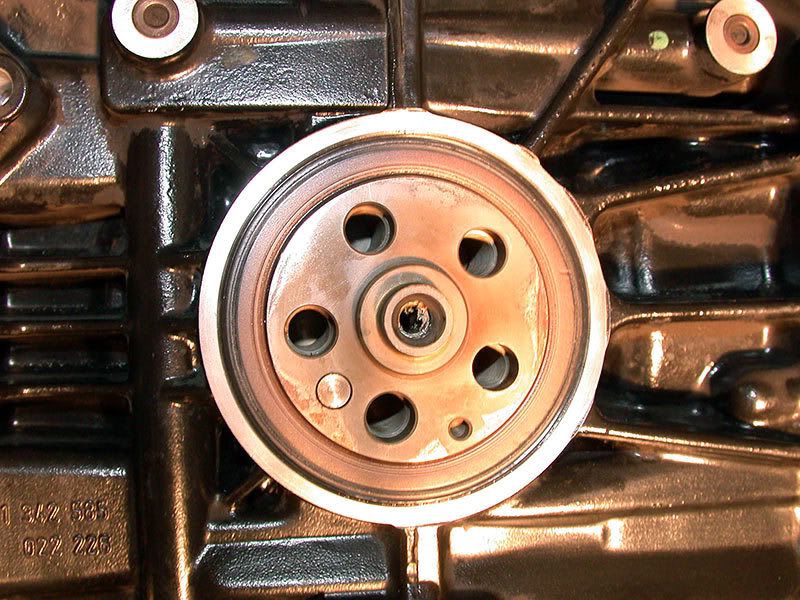
New radial seals fitted:
Now you need to put BRAND NEW flywheel bolts (bin the old ones, since they're "deforming" material type of bolts after they're mounted they're useless/dangerous in second-hand use).
Tighthem them in criss-cross pattern with 40Nm of torque first. Now you need to angle-tighten them to final 32-degrees.
I made angle-tool myself. First I made line in computer application, rotated it 32-degrees, put white sheet on computer screen and copied the lines from there. And got perfect 32-degree angle. Cut hole in the centre of the crossing point of the two lines drawing the angle sector. Fix a wire on the wrench to point the angle. Here's your homemade angle-tool:
Zero out the reading by taping the paper in the correct position and in criss-cross pattern 32-degree final tighten each bolt (I marked each bolt after it's done not to confuse anything):
Job done.
Hopefully this'll help somebody, Margus
 , but yes good write up and good luck, where this time?


