Airhead Gearboxes

Rob Farmer

Well-known member
UKGSer Subscriber
Joined
Feb 25, 2002
Messages
15,612
Reaction score
2
Location
Vale of Belvoir
Following on from a conversation at the Wee-kend. It would appear that the gearboxes are a bit of a black box for a lot of people so I thought I'd put a thread together showing what's involved in rebuilding them and showing what's inside. They are as you might expect pretty simple. Most of the problems could be avoided by using the right oil and checking the seals are in good shape.

I bought one the other day from Andy Mullins so I'll use that for the rebuild but will use pictures from other rebuilds I've done (so if you spot a picture from your rebuild don't fret)

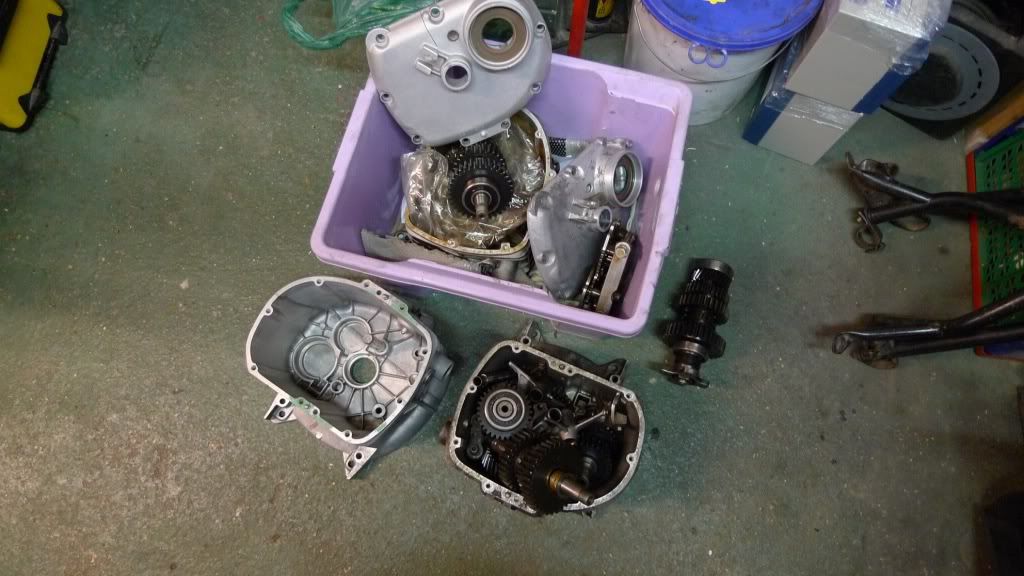
Most of them arrive in this sort of condition. Something's gone tits up and a sorry gearbox is languishing in a soggy box.

DSC00051.jpg
Of course it helps to drain the gearbox oil before posting (eh! Jay ;))

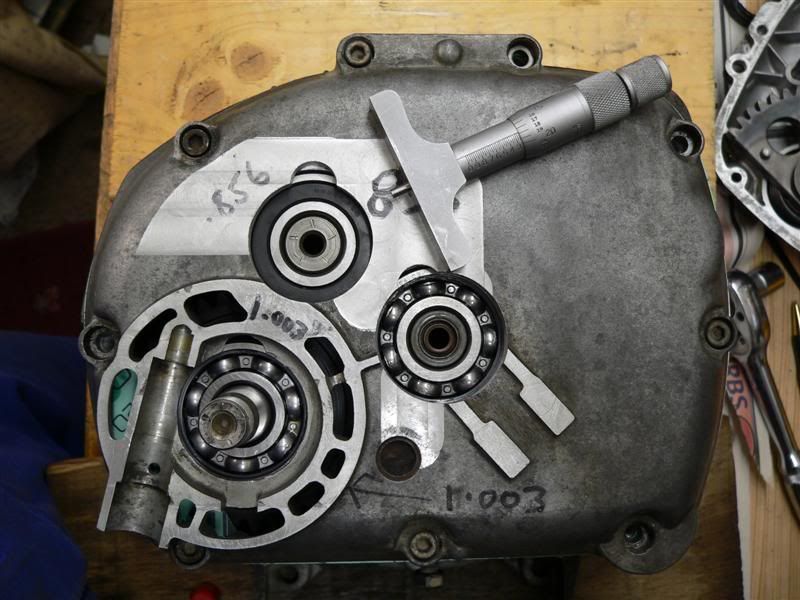
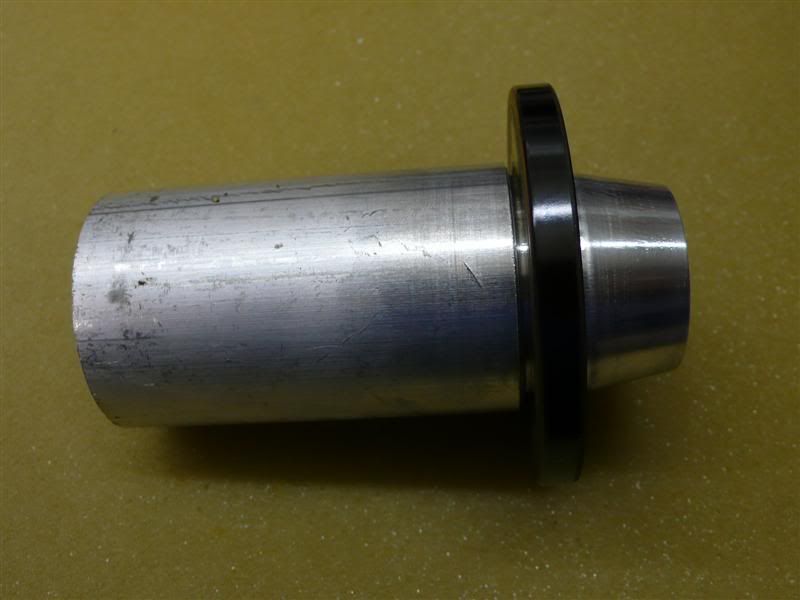
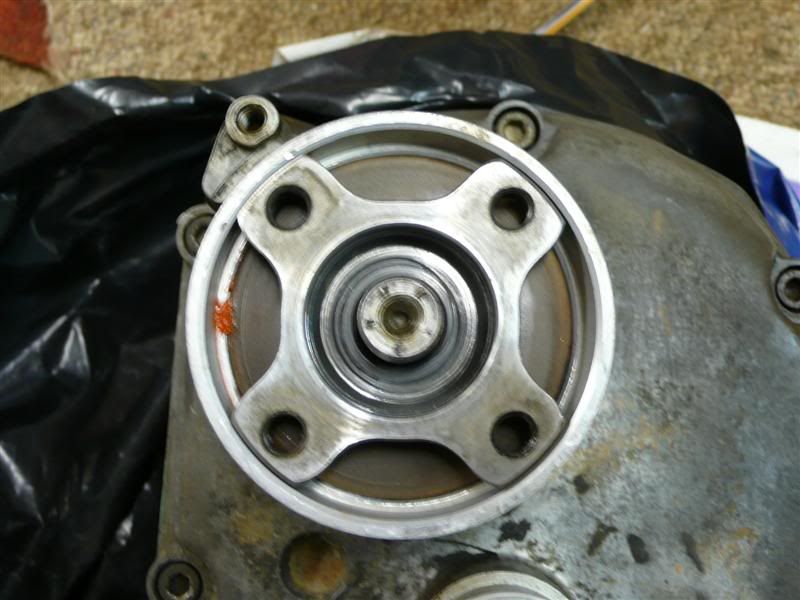
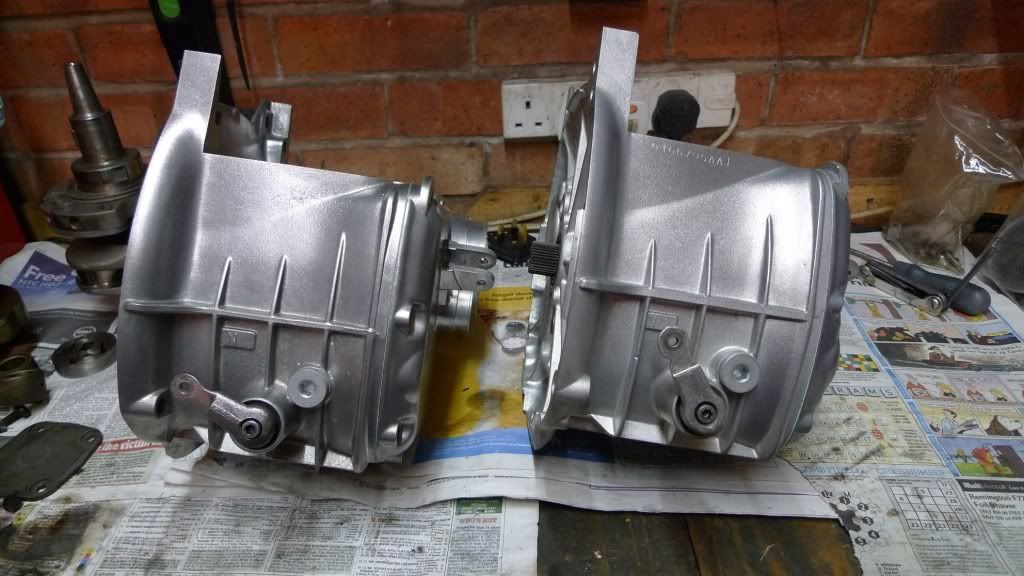
First thing is to drain the oil, pull the output flange off before heating and removing the end cover.

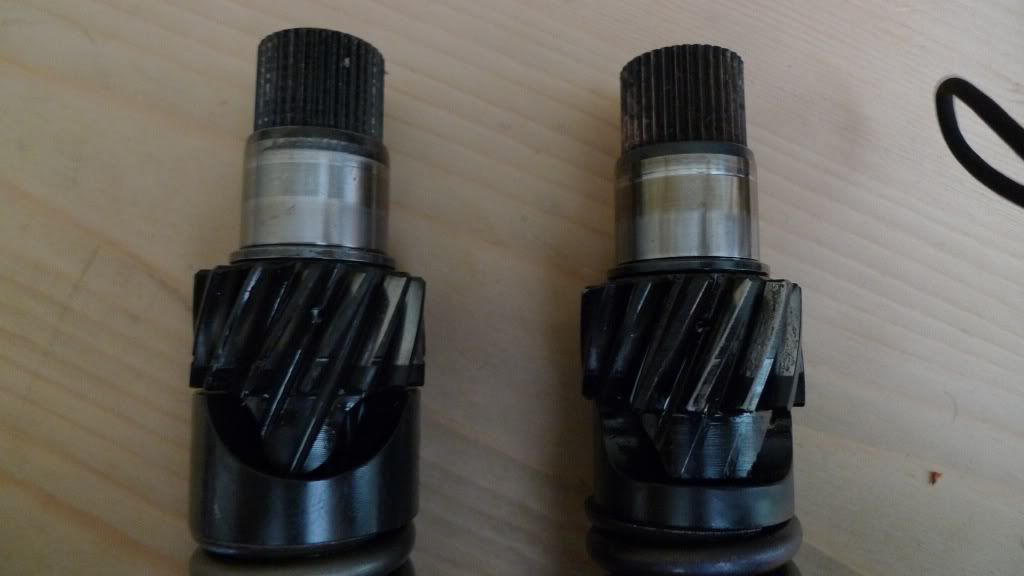
Your then faced with a gooey, dirty mass of metal - The input shafts been pulled from this one to show the state of the input bearing, the input shaft was shimmed too tightly, this loads the bearings causing overheating and ultimately bearing failure.

Most of the problems are caused by people using the wrong oil. It must be at least GL5 spec oil and needs changing. If you buy standard gearbox oil from Halfords it will not be up to the job. Buy the differential oil. Castols datasheet for the 80/90 EPX diff oil states that it is also for gearboxes that need GL5 spec oil - more on this later.

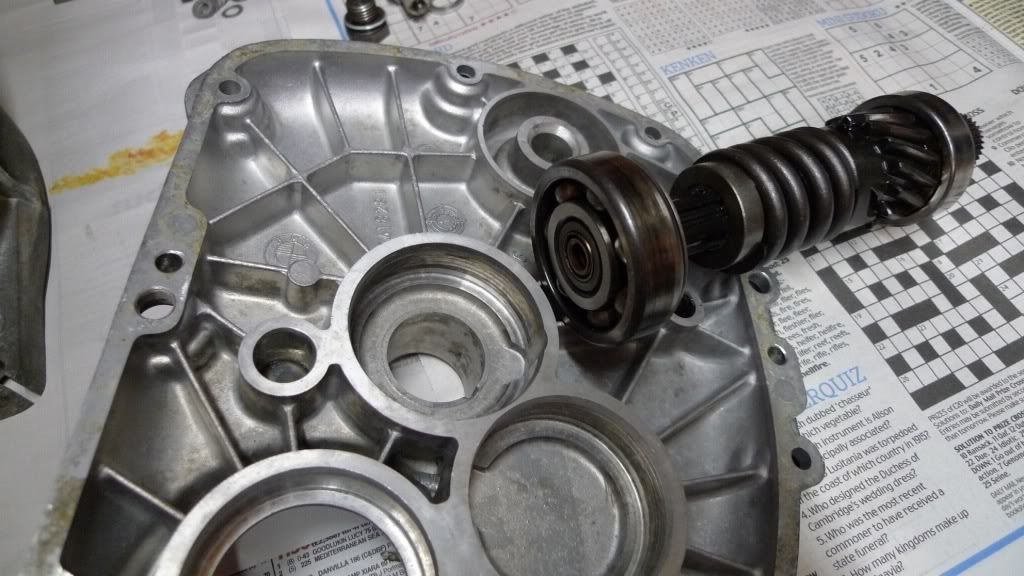
The sealed output bearing means this is a Paralever gearbox the Mono's have an open bearing.

P1010523.jpg


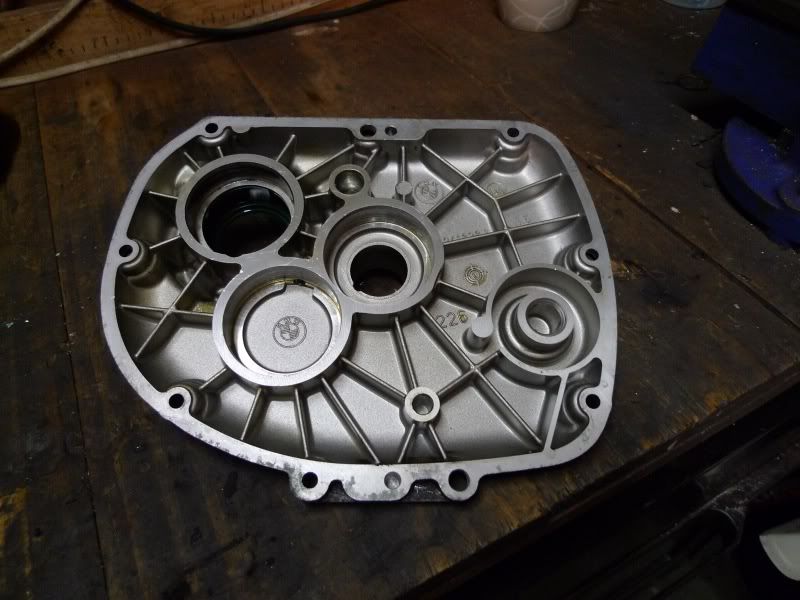
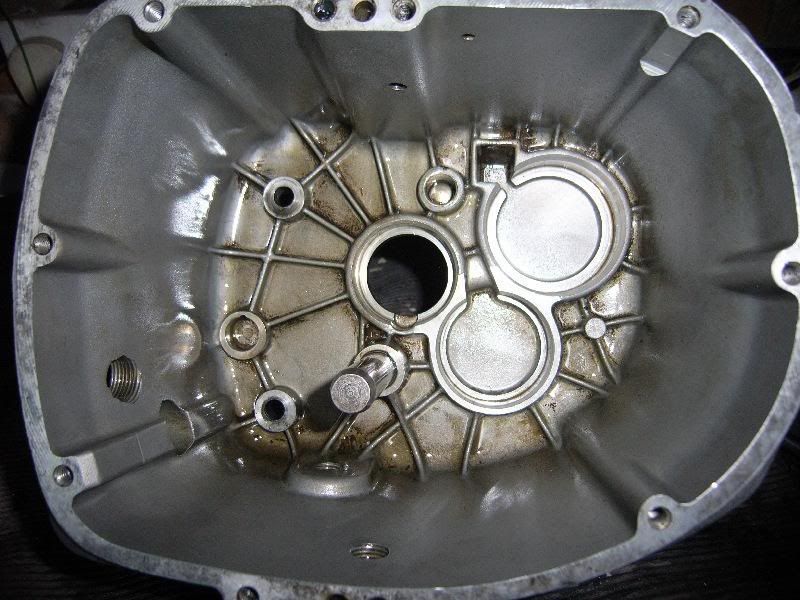
The engine side of the gearbox is then heated and the layshaft and output shafts can be pulled

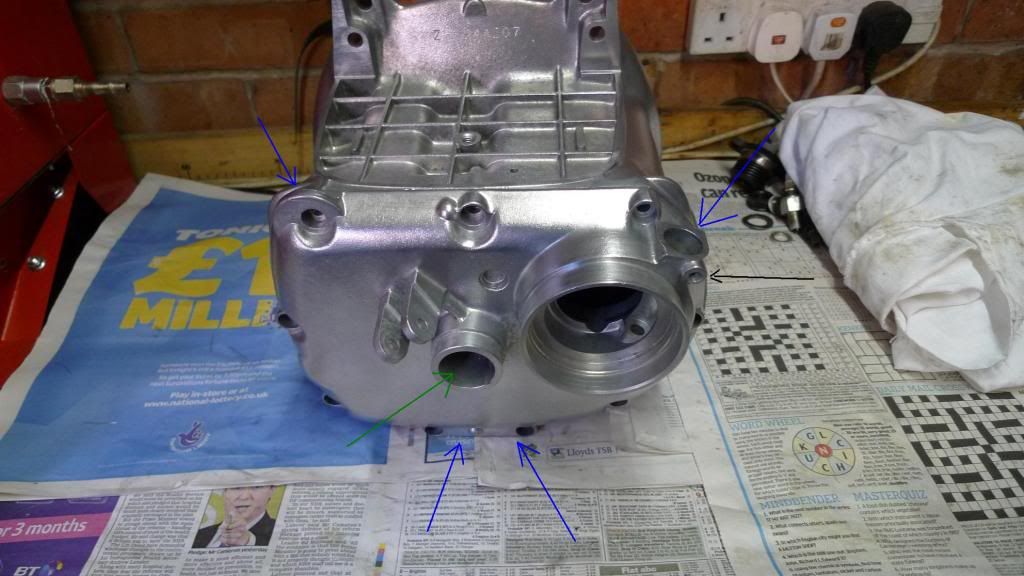
I then put the gearbox case in an ultrasonic cleaner for 20 minutes to clean the casing up for inspection. It's surprising what gets missed because of dirty cases.

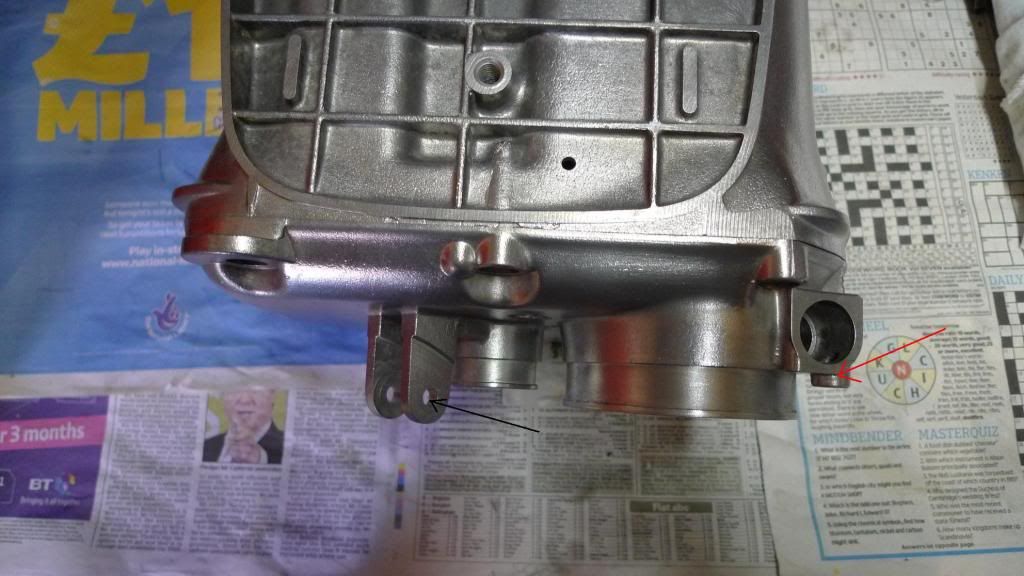
This was Pete keys gearbox casing. It had a crack in the clutch cable mounting point that had been hidden by the oil and grime.

crackincase3.jpg


20 minutes later you can see the condition of everything after the ultrasonics done it's job.

P1010595.jpg


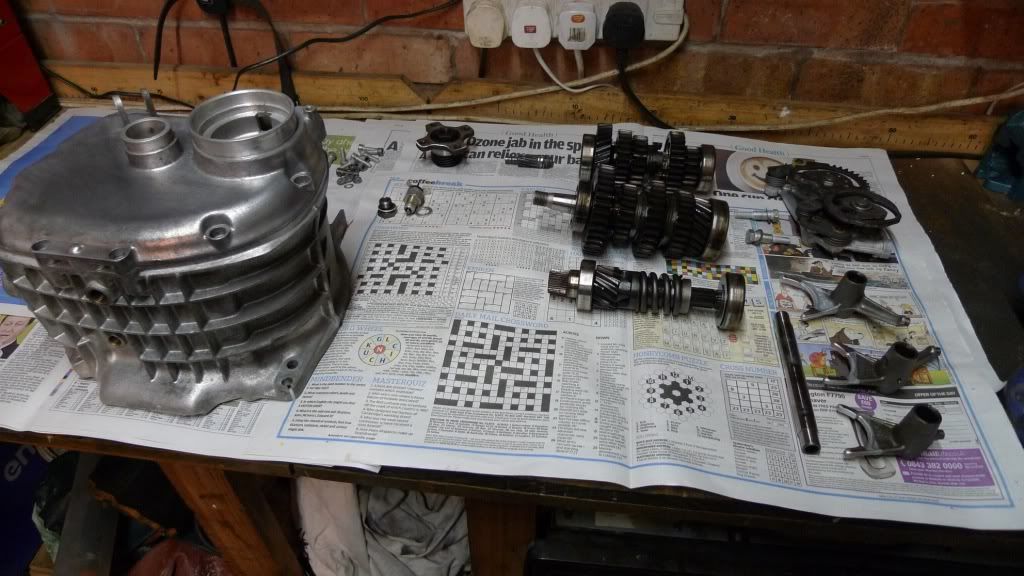
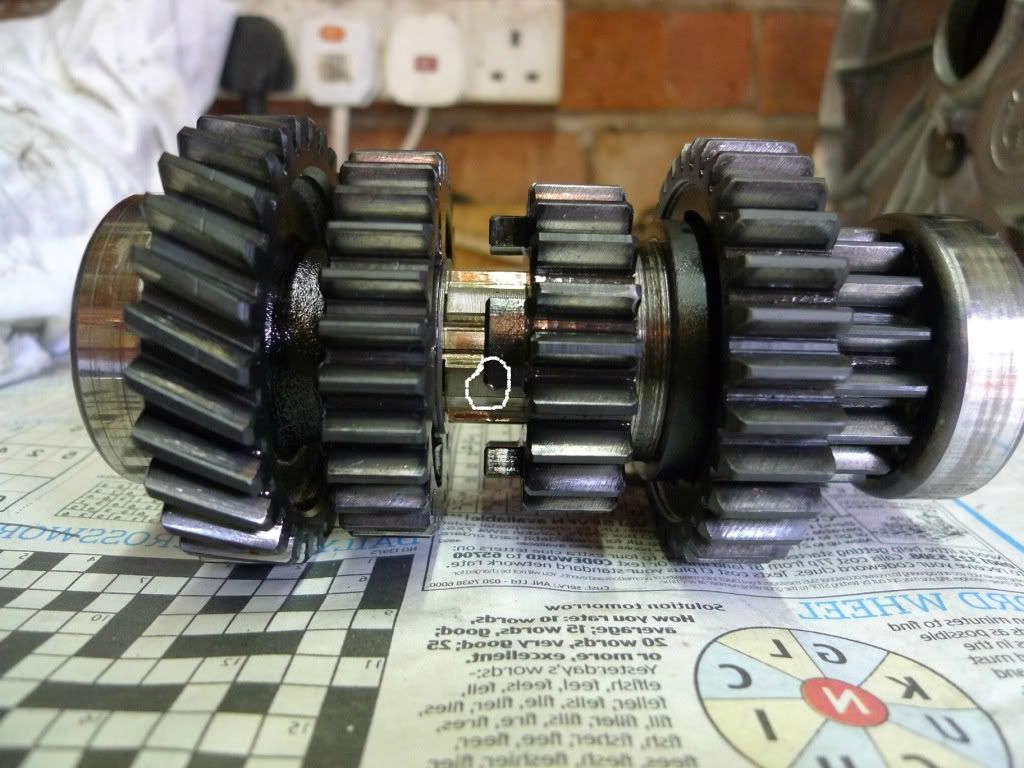
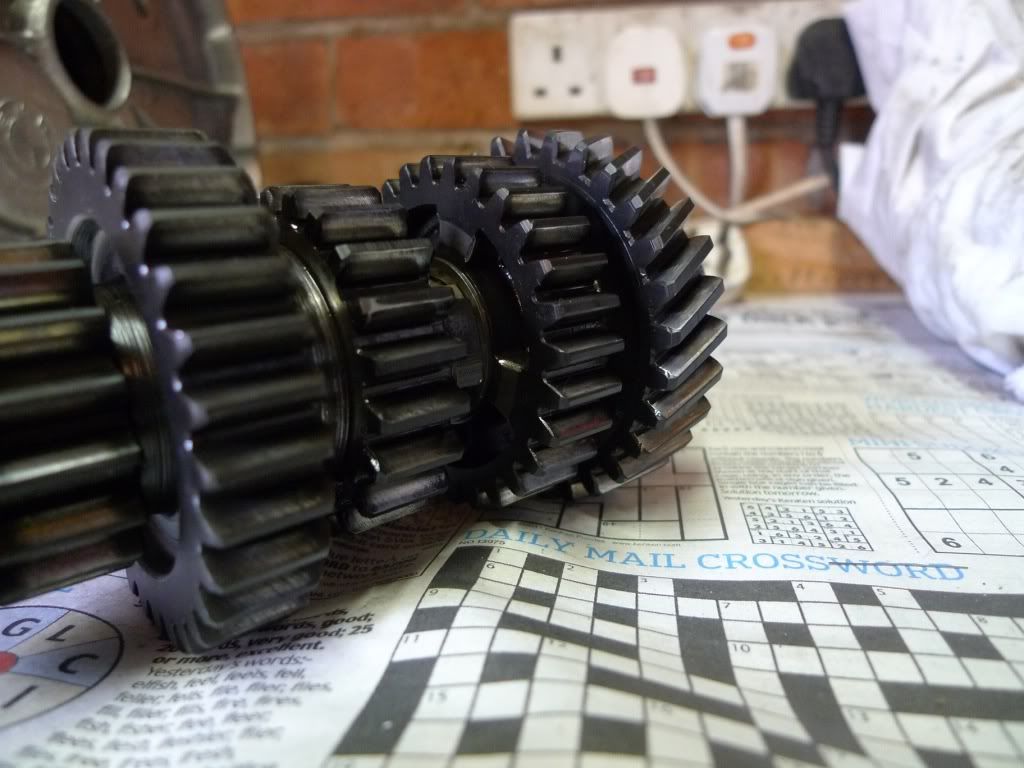
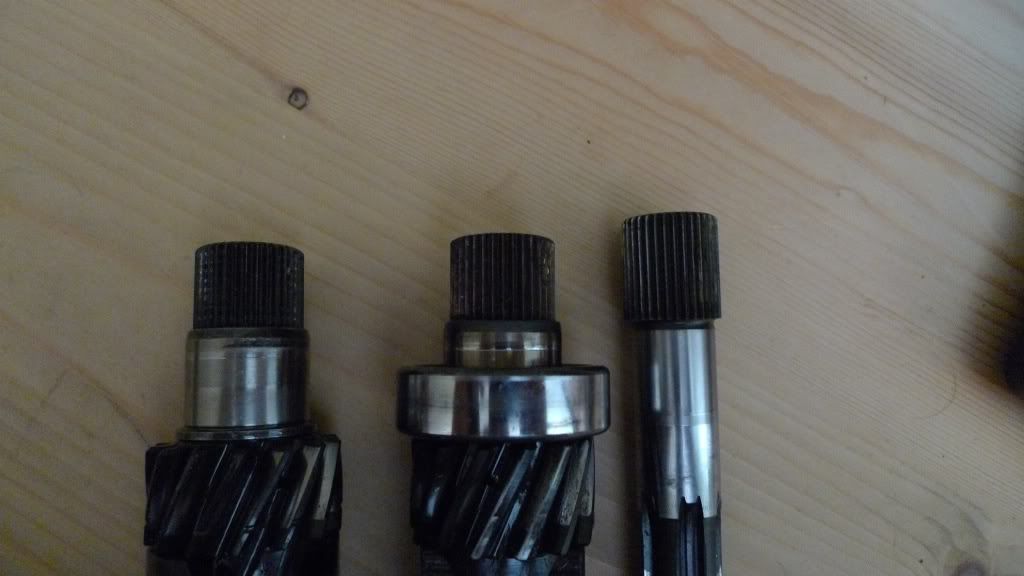
I lay everything out on the bench and then work through in a logical manner inspecting everything as I go.

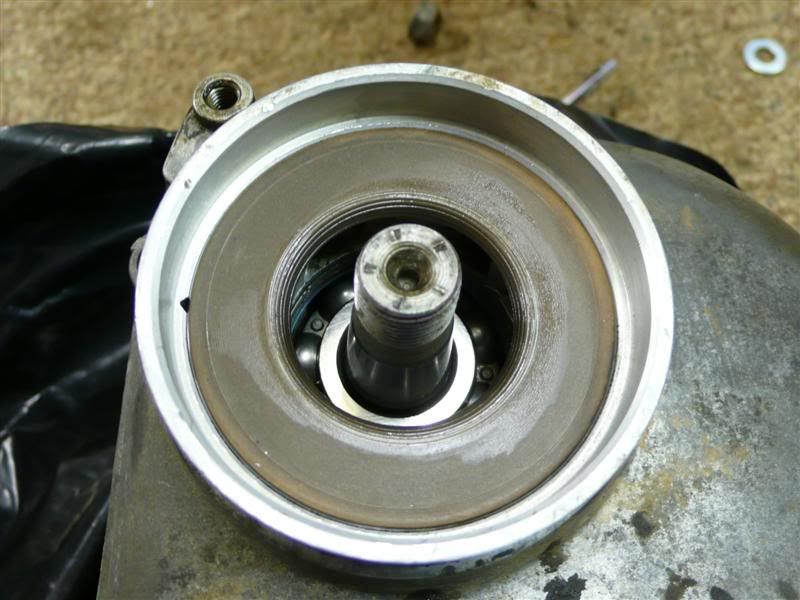
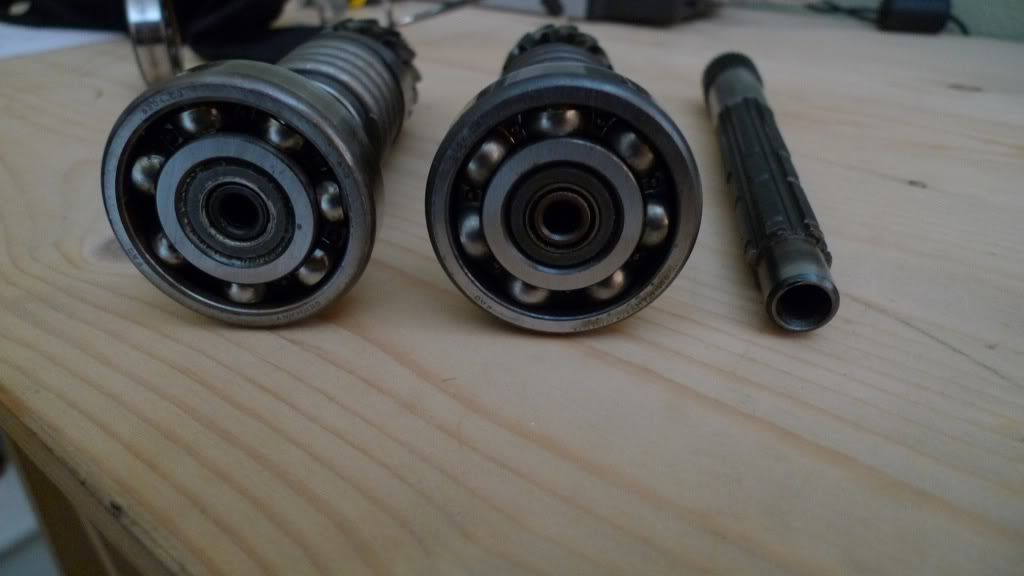
A common problem is the input shaft bearing failing due to dirt getting in through the rubber seal for the clutch arm. The bearing is open so a split in the seal allows dirt and water to run down into the bearing. This ones toast for that reason.

P1010596.jpg


More to follow...
 
Glad you like it guys :beerjug:

Input shafts

The heavy flywheel bikes have a different input shaft to the G/s or GS bikes. I'm pointing this out because I've seen them swapped about - Not a straight forward thing to do and needs the early end cover, pushrod etc.

Heavy flywheel on the right showing the extra length in the clutch spline area. (25mm on the heavy flywheel gearbox, 18mm on the later boxes)

P1010612.jpg


The splines will wear as time goes on, You'll see on Advrider comments about annual spline lubes where they religiously lube the splines to prevent wear and corrosion, Of course we being Brits never do this and then wonder why our clutches rattle at tick over and will not operate smoothly :D

If you do bother lubing them then the best bet is to use a solid lubricant with a high heat range. I use Castrol Optimal Paste TA from Motobins or Motorworks - rated at 1100°C and designed for hostile environments. I know others use Honda molybdenum. If you use copper slip or other wet fluids then the chances are it's going to melt and be flung off onto the clutch plate. Obviously something is better than nothing but you will risk contaminating the clutch plate.

If your input shaft splines are worn then the only option is to buy a new one. Not cheap at £165 for a new one. If you are happy to live with the rattle to save a few bob then it's your choice, obviously there's more than one thing that can cause clutch rattle but somebody else can cover that.

There are two different input shafts for the 81 onwards bikes. Somewhere around March 85 they changed the shaft from 6 spline for the input shock absorber to 12 spline presumably to give a larger contact area. I'm no expert on all the part numbers and exact change dates. It's enough to know there are different designs about and that you need to check that the parts match.

More pics then.

After the splines we get to the input bearing.

These bearings are a BMW only design, chasing bearing suppliers will usually get you the "You have to buy it through BMW" line. The bearing costs around £55 and more often than not does not get changed. The bearing also provides the bearing surface for the input oil seal, as the seal hardens and dust/grit accumulates a groove gets cut into the bearing surface, eventually, you will end up with the seal leaking. Fitting a new seal without changing the bearing will just be a short term fix. You can see on the picture above the middle input shaft bearing has been cut (clear shiny line) this one was just starting to leak, the shaft on the left is pretty good.

After the input bearing we get to the helical drive gear and it's shock absorber. This gear runs directly on the input shaft. There is a splined cam that sits between the spring and the helical gear. If you are getting metal flakes stuck on the magnetic drain plug when the oil is changed the chances are it's coming from the helical gear and it's cam.

They can wear so badly the lobes of the cam or gear can break off.

This is a worn pair (6 splines showing on the inside of the cam and a wide 15° Helical gear so these are pre March 82 Parts)

P1010614.jpg


The First Helical gears had a 15° cut on the teeth, after April 82 they were changed to 17.5° and then in 85 they were changed again to a different design but retained the 17.5° angle on the teeth.

If you look closely in this picture you can see the difference in the width of the teeth and the different designs of cam (15° on the right)

P1010613.jpg


Back to using the correct oil again - you can see where the oil has broken down on the right hand gear. The film strength of GL4 oil is not strong enough to withstand the pressures put on the helical gears, it breaks down allowing the intermediate shaft teeth to cut into the gear. I have a pile of worn gears like this. You can tell straight away when the correct oil has been used by the condition of the helical gears. Even high mileage boxes will have perfect teeth on the gears. The teeth on the left hand input shaft are from a bike that's been round the clock but well serviced.

Moving on to the shock absorber spring.

It isn't unknown to have the springs fail. The symptoms are the bike feels like it misses under hard acceleration. The input gear will actually ride over the top of the cam.

A split shock absorber spring and (suprise, suprise) cut teeth from the wrong grade oil (more GL4 gearbox oil) :rolleyes: 
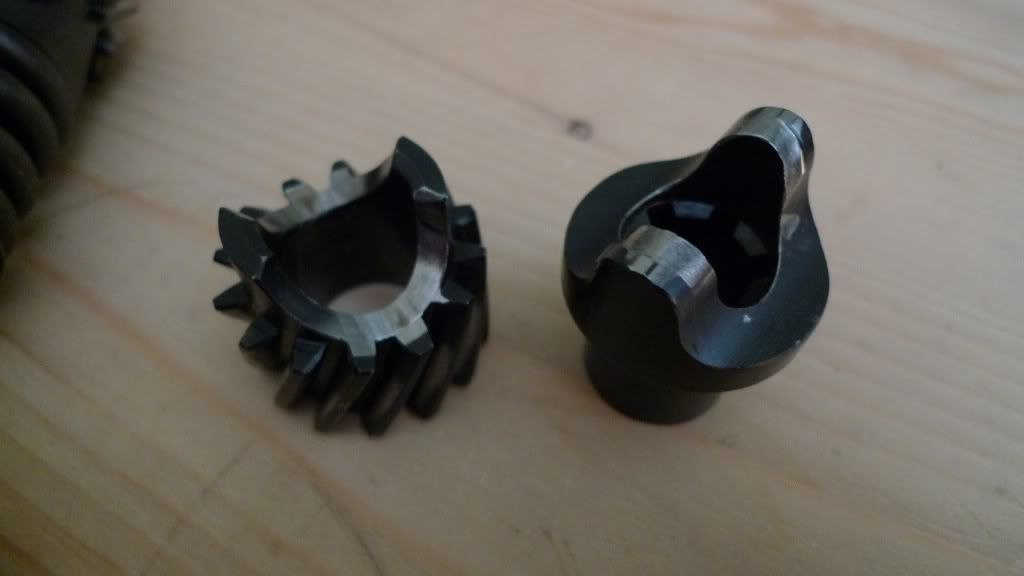
The input cam had scewed on this because of the pressure from the broken spring, the angle and pressure from the helical gear wore the input shaft so badly it was scrap. You can see the angle it's sitting at in the photograph.
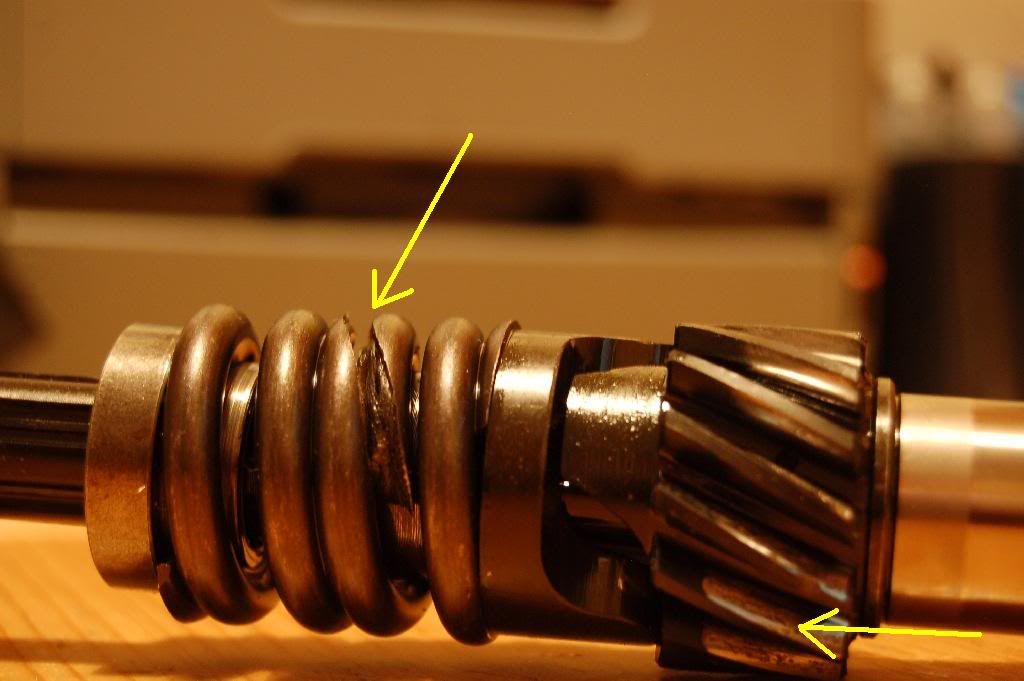
Jaythroinputshaft.jpg


That just leaves the output side bearing and the small oil seal in the end of the shaft.

The bearing sits on a steel top hat with an oil baffle between the bearing and the steel. The baffle should be considered a service item. You will bend it when you remove the bearing from the top hat (£3.50 for a replacement).

The small oil seal fits into the end of the Top hat sealing the push rod and preventing oil travelling down to the clutch.

end view of the input shaft showing the small oil seal - the shaft on the right is a heavy flywheel one. These shafts do not have an oil seal they use a felt seal wrapped around the pushrod.

P1010615.jpg


More to follow...
 
Blimey, life used to be so simple until this thread :D

Dug these out from my 'parts' dept and I'm changing the gearbox oil/FD/bevel box tomorrow. All these are GL5 btw !! The Castrol EPX is going into the gearbox...the others - the semi syn is left over from servicing the 1100GS ( have to use up all oils these days :rob ) in the rear end:ymca

IMG_4715.jpg


Great thread Rob ( bit heavy for my little brain but very VERY informative ) :thumb2
 
A great post Rob. So how long would you expect a gearbox to last without having to replace bearings etc? My 1978 80/7 has 162,000 miles on the clock and the gearbox has never been opened.

I've no idea but it's nice to know yours is still going strong. I've seen a few high mileage ones that have been great inside but something else has failed, spring on the selector plate, oil seal or some other minor thing.

Most of the catastrophic failures are down to badly repaired boxes where somebody has opened them up. I had a gearbox with a home made gasket made out of newspaper, the original shims had been put back but were too tight causing a bearing to fail on the input shaft.

There's also a few that have been recon boxes that have failed. These have generally been fitted with cheap chinese bearings and a dodgy mix of used parts (I'll come onto that later). I'm not suggesting that all recon boxes are dodgy just that there are unscrupulous people out there working to a tight budget.
 
I havent ordered the bearings and bits yet - all I can get locally in C3 are Naachi / NSK ? Jap branded stuff but probably chink.
Have you any preferences for the bearing supplier - at this point I was thinking Siebenrock - they claim to have a better front roller and the price on the rest looks OK for SKF s.

Naachi/NSK are ok and are the bearings supplied by Motobins. There's somebody in the UK doing recon/exchange boxes and fitting non C3 cheap chinese bearings, obviously these are not lasting.

The Siebenrock bearing is the same as the one supplied by Motobins, it has a plastic cage instead of the brass one fitted to the original.

The original bearings were FAG with the output shaft input side bearing coming from Koyo. I've no idea why this bearing was different because FAG make one of these :nenau

Personally I'm not bothered if the bearings are made in China as long as they are a branded name - suggesting some sort of quality control. The C3 classification means the bearing is self aligning.

The C3 classification is the RADIAL INTERNAL CLEARANCE and is important

I would never go to the trouble of rebuilding a box without using FAG or SKF bearings
FAG bearing made in Germany seem to be better quality than FAG one made in Eastern Europe

I have rebuilt a few boxes and i think water damage from it getting in down the speedo cable is a problem especially if the bike is not used that oftern
Changing the oil regularly is a good idear too
Airhead gearboxes IMHO are pretty reliable if looked after in use
I have stripped a few with in excess of 80,000 to check for people and replace the bearings to find no real problems at all
Getting the shimming correct when rebuilding the box is important to life and shift smoothness
I use a modded end plate to shim mine works a treat

box3Medium.jpg


Forming the output shaft seal is somthing you also need to be careful with on a paralever....So i made these tools to do the job

P1010840Medium.jpg


P1010841Medium.jpg


P1010842Medium.jpg


P1010843Medium.jpg


P.S Don't forget to fill the breather hole up with silicone on the paralever

P1010844Medium.jpg
 
Two questions if I may:

The kicksart on my 80 is at the wrong angle (sticks out too far) so does this mean that someone has been inside the box at some point in it's life?

Does the output bearing on the paralever have a harder life thanon a mono? Can't see why it should but I read somewhere that it's prone to failure

It could be the top tooth on the kick start quadrant has broken off.

The Paras can yank the output shaft to such an extent that the engine side bearing moves on the shaft creating preload on the output bearing. The bearings are not designed to run with this preload so overheat and fail. This was where the fuss about the circlip came from. I have seen two gearboxes with the circlip fitted where the circlips simply popped off and the shaft has still moved. I don't know but I suspect that the angle of the driveshaft has become so steep that the universal joint has been compromised forcing the shock through the output shaft - just a thought though. A lot of the aftermarket shocks are taller than the original unit making the UJ angle very steep.
 
I'll move away from the gears for a minute.

It's worth checking the gearbox casing out before you move on. If the cases are scrap there's little point in moving on with the rebuild.

The end cover has a few vulnerable points that are worth checking out.

This gearbox is going to be used in an RS that's being restored to original so it's had a session in the vapour blaster before being ultrasonically cleaned again, This time in a special cleaning fluid to remove any traces of blasting media and embedded grease. I wouldn't normally bother going this far, this finish is as close to new as you can get it and will dull down slightly. The fluids to get this finish are around £4 a litre, when you have a 27 litre cleaning tank it's a hell of an expense.

Gearboxendcover.jpg


First thing to check for are witness marks at the Blue arrows. With out the factory tool to remove the end cover the only option is to heat the cover and tap at these points to remove the cover. It's just gives an indication that the gearbox has been worked on in the past. The top two point marked by the arrows are also vulnerable when removing gearboxes I've seen a couple that have been dropped during removal causing the case to crack (see picture below).

The pushrod piston tunnel (Green arrow) can be damaged by grit if the rubber bellows splits, this can also be the cause of piston sticking leading to jerky clutches, or by the release bearing seizing, if this happens the whole release bearing/piston arrangement will spin at engine speed in the tunnel wearing the tunnel and causing a step inside. If the tunnel is damaged the only option is to fit a new end cover.

This is a split in the cover caused by the gearbox being dropped

DSC00112.jpg


The castings for the clutch arm (Black arrow) also need to be checked for damage, these are vulnerable if the gearbox is dropped. They are also prone to the holes becoming oval if the bolt securing the arm is not done up tightly, if this happens you will be using a lot of the clutch lever travel taking up the slack and ultimately the clutch will not be clearing properly.

The red arrow is pointing to the speedo/earth securing bolt. This is a 6mm thread and it is very common for the thread to strip. There's two causes of this, one is over enthusiastic tightening of the earth strap the other is not aligning the plastic speedo cable holder up properly and then trying to force the bolt in. If it does strip a helicoil can be used to repair the thread. The cover does need to come off though as it's quite tricky to drill straight.

Endcover2.jpg


Inside you are checking for signs of damage in the bearing housings. Bearings do fail and most times the cage simply collapses dropping the ball bearings down into the gearbox but occasionally they will lock up and spin in the housing.

The fourth housing on the right of the picture is the un-drilled casting for the kick start. To make this a kick start cover the factory would simply drill a hole through the centre of this.

P1010462.jpg


The main casing. Again checking for signs of bearings spinning or any other damage inside. This is prior to the finished cleaning session. The shaft in the centre of the box is for one of the selector arms. The arm slides on this shaft so it needs to be unworn and free moving. I've seen these badly worn from dirty engine oil. One gearbox had so much water in it the shaft had rust on it. As Garry H mentioned in an earlier post the speedo cable rubbers get baggy over time allowing water to run down the speedo cable and in through the loose rubber. I use a non setting silicone grease to stop this, it keeps the rubber supple and tight and stops the water entering, others use normal silicone sealer. It's worth keeping an eye on these rubbers especially on a GS if you use it off road - the rubbers are cheap, metal bits in the gearbox aren't. The extra wear caused by emulsified oil will also kill the bearings in short order.

gearbox.jpg


As mentioned in one of the earlier posts the clutch cable mounting point is vulnerable when removing the gearbox or if it's dropped. Just check for signs of damage.

Back to the gears...
 
My point with the drive shaft was that no pushing or pulling on the bearing will take place unless the sliding splines it the rear of the shaft are locked, galled, or siezed solid, that there are few lubes that will ensure that this doesnt happen, and no matter what you use it needs replaced regularly.

And while lubing the cluth side splines get a mention, I cant recall anyone ever reminding you the do the drive shaft splines on a Para as a service task.

Good point on the drive shaft lube :thumb2

Garry H posted a picture years ago of the limited movement available on his new drive shaft - I don't know if the picture still exists.


edit - Found the thread but the pictures have gone http://www.ukgser.com/forums/showthread.php?t=139062&highlight=drive+shaft
 
Next bit then...

Lay (or intermediate) shafts

This is where it starts to get interesting and not a little subjective.

The lay shaft is an intermediate shaft that's job is take power from the engine via the input shaft and route it in conjunction with the output shaft through the selected gear and then on out to the drive shaft.

One of the biggest problems with we have is that most of our gearboxes are worn to some extent, most will perform perfectly well with edges worn off the teeth or dogs, this makes it very difficult for somebody looking at the gears to simply look at them and tell if it's knackered or not, however if your having you gearbox rebuilt then it's a big help if you tell the person rebuilding the box if there are any issues.

Individual gears for lay shafts are no longer available so if it's knackered you either need a new one or a good second hand one. Since most of the 2nd hand ones are available because they're also knackered good luck with that one :D

For all extent and purposes these shafts come in two varieties. 15° and 17.5°. The 17.5° gear is narrower than the 15° and you can tell them apart when you see them together, some of the 17.5° layshaft gears have an X cast into them, unfortunately you need a 10 tonne press to remove the gear and actually find it.

layshaft up close -

P1010687.jpg


Furthest gear on the left is the Helical drive gear that meshes with the input shaft helical gear. The full power of the engine goes through this gear. Things to check for are undercutting of the gear caused by the wrong oil, bluing of the gears and general condition. This one has a very shiny surface on one side of the gear so I know I have a problem.

Motobins have started to sell a replacement helical gear for this shaft (£100ish + Vat) but it is only available as 17.5° which means the 5th gear and input shaft helical gear will also have to be changed to match.

Next gear along from the left is the third gear drive gear. This is a free running gear that relies on the 2nd gear drive gear (third from left) engaging with it to get drive. You can see the dog that engages with it (square blocks sicking out towards it) has worn corners (circled) most of the time these are fine and make no difference to the operation of the gearbox but they can also result in bad gear changes or gears not engaging properly - you know your own gearbox so it's best to pass the info on to the person rebuilding it.

Here's a different angle showing the drive gear for third gear and the wear where the 2nd gear drive gear locates in it, again more often than not it's going to have some wear.

P1010688.jpg


the fourth gear from the left (in the top photograph) is actually fourth gear drive gear. Again we check for condition, movement etc.

The last gear is the first gear drive gear. check the condition, movement etc.

The layshafts can get a lot of hammer. This one was the result of over enthusiast down changing. There are some fairly big changes in ratios going on in there so it pays to let the gears spool down. I rode this bike, there was a hefty "Clunk" going from 3rd to 4th gear but it still rode perfectly well if you slowed down the speed of the gear change.

P1010610.jpg


The condition of the gearshaft needs to be looked at as well, any notches ow ear in the shaft splines can effect the gear change.
 
......Forming the output shaft seal is somthing you also need to be careful with on a paralever....So i made these tools to do the job

P1010840Medium.jpg


P1010841Medium.jpg


P1010842Medium.jpg


P1010843Medium.jpg


Do you have the dimensions (or diagrams) available for the two tools that you have made for installing the outputs shaft oil seal?
 
Rob ,any chance of posting a picture of the ultrasonic cleaner and thanks for the thread ,a great help for mec nobs like myself:friday
 
Mines a 27 litre cleaner the same as the one in this vid, it is big enough to fit an entire gearbox in. Before you buy one it's best to check out the cost of chemicals, usually around £4-£5 a litre, the vid shows how quickly they get contaminated. Half a bottle of fairy liquid in the tank is fine for blowing off the worst of the dirt and degreasing but you will need specialist chemicals to get the most out of one.

<iframe width="480" height="390" src="http://www.youtube.com/embed/Lk5JEgPHo9c" frameborder="0" allowfullscreen></iframe>

The ultrasonic on it's own doesn't give the finish I get on the gearbox in the pictures. I use it as a pre cleaner for degreasing and then as an after cleaner to remove all traces of glass beads after it's been through the Vapour blaster. It's the vapour (or Aqua) blaster that gives the finish. There's a cabinet the same as mine here http://www.youtube.com/watch?v=r1cwHdwDOvU&feature=related

The nice thing with the vapour blaster is the consistent finish. It just needs an occasional wipe with Solvol to keep it looking like this.

P1010690.jpg
 
Bob,

I tried Soda blasting and had the same results as Tony, it has it place and gives a decent finish on soft alloys or for delicate cleaning but on hard stuff it has very little impact other than to create an uneven finish.

Apart from being ridiculouly expensive the vapour blasters need a serious compressor behind them. My blaster ideally needs a FAD of 26cfm. They are superb bits of kit though and the finished surface is stain resistant unlike dry blasted finishes.

There's a vapour blaster like mine for sale in Lincolnshire http://www.volkszone.com/VZi/showthread.php?t=700180 you get an idea of how much they cost. From the description in the ad this one needs at least another £100 spending on it to make it usable. It cost me around £250 to refurb the pump on mine, most are taken out of service for fault pumps. Talking to one of our local surface finish guys, he breaks his up when thery're worn to prevent anybody else geting their hands on it and starting up in competition to him, others apparently do the same which explains why they're hard to come by. I have two people chasing mine and have been offered £2k for it.
 
Rob - I notice that the two boxes have the gear change lever at different angles - any idea which bikes get which lever ?

I think the one on the left is a GS/Mono, the one on the right is for the wire type clip (with the rubber bellows) standard footpeg bikes up to 84. I just whacked them in for the picture and obviously got them crossed over.
 
Bob,

I tried Soda blasting and had the same results as Tony, it has it place and gives a decent finish on soft alloys or for delicate cleaning but on hard stuff it has very little impact other than to create an uneven finish.

Rob,

Thanks for that. It sounds as though Soda-Blasting is not the way to go.

A couple of years ago I was having some chrome plating done by a small company in Cowdenbeath; the owner had just bought a vapour blaster like yours. I think he said he paid £5K for it. Maybe I'll just give him a call the next time I'm needing something done.

My 3hp 100 litre compressor delivers 11cfm, so not much use then. What do you use ??

26cfm would require a serious compressor - one of those Broomwade diesel units, or a road-menders' rig on a tractor :D. A three-phase supply would be essential for an electric unit I guess.

Its a case of "Wants vs Needs" :blast

Bob.
 
Bob,

The usual cheap way is to connect two 14cfm compressors into a common tank to give a similar arrangement to the 28cfm units from Machine mart (£1200). Like this

000115076.jpg


The down side is the noise.

The pefect solution would be a variable speed rotary vane compressor but who has £5k to £10k knocking aout for a compressor for the garage? :D


Back
Top Bottom