Also found this:-
Fitting a Baglux Tank Cover to a BMW 1150GS Adventure
Fitting a Baglux Tank Coverto a BMW 1150GS Adventure
by Alan (aka bigtrailbikerider)
General Fitting Guidelines:
*Before fitting the tank cover it would be considered a good idea to wash and polish the petrol tank. Ensure that the polish is buffed to a good shine and that no polish haze or residue is left remaining.
*Before attempting to fit the tank harness make sure that the fabric is warm, this will then ensure that it is nice and flexible to enable the cover to follow the contours of the tank.
*Ideally, leave the tank cover in a warm environment i.e. airing cupboard for a few hours prior to fitment.
*Attempting to fit the tank cover without it first being warmed would be like trying to wrap a piece a tin around a doughnut!
*Remove seat and also the plastic cover that is situated on the right hand side of the bike.
*Offer the tank cover into position and locate the fuel filler cap in to the centre of the tank cover aperture.
*Make sure that all the free straps are clear from under the cover before preceding any further.
Note
Extreme care should be taken not to trap any cables or pipes under the tank cover securing straps during the next process. In particular, the first strap that locates around the headstock.
Fitting the straps
Starting from the top of tank, nearest the filler neck you will now attach all the straps, working along towards the rear of the tank. Ensuring that you keep the filler neck central within the tank cover aperture and also maintaining the BWW tank badges central within the clear plastic windows at all times.
At this stage do not over tighten any of the straps
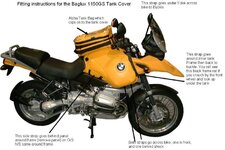
*Starting at the top of the tank cover, the first strap goes around and under the headstock from the left-hand side and attaches into the plastic buckle on the right hand side.
*The next two straps are located either side of the first headstock strap. These straps loop around the lugs that secure the tank into position, and then attach back onto them selves again.
Now for the awkward ones!
*To locate the next two straps you will need to sit on the floor and look up under the beak. You will see a black tubular frame that supports the beak section that runs along either side of it, this is where the straps attach to.
*The left strap attaches to the left tube and vice versa on the other side.
*Remove the strap from the plastic clip and then feed it from the top of the tube back down into the clip again.
*The stainless steel clip encased within the webbing will locate nicely around the tubular frame.
DO NOT GET CONFUSED WITH THE MOUNTINGS OF THE STD GS TANK COVER!
These straps cross from one side of the bike, either side of the shock absorber, to the other!
Note
*Care should be taken with the off side strap (or left hand side looking from the front) to avoid excess stress to the adjacent rubber pipe.
*Care should also be taken with the nearside strap (or right hand side looking from the front) to avoid excess stress on the adjacent rubber pipe and also to avoid trapping the power cable that feeds the auxiliary power socket.
Moving around the tank to the two side straps, the first of which is quite awkward to locate. It is the same design as the last two straps that were fitted, i.e. there is a stainless steel clip encased within the webbing.
*Remove the strap from the clip, as before.
*Looking under the fuel tank adjacent to where the strap is located, you will see a large section of the aluminium main frame.
*Using the offside strap for example, kneel on the floor and feed the strap from the right around the frame and back into the clip.
*The nearside strap will feed from the left hand side around the frame and back into the clip.
*The next two clips are easy; these just clip onto the lip of the fuel tank.
*Finally, the rear most strap just wraps under and around the two little lugs (the ones with the small holes in) that protrude at the rear of the tank!
That’s it…………all that remains now is to start adding tension to all the straps, starting from the front and back along each side in unison.
Tidy the finished job up by securing the excess tails of the straps with either insulation tape or personally I use small black plastic ties.
Care should be taken not to add to much tension to the straps so as to cause damage to the tank cover or the straps.
Then over a period of the next 7 – 14 days progressively add more tension to straps to settle the cover down.
If the straps are far to long then any excess can be trimmed, but anneal the end of the straps after they have been cut to prevent them from straying. A lighted match or cigarette lighter is ideal.
But most importantly of all……………TAKE YOUR TIME!!!!!
Hopefully this will help you?
Cheers
Alan (aka bigtrailbikerider)
DISCLAIMER


 I will try your mod and let you know how I get on. Good thing about this is with this good weather, the cover is being nicely stretched!