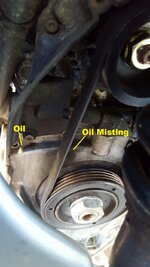
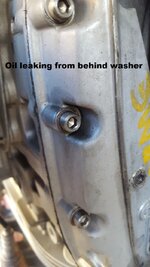
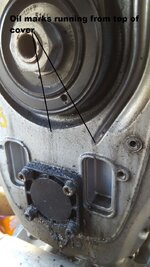
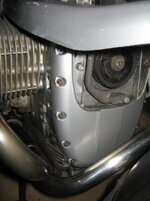
Word of warning, powder coating your front cover will result in the coating going soft and an ensuing oil leak as per pics. All of the bolts required tightening up, the two outer ones on the top of the cover were very slack as evidenced by the oil draining down the cover..


You are using an out of date browser. It may not display this or other websites correctly.
You should upgrade or use an alternative browser.
You should upgrade or use an alternative browser.
Cosmetic Makeover Front Engine Cover all oil heads
- Thread starter RPMDAKAR
- Start date

Bendy toy
Registered user
My cover was masked off at the gasket face before coating. I risked corrosion getting under the bare metal edge but there was no way to be sure that coating could not flake off and block oil galleries. More importantly there are oil galleries at the top of the cover. Leaks in there would risk a loss of oil to the cylinder heads. So I stuck to the original metal to metal with an anaerobic sealant.
I used Loctite 518 gasket sealant. Maybe silicone RTV would do a better job of sealing the joint edge but 518 seems to have been good enough. Its now done one winter with no problems.
I used copper washers under the screw heads and high solids copper paste on the screws all the way up. No oil leaks and no corrosion from under the bolt heads. I did have to retighten the screws as the coating settled but once only was enough.
My cover was masked off at the gasket face before coating. I risked corrosion getting under the bare metal edge but there was no way to be sure that coating could not flake off and block oil galleries. More importantly there are oil galleries at the top of the cover. Leaks in there would risk a loss of oil to the cylinder heads. So I stuck to the original metal to metal with an anaerobic sealant.
I used Loctite 518 gasket sealant. Maybe silicone RTV would do a better job of sealing the joint edge but 518 seems to have been good enough. Its now done one winter with no problems.
I used copper washers under the screw heads and high solids copper paste on the screws all the way up. No oil leaks and no corrosion from under the bolt heads. I did have to retighten the screws as the coating settled but once only was enough.
Just off out to give it a good spanking to see if I have sorted it. I'm intrigued by the copper washers thing, were did you locate those from?
Bendy toy
Registered user
I got M6 copper washers from eBay, fitted with the rounded side towards the casing. I reasoned that copper paste between stainless and aluminium stops the electrolytic corrosion then copper washers can't do any harm. It's now done one winter, ask me again in March how well its survived this one. 
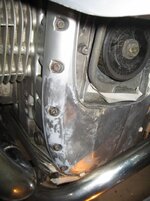
The Loctite 518 made a good job of sealing the gasket face no oil leaks. A few screws had to be pulled up initially but they've since been fine. Unfortunately my cover was in a bad way at the bottom where corrosion from the belt cover bottom screw had spread all over the place. That area was cleaned as best as possible but the corrosion pits have bubbled the coating. So not a 100% success though the bubbling has not got any worse so I guess the metal is well protected.
Maybe you could try the washers with 518 either side. A bit messy but it sets only under the joint so the excess can be cleaned off.
I recently replaced a cylinder rocker cover. They don't "seem" to get stinking hot so I tarted it up with a spray can. The paint has heat bubbled.
Quite possible the front engine cover would react the same way with ordinary paint and VHT isn't especially protective. Powder may be the only reliable option.
Quite possible the front engine cover would react the same way with ordinary paint and VHT isn't especially protective. Powder may be the only reliable option.
I refinished the front cover (and a lot of the rest of the engine cases) on my 850GS a few years ago and that stood up to a 2000 mile trip to Spain and back with temperatures ranging from sub-zero to high 30s. The finish was unaffected. I used U-POL etch primer followed by silver Smoothrite (I think they call it Smooth Hammerite now). It was a good colour match to the original paint and I think the 1200 has very similar colour engine paint to the old oilheads. When my 1200 eventually gets bad enough I plan to use the same finishing products on that.
Bendy toy
Registered user
I will try that on my rocker cover. Ordinary acrylic certainly hasn't coped.
I recently used smooth hammerite on car suspension parts. It's not as rock hard as it used to be (hopefully less brittle) also more of a satin finish.
Sent from my iPhone using Tapatalk
I recently used smooth hammerite on car suspension parts. It's not as rock hard as it used to be (hopefully less brittle) also more of a satin finish.
Sent from my iPhone using Tapatalk
kevingambrell
Registered user
What about good old fashioned stove enameling? There are still a few people stoving paint.
Ask them to mask off the jointing face.
Ask them to mask off the jointing face.
I recently used smooth hammerite on car suspension parts. It's not as rock hard as it used to be (hopefully less brittle) also more of a satin finish.
They had to change the solvent they use for environmental reasons. It does dry pretty hard eventually - it just takes a very long time to do it (days/weeks depending upon the weather) but you can accelerate the process by applying moderate heat. I put small parts on a radiator in the house (wife loves the smell......
 ) in the winter or out in the sun in the summer. For larger parts (the engine, for example) I use a fan heater directed at the painted areas for a few hours to help the solvent evaporate off. It probably doesn't harden quite as much as it used to [I'm talking about paint here.....] but for a front engine cover that seems like a good thing to me as a stone flicked up off the front tyre is more likely to cause a dent in the surface rather than a chip. Maybe!
Bendy toy
Registered user
I painted my old MZ frame with the high solvent Hammerite smooth. After a few weeks I noticed stone chips. After a while it looked like a shot gun had gone off. I eventually paint stripped the area and coated it with black polyurethane. No more stone chips.
IMO the BMW front cover suffers more from electrolytic corrosion around bolt heads than it does with stone chips. The exhaust cross pipe and fender extender keep the stones at bay.
IMO the BMW front cover suffers more from electrolytic corrosion around bolt heads than it does with stone chips. The exhaust cross pipe and fender extender keep the stones at bay.
The father of an acquaintance was a sales rep for Hammerite, many years ago. Even they reckoend it needed 6 weeks to properly harden. It would seem to go hard, then soften a bit after a week before hardening fully much later.
Sent from my SM-G388F using Tapatalk
Sent from my SM-G388F using Tapatalk
Bendy toy
Registered user
The father of an acquaintance was a sales rep for Hammerite, many years ago. Even they reckoend it needed 6 weeks to properly harden. It would seem to go hard, then soften a bit after a week before hardening fully much later.
Sent from my SM-G388F using Tapatalk
My bike frame was fine for about 2 months then the stone chips started. It became harder but also brittle and not fit for the job. I also painted the exhaust support stick (the one MZs hang down from the rear seat to the carry the exhaust back end). It was fine for a few weeks but before long covered in chipped off paint and starting to rust.
I painted my 1100 front cover and rocker covers with Hammerite Smooth (the new formulation). It was absolutely fine and looked as good three years later when I sold the bike as it did after I'd applied it. It is eminently 'fit for purpose' if you prepare and apply it correctly.
After removing all loose coatings and feathering the edges of existing sound powder coat, degrease thoroughly with panel wipe (I also put my rocker covers through a dishwasher cycle when my wife wasn't looking), key the surface with a coarse (grey) scotchbrite, degrease thoroughly again.
I didn't bother with a primer.
Warm the part first (I used a heat gun for the rocker covers, fired a fan heater on 'warm' at the front cover for 1/4 hour ). Mist thin coats on using a well shaken and warmed rattle can (leave it in a bucket of warm water). Let each thin coat flash off naturally or gently (carefully) help it with a hot air gun on low heat - this is better and much faster than allowing it to tack up naturally. I ended up with about 6 to 8 coats on each component.
Let it dry naturally for a couple of days until the coating feels hard, reassemble and then give it some heat by going for a short ride around the block. Leave it again for a day or so and then just use it as normal.
I would guarantee that the people who say Hammerite smooth doesn't work or is 'not fit for purpose' have rushed the job and ballsed up the prep and application. The worst thing you can do is lather a couple of thick coats onto a poorly prepped surface.
As a side note, there's no way on earth I would get a component powder coated, bolt it straight back on and expect it to work. As people have found out, it's way too soft for a long time and either needs all the joint faces and bolt lands masking off before application or the coating machined off before refastening (or leaving to fully harden but that's really a bodge).
Attachments
Bendy toy
Registered user
Mine was powder coated and bolted on without cleaning off the screw landing faces. No problems though I did retighten the screws after a few heat cycles. I DID NOT coat the joint face as this risked a leak due to the inevitably uneven surface. More importantly there is an oil gallery each side at the top. I didn't want an internal leak that could starve the cylinder heads of oil.
I had previously powder coated the cam covers and crank end covers on the Diversion 900. There was never any problem with screws coming loose and through 2 winters of use and one of storage, corrosion was almost entirely stopped. One part of the rocker cover did fail where corrosion got under from the joint face. On the GS I chamfered the sharp edge with a file. So far, no problems.
The big snag with powder coat is when it does fail (as protective coatings always do) there is no way to touch it up. Paint such as Hammerite can be retouched leaving almost no mark. Powder would have to be stripped and re-done.
The old Hammerite formulation was definitely brittle when fully cured (2 months plus). I used it as described above and in thick layers. It always stone chipped. The new formulation is slower drying and I cant imagine the manufacturers have not fixed it's old penchant for chipping off.
I've recently used the new stuff (brushed) on a car back axle. It doesn't cover especially well - three coats for full coverage. It's also not as glossy. At least, the can I have leaves a sort of satin finish. Ive not yet used the spray can product.
Never mind the front cover, has anyone found a paint that can survive on the centre stand cross bar? I've given up expecting a permanent solution and just dab on some black paint twice a year.
kevingambrell
Registered user
Never mind the front cover, has anyone found a paint that can survive on the centre stand cross bar? I've given up expecting a permanent solution and just dab on some black paint twice a year.
I did the same then fitted a guard over the stand, think its a rugidroads one or who ever they are. Now all I have to do is fit a guard over that
to stop the guard turning to crap. Mind you it does keep a lot of crap off the rear shock.
Bendy toy
Registered user
I solved the centre stand problems by taking the stand off the bike. ")
I had it powder coated but never missed it while it was away being done so it was never put back on the bike. If I was to store the bike for long periods I would refit the stand.
The centre bar can be protected with helicopter tape or the same with a split rubber hose over the top.
I had it powder coated but never missed it while it was away being done so it was never put back on the bike. If I was to store the bike for long periods I would refit the stand.
The centre bar can be protected with helicopter tape or the same with a split rubber hose over the top.
