PanEuropean
Registered user
Hello All:
I think some of this content and some of the photos have been posted elsewhere in this forum, sort of appended onto other discussions, but it's hard to find all the info in one place, so I have created a new thread with photos and comments, to make it easier for folks to get this information when they want to do an install.
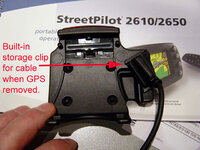
I use a Garmin mounting bracket and Garmin power cable (Garmin sells this as a kit for USD $50, here's the link: Motorcycle mounting kit. This Garmin bracket comes with 4 small bolts and nuts which are intended to affix the Garmin bracket to a Ram-Mount backing plate. There are a lot of reasons why I like the Garmin bracket - Garmin tested it for tens of thousands of miles on motos before putting it into production, it is discreet, doesn't have the Garmin logo on it (so it doesn't advertise that you have a GPSR in the saddlebag when you park the moto somewhere), it's very lightweight, and it has a clear warning system that tells you if the GPSR is not properly secured in the bracket. The Garmin bracket also has a built-in recess to hold the cable securely when the GPSR has been removed from the bike.
To clear up some confusion about Ram-Mount products (and it's easy to get confused about Ram-Mount products, because although they make great quality products, they have a horrible web site) - Ram-Mount makes their own bracket to hold the SP 26xx, which I do not personally recommend, however, they also make generic hardware (base plates, arms, and various attachment clamps) which are used to hold other mounting brackets, such as Garmin's bracket and Touratech's bracket on the motorcycle.
I do recommend Ram-Mount's generic components, and Garmin had even engineered the 4 holes on their mounting bracket to line up perfectly with Ram-Mount's base plate (note: not Ram-Mount's bracket, but Ram-Mount's base plate).
So, to summarize so far, there are 4 items you will need to get:
1) Garmin mounting bracket and cable (link provided above). If you want the bracket only and no cable, the Garmin part number for the SP 26xx motorcycle bracket by itself is 010-10495-01, that costs USD $20 and comes with the 4 bolts (URL: Motorcycle mounting bracket (replacement).
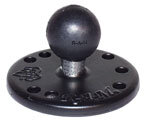
2) Ram-Mount 2 1/2 inch base with ball, Ram part number B-202. This attaches to the Garmin bracket, they are designed for each other.
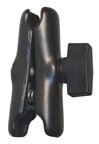
3) Ram-Mount Double Socket Arm. These come in various lengths. Choose the length to suit your motorcycle. For my Honda ST1100, I use the short (1 1/2 inch) arm with a SP 26xx, and the regular (3 inch) arm with a SP III. Note that the arms are made to fit various ball sizes, so be sure to get the right size. The one inch ball is standard and is appropriate for motorcycle GPS installations. Ram makes bigger ball sizes for laptop computer mounts.
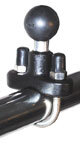
4) Some form of Ram attachment to hold the whole mess to your motorcycle. Because my ST1100 has standard tubular handlebars, I use the U-bolt Base with Ball, Ram P/N B231Z. But, there are other Ram attachments available for different applications, including one that is made specifically to fit the left handlebar clamp of Gold Wings.
Now that you have all the components together, you can plan to install the device. Be sure to mount it in such as way that you have considerable freedom to adjust the tilt of the GPSR up and down - through at least a range of 60° of tilt. If you wonder why, go read the threads about all the difficulties some users are having with reflections from their GPSR display. If you have considerable room to tilt the GPSR, you can avoid this problem, which varies depending on what direction you are riding in, and where the sun is in the sky.
I suggest you hardwire the GPSR power cable to your motorcycle, rather than using a cigarette lighter style plug-in. Remember, the SP 26xx does not have batteries, so if a cigarette lighter style plug-in comes loose, even for half a second when you hit a pothole, the GPSR will reboot. Also, the connectors on the SP 26xx power cable are exposed tabs, so best to connect to a power supply that is switched with your ignition, rather than 'hot' all the time. This will save blown fuses if you accidentally rub the connector against a ground point on your moto.
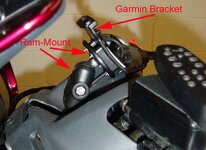
Below are a series of pictures illustrating the different components, and the complete installation. It's quite important to install the GPSR on the centerline of your handlebars, first because if it is off-center, you will cause unwanted steering inputs when you press the buttons or touchscreen, and second because the GPSR has considerable mass (a lot more than a tiny GPS V, handy phone, or MP3 player, for example), and you don't want a big off-center mass messing up your steering geometry.
PanEuropean
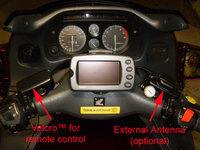
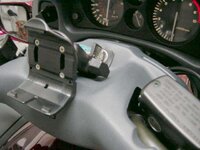
What the final installation should look like (more or less)
On the centerline, instruments not obstructed, not sticking out so far it would interfere with a tankbag, installation allows for tilting up and down.
I think some of this content and some of the photos have been posted elsewhere in this forum, sort of appended onto other discussions, but it's hard to find all the info in one place, so I have created a new thread with photos and comments, to make it easier for folks to get this information when they want to do an install.
I use a Garmin mounting bracket and Garmin power cable (Garmin sells this as a kit for USD $50, here's the link: Motorcycle mounting kit. This Garmin bracket comes with 4 small bolts and nuts which are intended to affix the Garmin bracket to a Ram-Mount backing plate. There are a lot of reasons why I like the Garmin bracket - Garmin tested it for tens of thousands of miles on motos before putting it into production, it is discreet, doesn't have the Garmin logo on it (so it doesn't advertise that you have a GPSR in the saddlebag when you park the moto somewhere), it's very lightweight, and it has a clear warning system that tells you if the GPSR is not properly secured in the bracket. The Garmin bracket also has a built-in recess to hold the cable securely when the GPSR has been removed from the bike.
To clear up some confusion about Ram-Mount products (and it's easy to get confused about Ram-Mount products, because although they make great quality products, they have a horrible web site) - Ram-Mount makes their own bracket to hold the SP 26xx, which I do not personally recommend, however, they also make generic hardware (base plates, arms, and various attachment clamps) which are used to hold other mounting brackets, such as Garmin's bracket and Touratech's bracket on the motorcycle.
I do recommend Ram-Mount's generic components, and Garmin had even engineered the 4 holes on their mounting bracket to line up perfectly with Ram-Mount's base plate (note: not Ram-Mount's bracket, but Ram-Mount's base plate).
So, to summarize so far, there are 4 items you will need to get:
1) Garmin mounting bracket and cable (link provided above). If you want the bracket only and no cable, the Garmin part number for the SP 26xx motorcycle bracket by itself is 010-10495-01, that costs USD $20 and comes with the 4 bolts (URL: Motorcycle mounting bracket (replacement).
2) Ram-Mount 2 1/2 inch base with ball, Ram part number B-202. This attaches to the Garmin bracket, they are designed for each other.
3) Ram-Mount Double Socket Arm. These come in various lengths. Choose the length to suit your motorcycle. For my Honda ST1100, I use the short (1 1/2 inch) arm with a SP 26xx, and the regular (3 inch) arm with a SP III. Note that the arms are made to fit various ball sizes, so be sure to get the right size. The one inch ball is standard and is appropriate for motorcycle GPS installations. Ram makes bigger ball sizes for laptop computer mounts.
4) Some form of Ram attachment to hold the whole mess to your motorcycle. Because my ST1100 has standard tubular handlebars, I use the U-bolt Base with Ball, Ram P/N B231Z. But, there are other Ram attachments available for different applications, including one that is made specifically to fit the left handlebar clamp of Gold Wings.
Now that you have all the components together, you can plan to install the device. Be sure to mount it in such as way that you have considerable freedom to adjust the tilt of the GPSR up and down - through at least a range of 60° of tilt. If you wonder why, go read the threads about all the difficulties some users are having with reflections from their GPSR display. If you have considerable room to tilt the GPSR, you can avoid this problem, which varies depending on what direction you are riding in, and where the sun is in the sky.
I suggest you hardwire the GPSR power cable to your motorcycle, rather than using a cigarette lighter style plug-in. Remember, the SP 26xx does not have batteries, so if a cigarette lighter style plug-in comes loose, even for half a second when you hit a pothole, the GPSR will reboot. Also, the connectors on the SP 26xx power cable are exposed tabs, so best to connect to a power supply that is switched with your ignition, rather than 'hot' all the time. This will save blown fuses if you accidentally rub the connector against a ground point on your moto.
Below are a series of pictures illustrating the different components, and the complete installation. It's quite important to install the GPSR on the centerline of your handlebars, first because if it is off-center, you will cause unwanted steering inputs when you press the buttons or touchscreen, and second because the GPSR has considerable mass (a lot more than a tiny GPS V, handy phone, or MP3 player, for example), and you don't want a big off-center mass messing up your steering geometry.
PanEuropean
What the final installation should look like (more or less)
On the centerline, instruments not obstructed, not sticking out so far it would interfere with a tankbag, installation allows for tilting up and down.