Oil pressure switch

Dakarnoway

Active member
UKGSer Subscriber
Joined
Feb 16, 2006
Messages
152
Reaction score
0
Location
Ribble Valley, England
Thought i`d post this on here as well as f650 site as I need some help with this new switch that nows updates the old OE parts.

I`m not too worried :rolleyes: that I can get my Dakar back on the road before next Friday, only i`m off to Ireland on Saturday. :augie

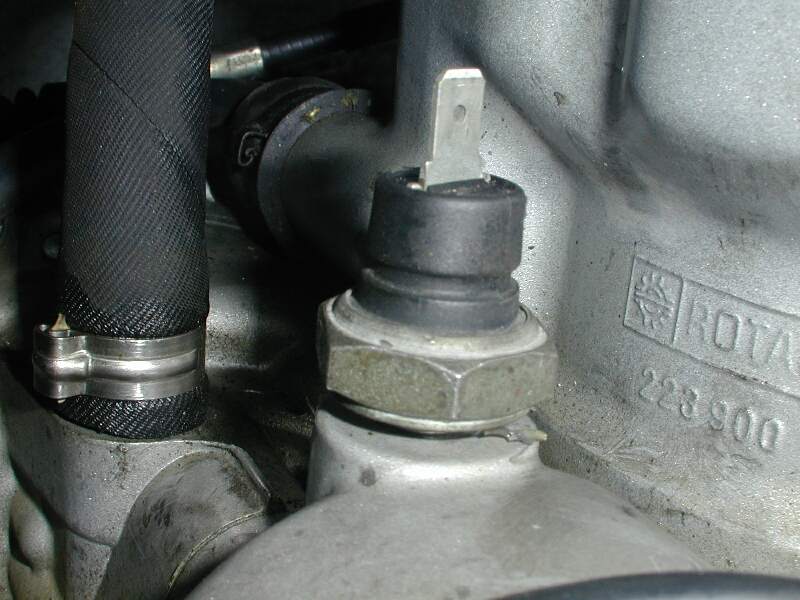
Refitting my rear shock last week after a rebuild. I went for a ride just to check everything is Ok! On the way back after a brew at a mates house I had no oil light so a prod here and there, still no oil light. Rode home gently and took body panals off and thought a new switch would not be a bad idea (it`s the second one, though this was fitted with about 4000miles on the bike). So i`ve ordered one and the parts guy said it`s been up-dated and comes with a 90* adapter. Yeh Ok fine I say. :confused:
I have received it today and a good long look through my BMW Repair Manual and nothing except what torque I need to tighten the switch to the engine cases. It also comes with a new cable and so hope someone might have fitted a new switch, adapter and cable recently.

I am hoping that I just undo the switch, 90* adapter in where the switchcomes off or out of the engine casing. Screw the switch to the adapter ... But not sure where I should connect the cable. :eek

Ah! Just before I send this off, is this procedure explained in the new Haynes manual now available for the f650 GS and if so could someone send me something ???

I feel some one will come to my rescue :bow

Cheers Dakarnoway

As I said i`m not panicing :eek:
 
Hello Dakarnoway, I have the Haynes Manual. It says: Removal: 1 the oil pressure switch is screwed into the crankcase behind the cylinder. 2 Lift the rubber boot and disconnect the wiriing connector from the switch. 3 unscrew and remove the switch. Discard the sealing washer as a new one should be used.
Installation: 1 Clean the switch threads and apply a thread lock. Install the switch using a new sealing washer and tighten to the specified torque setting (12 Nm). 2. Attach the wiring connector and fit the rubber boot. 3 Run the engine and check that the switch operates correctly without oil leakage.

There's nothing about a modified version of the switch. Looking at the wiring diagram, the cable goes straight to the instrument cluster and warning lights.

Don't know if that's any help. E-mail me at [email protected] if you want more info from the manual.

Best wishes with it.

Rob A.
 
Hi RobA,

Ok hmmm, i`ve got the parts out of the packets and I can see that it`s not so hard to put the 90 deg adaptor into the same place as the old sensor. It`s just at what angle then does everything point out to the left or towards the back :nenau
The sensor has a washer that will not come off the threads and I can push that very easily onto a connector, then a cable goes out from this with a crimped bit of metal on the wire at the end ... but thats my problem ... to where does this connect too.

I`m thanking you for your reply RobA, just recaping or making others see what I have to do.
Thanks again, Dakarnoway
 
If I knew how to transport the thread that i`ve posted on f650.co.uk onto here then you would see that it is quite a simple fix ... and if you have a knowledgeable mate that understands electrics. Thanks to Colin and thanks to RobA for your help from the Haynes F650 GS manual.

I can now use this :aidan cos i`m on my way at the weekend for some of this :beer:

:JB
 
If I knew how to transport the thread that i`ve posted on f650.co.uk onto here then you would see that it is quite a simple fix ...
:JB

Highlight, copy and paste into new post.


feel like i`ve covered new ground, a pioneer, even big headed.
It`s quite simple really, get a mate that understands electrics and let him solder the new cable to the old one and hey presto.

Ok, with this oil pressure switch you now get a 90 deg adaptor, the switch and a cable with a one of those connectors that you press a spring clip, like a lot of connectors on the bike.
A dab of Loc-tite on the threads of the adaptor, screw it in finger tight. To tighten further you will need a 22mm spanner and it`s a fiddley, a quarter turn at a time torqued to 12Nm but it`s a guess `cos I can`t get a torque wrench in there. Three full turns, gently, is how tight it needed to point to the angle I wanted.
I wanted the threads for the switch to be facing outwards but slightly backwards say 4 o`clock if the the front of the bike is 12noon. This is so the winding mech on the shock does not get in the way when put back on the bracket.
The switch is also easier to to tighten up at this angle, you will need a 24mm spanner. Again tighten it up gently, dab of Loc-tite on the threads and just go for feel on tightness. I`d hate you to bend the adaptor, though it is a hefty bit of metal.
I wanted the cable to face upwards from the switch and the length is important so that when you cut the original wire from the old switch i`ve not got an excess of wires. The new cable has a sheath about 2/3rds it`s length, it is not heat shrink stuff. Also an inch of plastic tubing which I didn`t use.
So the cable/connector is a push fit. It cannot go on the wrong way as there is a notch within the switch and one on the connector. Press the spring-clip and hopefully the cable faces upwards off the switch. The length of the new cable determines where you are gonna cut the old wire.
My knowlegable mate says the this cable has an end that is made to be able to crimp and solder to another wire/cable. He`s done the job before I get chance to ask does he want sugar in his tea!!!
Black insolation tape over the solder and tape that to wiring harness, rip-tie in parts to tidy-up. Winding mech back on bracket, swing Scottoiler back into place. What was all the fuss about
to my mate Colin. Thanks
 
Ha! Thanks LOLGEOFF,
My post reads just fine the way you have done it. :clap :thumb2
Maybe I need an office temp. because I can only type and use a mouse. :blast
Next post is in WaNtEd SeCtioN :type
 
Thanks, Geoff. Here's what I've just posted on F650.co.uk:

Reviving an old thread here:-


My oil light started flickering at idle, then staying on at idle but going out as soon as it revved. The point at which the light went out has gone up progressively until, by the time I got home, it was on permanently. This happened over a period of just five miles or so.


I chose to believe that this indicated a dodgy pressure sensor rather than an actual oil pressure problem, and I am MASSIVELY relieved to see that a dodgy switch is a known problem. I'll order one today.


Now, stupid question: the BMW repair manual says "remove oil pressure switch" but I can't see that it shows where it is. Can anyone give me some clues please? And is there anything I need to know before attempting to change it?


Thanks in advance,


Robin.
 
I didn't recognise you over there Robin. It's easy to change the switch once you've got a socket on it. The one I fittted though just had the push fitting on the wiring.
 
Get an Aprilia switch

This is the switch you are looking for:

OilPress.jpg


The new M12 oil pressure switch with the M12/M10 90-degree adapter can hardly be considered an improvement to anyone but BMW logistics dept:

oil_switch.jpg


The Aprilia Pegaso used the same M10 switch that the -05 F650GS, and I believe they still carry it:
http://www.af1racing.com/store/Scripts/prodView.asp?idproduct=2642
 
Thanks, ThorH.

Unfortunately, my replacement parts arrived today. £10 for the pressure switch, £30 for the adapter and wiring insert. :eek: Had to wait a wek or so to get them from Motorworks.

Complete pain to fit - there's not much room in there, impossible to get torque wrench on either the adaptor (which is square anyway) or the new pressure switch because it requires a deep 24mm socket (which I don't have) to reach over the socket thing.

Still, all done now and works. No leaks yet, but I'll give it a good run tomorrow to see if it leaks when it's hot.

If this one fails, I'll try the Aprilia one. Except I've already cut off the spade adaptor. :blast


Back
Top Bottom