1989 BMW R100GS-Paris Dakar Restoration

I've since spoken to Richard, Hagon's wheel builder, who pointed out yet more pitfalls. Corrosion usually means the nipples and spokes are difficult to extract so he always re-drills the holes. The nipples have tiny M2 grub screws (which I wasn't aware of and Motorworks never provided when I ordered the ss spokes and nipples) which Hagons have in stock. I shall also fit right angled tyre valves as this makes inflating on a garage forecourt a doddle (£2.50 each on eBay).
.:thumby:

Got a phone call today from Richard to say that the right angled tyre valves I supplied him with (he's only just returned from holiday) are too big for the 8mm holes in the Akront rims. And there's me thinking tyre valves were a universal fitting. I've now emailed the ebay seller to see if he has any the correct size and I see there are plenty of 8.3mm right angled tyre valves on eBay.
 
Tonight I fitted the Motobatt battery, searched high and low for the correct ignition key - I seem to have about four Neiman keys - and then turned on the ignition, not to start the engine as I've yet to add the oil. And what happened? The clock started to work and the side light came on. And that's that. No headlight, horn, indicators or rear light I found a connector block half way along the top tube of the frame I must have missed with the terminals all corroded but that's now cleaned up. Fuses OK so I think there must be an earth I've missed. All the connections are bright and cleaned. I'll just have to check things through systematically.
 
Right. where to start? Well with the electrical woes, rather than struggle on with a subject I know nothing about it was time to bring in an expert, Chris Tonbridge (TunnerUK of this parish) who is about to start up his one man business less than a mile from me. Whilst he specialises in installations (heated grips, GPS, intercoms) he was happy to come along and have a look at the R100GS-PD. Well things weren't straightforward (all they ever?) so I'll itemise what he found -

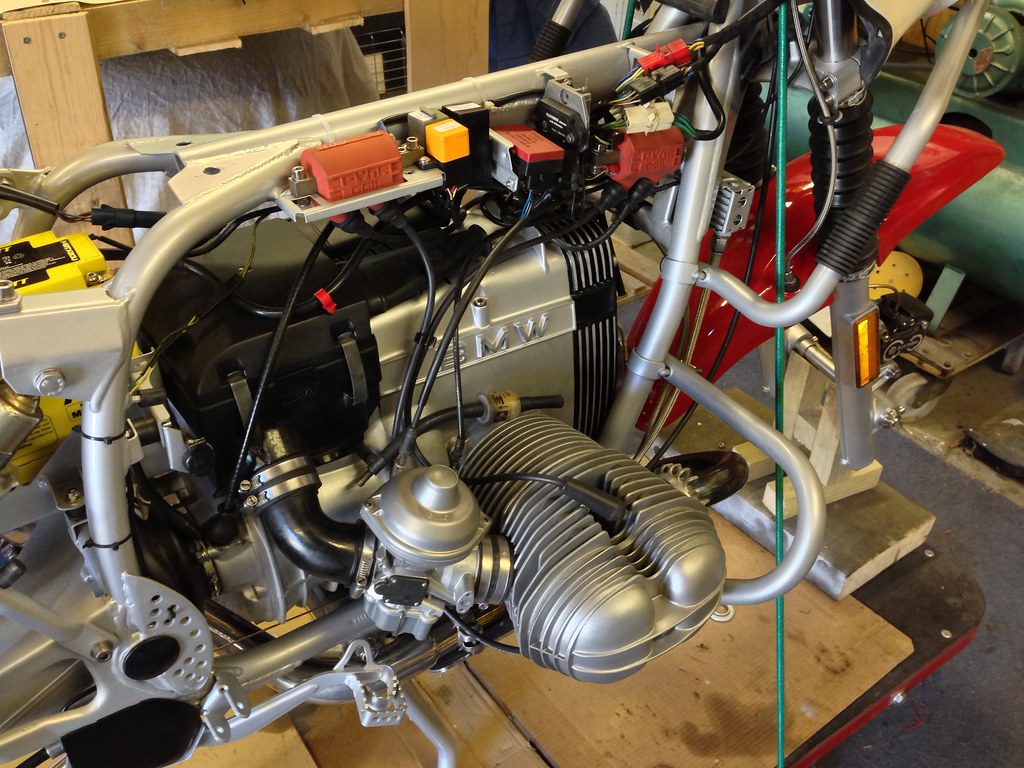
1. I had gone over the wiring loom, and taken apart every connection and cleaned them out using a needle file but they were not as clean as I thought. In particular Chris found the red, white and black connector blocks alongside the top tube of the frame particularly faulty. But not just the corrosion. He noted that the 29yr old male and female connectors had lost their tension and no amount of cleaning would restore their 'springiness'. I was more interested in effectiveness than originality so Chris cut these off, installed new crimped bullets (using a professional crimper and not my crappy Draper device) with shrink insulation and memory tape.

2. He found an earth next to the neutral switch which I had failed to connect <doh>.

3. ...as well as the connectors in the rear light which I had not connected <doh squared>

4. ...and the brake light switch I had fitted back to front (oh for goodness sake).

5. I had earthed the starter motor to the engine which was wrong but Jim Cray had fitted a Police-spec rectifier and the black lead was 'hiding' behind the front engine casing. A phone call to Jim solved that one.

6. Chris got the horn work by staring it out. There was no rhymn nor reason to it, it just started working.

I can't speak highly enough of Chris's work and I wish him really well for the future. His business will also involve paint spraying (he's installing paint booths at the moment) as well as bead blasting and motorcycle electrics.

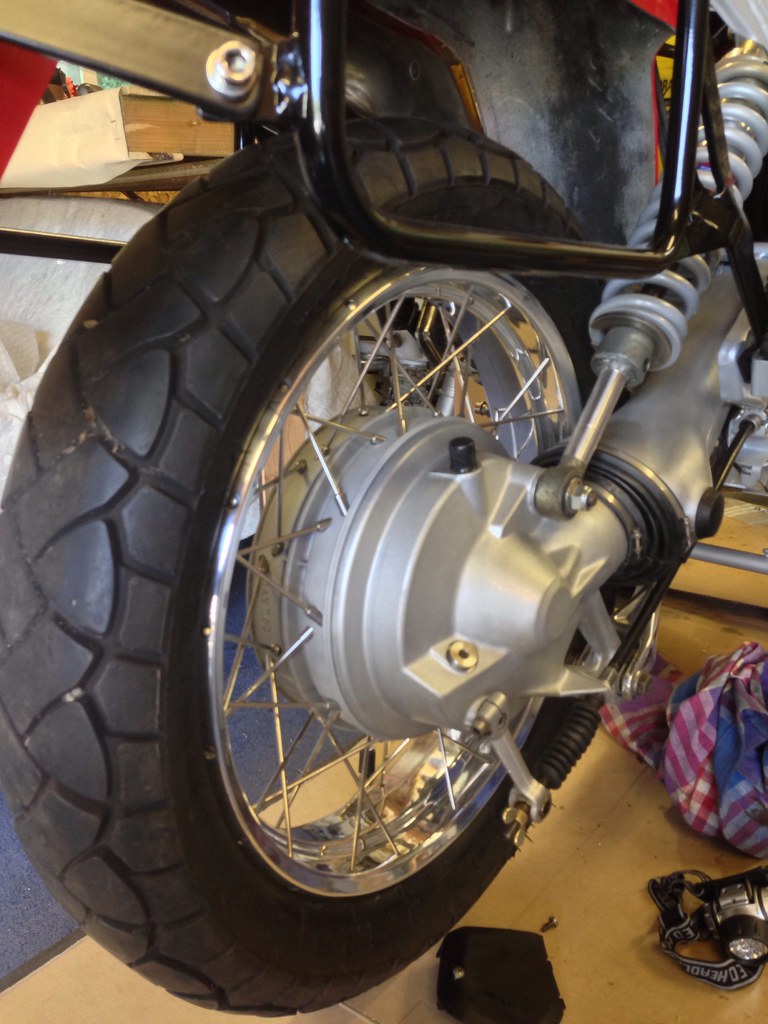
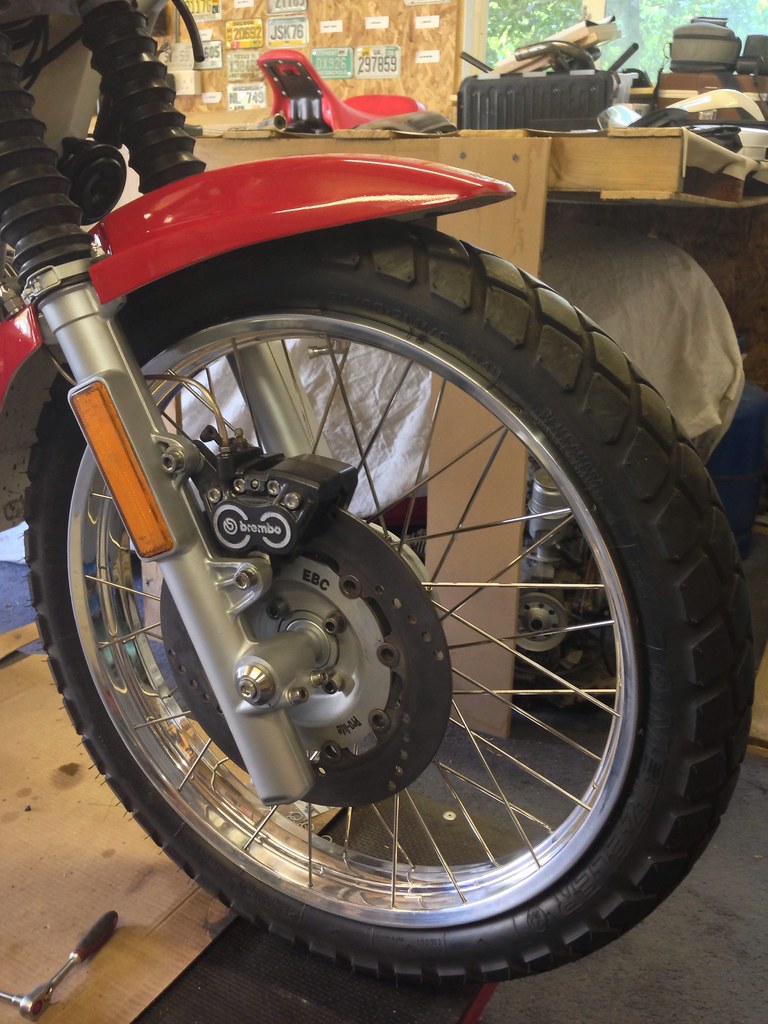
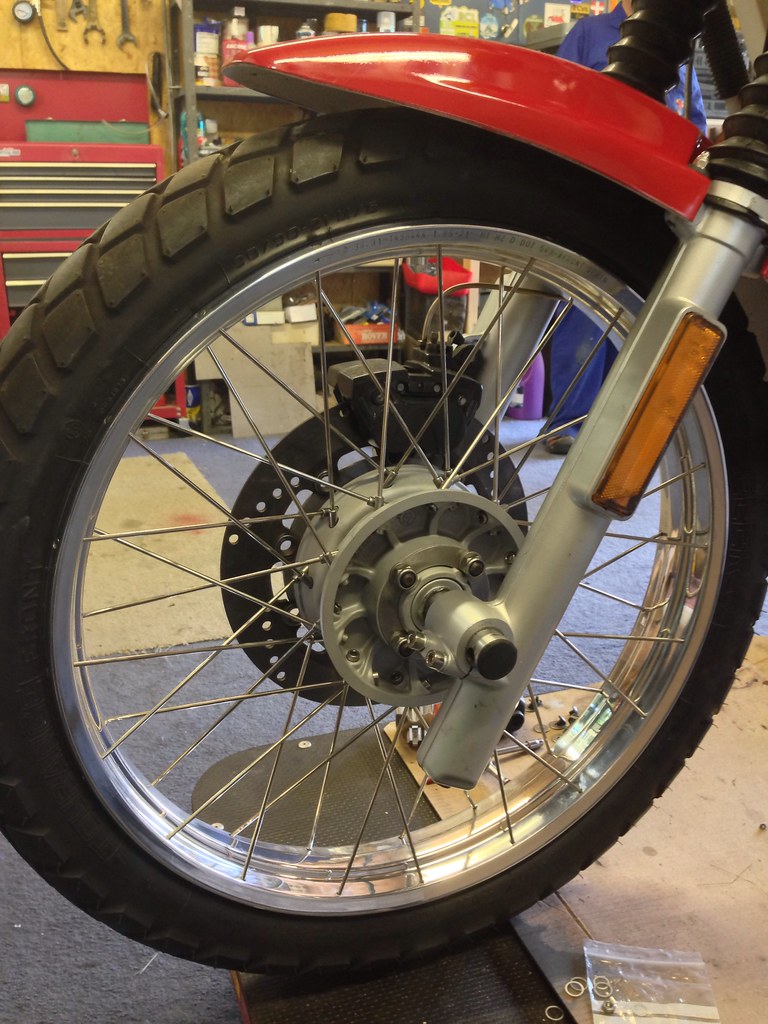
Yesterday I collected the rebuilt wheels from Hagons and they've made an exceptional job - highly polished rims, stainless steel spokes and nipples, bead blasted and lacquered hubs. And refitted the tyres.

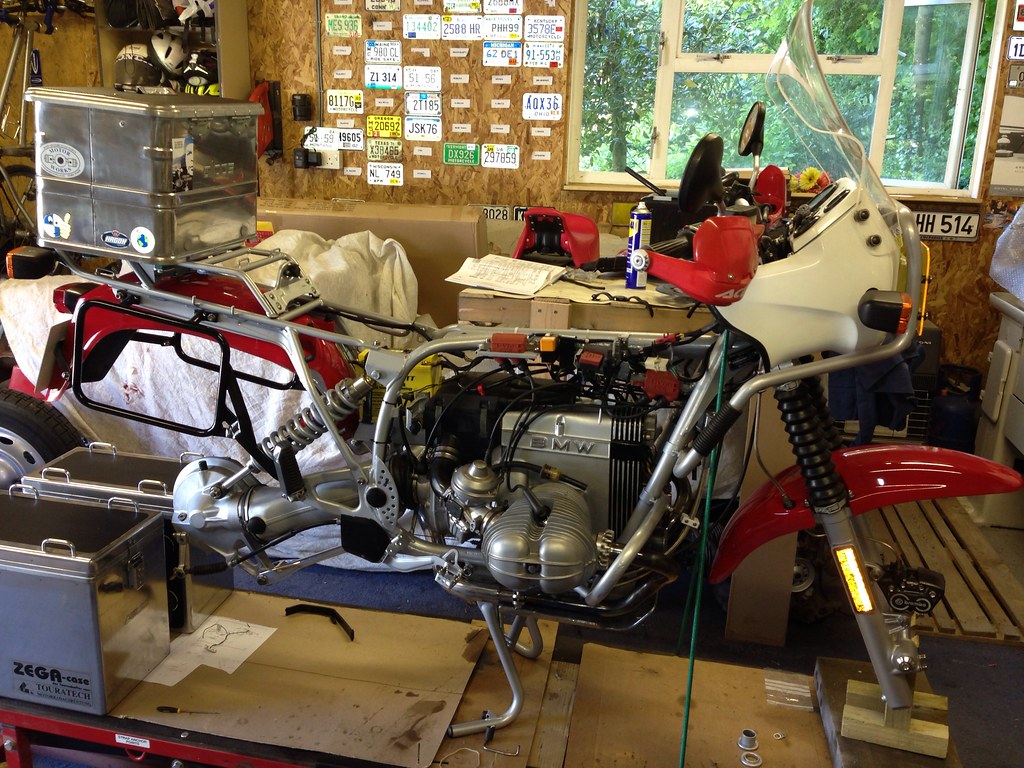
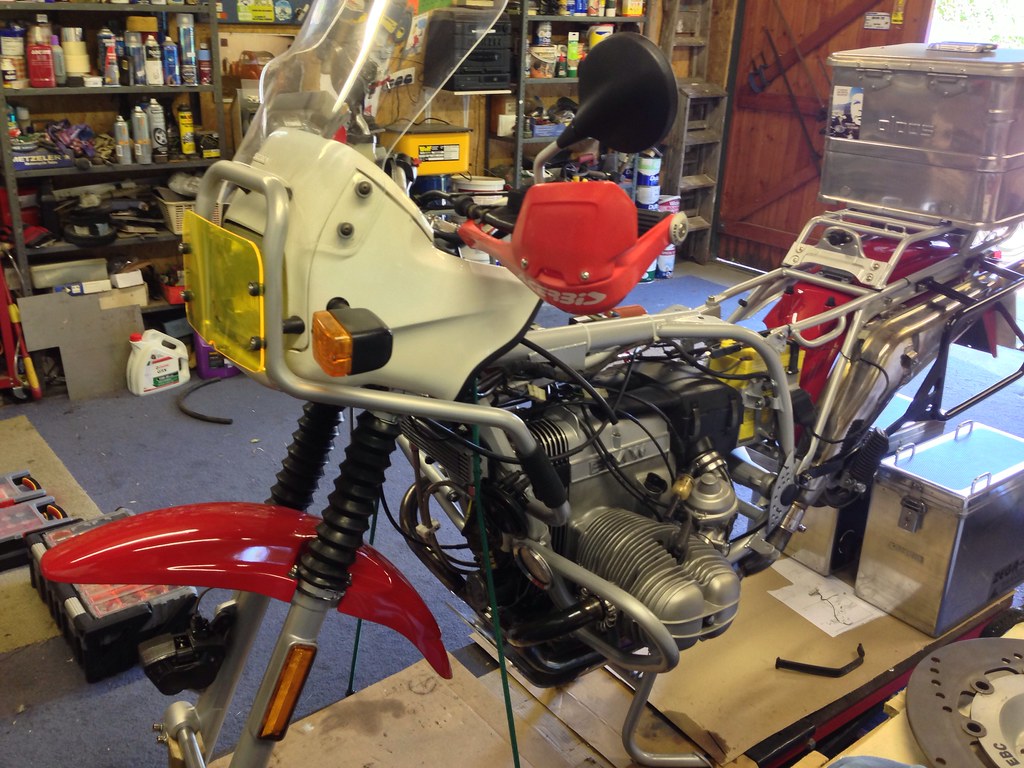
Today we got the engine running which was a relief, and it's a bit lumpy at present as I have to alter the timing having fitted the American twin-plug coils.

I spent an hour bleeding the front brake but cannot get any sign of any pressure. I've used Gubson Easi-Bleed in the past but don't have a suitable cap so after using an entire 250ml bottle of DOT4 up, I have ordered a MityVac bleeder.

http://www.youtube.com/watch?v=PwAQ2qDQjPg
 
Hello Hello! (Can you believe I've just got home from my workshop!!!!)

I did indeed have the pleasure of working on Paul's bike for a few hours.

It is absolutely gorgeous!

There were a couple of head scratching moments but we got all the glitches ironed out in the end. Very satisfying!

I don't think I've ever heard an airhead engine sound as tight as his, no death know, no taps or rattles. It really does seem to have been built properly.

The work Paul has done is lovely and the bike will look stunning when it's all buttoned up and back together.

Really nice to meet you Paul, you'll have to pop down for a cup of tea soon!
(Hopefully once the bike's MOT'd :thumb)

Here are a few photographs and a quick vid of the initial startup :thumb2


<iframe width="853" height="480" src="//www.youtube.com/embed/YP8xZJrkKWQ" frameborder="0" allowfullscreen></iframe>
 
I spent an hour bleeding the front brake but cannot get any sign of any pressure. I've used Gubson Easi-Bleed in the past but don't have a suitable cap so after using an entire 250ml bottle of DOT4 up, I have ordered a MityVac bleeder.

Try taking the brake caliper off and holding it higher than the master cylinder. Try bleeding it like this and/or leave overnight with the brake lever cabletied fully in :thumb2
 
I use the brake lever clamped method when trying to remove the last vestiges of any air in the system but at the moment I can get no pressure at all. I did rebuild the master cylinder so it's just possible I have incorrectly fitted the new rubbers but I very much doubt it. Kenny, I cannot easily removed the brake caliper now as it passes through a grommet in the front mudguard.

I still can't get the rear brake light to reliably work as when I replace the black cover, it seems to interfere with the switch spring. More tinkering needed.

Jim Cray twin plugged the engine and the timing needs to be slightly adjusted using the instructions which came with the kit. This should make the engine less lumpy and give a nice steady tick-over.

I'm dead chuffed with the wheels which were rebuilt by Richard at Hagons. I supplied the Motorworks stainless steel spokes, he sent the wheels away for polishing (they look like chrome) and beadblasted and lacquered the hubs.

When I've time I'll be placing a couple of items in the 'For Sale Section'. These are the high mudguard (apparently more popular than the low one but I know which I prefer) and the Bib (or bra, whatever it's called) which I won't be fitting. Access to the oil filter is bad enough without fitting that clutter. But I am off to Spain on Tuesday so it will have to wait until I get back.

PS I wonder how many of us realised that there were minute M2 grub screws tucked away in the ends of the spoke nipples? Richard explained to me that with the cross spoking system on these wheels, the spokes are not as tensioned up as tightly as a normal wheel so these grub screws lock the nipples/spokes in place to prevent them loosening. Interesting.
 

Attachments

  • IMG_3954.jpg
    IMG_3954.jpg
    106.2 KB · Views: 2,240
Hmm. After trying the conventional plastic tube method, I was given a syringe. The plastic tube was too loose on the syringe so I Araldited the tube on and left overnight to set. This morning I tried pumping some brake fluid into the bleed nipple, the glued joint leaked and the escaping fluid stripped some paint off the fork leg. Then I got out the new MityVac and in spite of following the instructions to the letter, it didn't seem to have enough suction to suck the fluid out. I then clamped the brake lever to the throttle and went away to do something more satisfying.:blast
 
I have tried a MityVac too, with similar results.

Then I tried Speedbleeders, and they have worked perfectly on everything so far.

They have a sealing compound moulded on to the threads of the nipple, which makes me suspect that some of the problems with other systems may be drawing air past the threads on the nipple, so perhaps sealing them with a bit Teflon tape me be worth a try.

Thanks for the tip about the connector blocks - I have ordered four packets of Pozi- Locks and will set about mine when they arrive.
 
You have a lot of patience I can tell. Really enjoying this thread and would like to know how you get the engine gases so clean!! Do you have some sort of blaster (dry ice or fine powder)?
 
Andy, The engine was rebuilt my BMW guru Jim Cray whose workshop is not far from me at Oare near Faversham. The engine cases were beadblasted by him. The gearbox and final drive were treated with a miraculous stuff called RUB N BUFF. This silver material is applied with the finger tip - a little goes a long way - then buffed up with a rag. If they get scuffed or stained with petrol, it would take less than a minute to re-apply some more. I've no idea how well it would stand up to weather though.

Dr F, I will check. Another tip I found whilst searching on the Net is to undo the master cylinder and brake lever from the handlebar and hold it up as far as it will go (cap must be on obviously) as this would encourage the very last reluctant air bubbles to rise to the top. Another tip I found was to thump the end of the handlebars with a rubber mallet at the same time as squeezing the brake lever in and out, which is claimed to budge any reluctant bubble.

I shall try each and every method until I get it right:rob
 
How are you getting on with it Paul?
I was going to pop down and see you but time hasn't been my friend this week.
 
Chris
We only got back from Spain yesterday - 38F down in Valencia - so we have lots of unpacking to do and the garden is in a mess with this drought. Tons of deadheading to be done. We had a firm in whilst we were away who installed a new boiler out in the old garage. Floorboards were taken up and stuff so a small amount of clearing up to be done. I shall probably have yet another go at bleeding the front brake in a few days, adjust the timing, then take her for a ride around the estate before booking an MoT.
 
Right, where were we? Well after a Spanish break (40F!) and some other important jobs, it was back to the bike and the bleeding of it's front brake.

Today I got hold of another syringe the nozzle of which formed a tighter fit in the thin plastic tube. Fresh DOT4 brake fluid and off I went. I connected the tube to the bleed nipple, backed off the nipple by half a turn and back flushed fresh fluid into the caliper.

I should mention that another owner advised me to wedge the pads against the discs, something I've never done before in 40yrs of brake bleeding, but things are getting a bit desperate.

Tiny tiny bubbles appeared in the master cylinder and one or two larger bubbles, BUT NO PRESSURE UNDER THE BRAKE LEVER. After doing this for 30mins, I then resorted to the new American-made Mity-Vac. This PULLS the fluid through the bleed nipple, or would do if at least one of the adaptors would form a tight fit around the nipple. Failure.

I then decided to try the simple plastic tube & jam jar method and got some more bubbles out BUT STILL NO LEVER PRESSURE.

I cannot raise the caliper as far as it will go as the stainless steel hose passes through a hole in the front mudguard.

I have yet to thump the end of the handlebar with a rubber mallet nor remove the master cylinder and lever and raise as far as the s/s will allow. I am running out of solutions Peeps. Rebuild the rebuilt master cylinder?

PS Odd drops of brake fluid has stripped the paint from the freshly painted and lacquered fork leg. Poo!

PPS As for the two tiny holes seen inside the master cylinder reservoir, the one furthest away from the lever is the one where the tiny bubbles appear from. Presumably the other hole is an entry port? It looks clear anyway.
 
My favourite reads are always the restorations on here
this is another first class job
fantastic well done :beerjug:
 
This morning I returned to the bike and decided to dismantle the master cylinder. On doing so I noticed a couple of things which weren't right. There was a very slight weep of brake fluid at the join between the reservoir and the master cylinder which suggests the O-ring wasn't changed (by me), also the minute grub screw (M3?) which screws upwards and keeps the reservoir and master cylinder together, was missing. It looks like there never was one. Everything else cleaned - that return hole in the top of the master cylinder is incredibly tiny but clear.

Another tip I was given was to ram the piston in (and out) using a large screwdriver as this would give more oomph (better leverage) than relying on the brake lever.

A small amount of fork oil was found to have dripped from one fork slider, Odd that as the fork sliders are empty of oil at present. I must re-check for any seals (unless it's more brake bloody fluid).


Back
Top Bottom