ADV to standard GS seat swap

Den

Well-known member
UKGSer Subscriber
Joined
Feb 1, 2003
Messages
6,748
Reaction score
4
Location
Scotland
For anyone considering this, Ive swapped them back and forward 4 times now due to Mrs Dens comfort expectations.
Do-able in about half an hour.

Remove adv seat
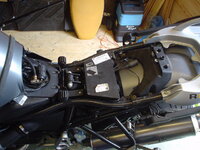
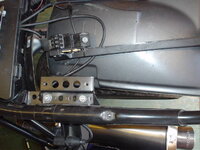
Remove front seat bracket and spacers under bracket 6x screws. Pic1 / 1a
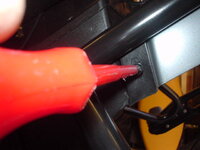
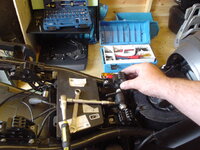
Unscrew, but not fully, black plastic screws which connect the coloured and black plastic parts of rear mudguard. Pic2 Pull screws and they will come out with the screw socket thingys which go through the mudguard halves.
Remove rearmost screws from rack.
Mudguard will now dangle down.
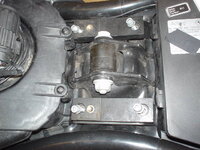
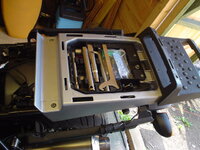
Look underneath rear bracket with seat lock on it. Pic3 4 screws hold this on from underneath, remove these.
Remove remaining 4 screws holding rack.
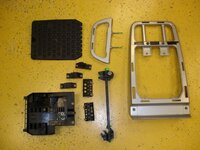
Remove rack.
Remove screw holding combined helmet/seat lock to frame.
Remove lock/ cable and rear seat bracket as one unit.
Pic1
 

Attachments

  • seatswap 001.jpg
    seatswap 001.jpg
    93.1 KB · Views: 2,335
1a
 

Attachments

  • seatswap 002.jpg
    seatswap 002.jpg
    64.6 KB · Views: 2,317
pic2
 

Attachments

  • seatswap 003.jpg
    seatswap 003.jpg
    36.8 KB · Views: 2,183
rear bracket screws Pic3
 

Attachments

  • seatswap 004.jpg
    seatswap 004.jpg
    51.8 KB · Views: 2,190
Fit R/H front seat bracket to frame ( the one that looks like a bit of mecanno) 2 bolts. Pic A . Fit R/H front seat hook thing to bracket With slots pointing back.
Do same to L/H side. This might come with Mecanno bracket, seat lock and seat hooks as one unit if secondhand.
1 screw holds rear of this assembly to frame.
Fit R/h pillion seat hook to frame 2screws.
Rejoin mudguard halves and push in connectors. dont screw the plastic scews back in, just push them home.
Fit new rack. Bolts at back go right through mudguard to light bracket.
Slip in tooltray. Secure with 1 screw at back.
BEFORE FITTING SEATS.... you will have to re key your seat lock. or you wont get them off again. Locks come out easy enough, just swap them over.

I think thats about it, oh before I forget . Dont fit red seats.

Pic A
 

Attachments

  • seatswap 005.jpg
    seatswap 005.jpg
    53.2 KB · Views: 2,190
.
 

Attachments

  • seatswap 007.jpg
    seatswap 007.jpg
    95.9 KB · Views: 2,218
.
 

Attachments

  • seatswap 009.jpg
    seatswap 009.jpg
    89.3 KB · Views: 2,175
Is it really that easy.

I've just upgraded to a Adv. from a 1100gs and my old seat was a corbin, having covered over 70,000 miles on the thing, I would now consider it to be fully broken in! Thank god I don't have to buy a new one.

thanks,

Paul:beer:
 
Hi Den

Good description, but I'm more interested in the black rack you have fitted. Looks alot more usefull than the standard one, whats the info on it? Is it a top box mount?

Thanks
 
its the standard bmw top box mounting plate. Not for sale. Still have to swap seats when on holidays with wife
 
Are you still able to fit the seat to the GSA, even if you have the Alum system luggage panniers etc.
 
Where did you procure the tool tray from to finalise the seat swap!

Do you really need this part.
 
Tool tray....

swith said:
Where did you procure the tool tray from to finalise the seat swap!

Do you really need this part.
standard on the GS

PS: Ally Adv Panniers will fit both GSA and GS
 
swith said:
Where did you procure the tool tray from to finalise the seat swap!

Do you really need this part.

You need all of this..........
 

Attachments

  • 1150gs 2 piece seat parts pic_web.jpg
    1150gs 2 piece seat parts pic_web.jpg
    82.8 KB · Views: 1,915
Will you need to carry out the same exercise for changing the front seat only!

Very rarely use the pillion seat.
 
swith said:
Will you need to carry out the same exercise for changing the front seat only!

Very rarely use the pillion seat.


Yes...........what you going to mount the front seat onto...........fresh air??????????????????
 
As I don't use the pillion seat much at all, do you still need to purchase the tool tray!

Paul
 
Dont bother with the tool tray. You can get much more in that space by using a couple of tool rolls or bags. And it rattles less


Back
Top Bottom