1150GS scrambler build log

Michaelwhy

Registered user
Joined
Dec 27, 2022
Messages
17
Reaction score
1
Location
Newcastle
Hi All

A little bit of background to start, will get this out there first off and get ready for the flames and lightning bolts. I am not a fan of adventure bikes but I do get it and equally not a fan of Japanese sports bikes either.

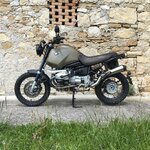
So why do I own one - they are huge !. I am 6ft 3in and love the scrambler style bikes. I had a ducati scrambler for a while but it looked like I was giving birth to it rather than riding it , test rode a r9t scrambler and better but kind of the same problem.

I swapped the ducati scrambler for a multi strata and loved it until I met up with a mate who has a 1200gs and after following him on a 200 mile twisty trip noticed he didn't change gear - ever , he was relaxed and ready to go when we made a coffee stop and I was a knackered sweaty mess.

So while not the biggest fan of the look GSA's are the right size and shape for me and love the torque and effortless ride. So a few months ago started looking for a gs and after a bit of Googling ended up seeing conversions that had been done and was hooked from there. Something like an 1100 or 1150 seemed the best balance of cost, power and the least amount of electronics that would need to be sorted or stripped off. After a few weeks of searching a likely doner appeared, emailed the guy at 10.30 on a sat night and was on a 5 am train the next morning for the 300 mile trip to collect it.

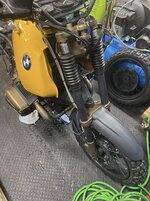
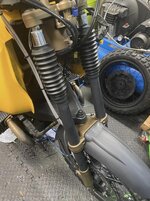
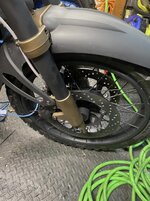
It looks really clean from a distance but it had lived outside for a few years and was starting to corrode badly in the usual places , but had been well maintained and serviced so perfect doner for a scrambler build

I haven't figured out how to add photos so will pause here in case I loose everything I have just typed
 
I'm in. As you'd have expected. :thumby:


Quick way to add photos is go to Advanced (bottom right) then click on attachments (paperclip) and upload. Then work out why they're sideways or upside down. Preview Post to see how you've got on.

Alternatively, save them to somewhere like FlickR and then embed the code for them. (bit trickier, depending on how IT savvy you are)
 
Pt 1

Thanks tufty, followed your instructions but it doesn’t seem to like the photos and the upload fails. Doing this from an iPad so will try later from my PC

The seller’s description was pretty accurate, mechanically sound but cosmetically a bit tatty , corrosion on the cylinder heads , alternator cover etc. at some point the abs must have failed and all the wheel sensors , pumps , pipes etc have been stripped off and the wiring chopped out. Loads of little scuffs and scrapes but the tank was in good shape and I liked the colour. So ended up the proud owner of a 2003 1150 with 57000 miles in yellow. It was registered in New Zealand and imported to the UK in 2006 with full history. After riding it from Luton back to Newcastle I did consider just cleaning it up and leaving is standard.

I have done little bits of powder coating in the past and still have the gear to do it but a saw some parts that had been ceramic coated (cerakote) and liked the Matt finish . I also decided that where possible I would do as much as I could myself so ended up with a large compressor and grit blasting cabinet.

So my first comment or guidance for anyone considering stripping and repainting- bmw paint either falls off as soon as you look at it or on the same item that was painted at the same time with the same paint/powder coat if it’s still stuck on it is a complete bas@@@rd to get off. Sandblaster just dulled the finish.

I used the best paint stripper I could get my hands on, i thought the finish was powder coat but there seemed to be a top , colour and primer on things like the valves covers but whatever it was it was rock hard and the stripper would bubble the top and colour but wouldn’t touch the primer. So I have spent months with a mix of wire brushes, paint stripper and bad language before most of the parts could be blasted ready for the cerakote. As the wheels and frame wouldn’t fit in my blast cabinet I sent those out to a local sand blasting/powder coater and even with the chemicals they can use it took them days to get them stripped.I have most of the rear suspension left to do so while I could carry on as I have been I have dropped everything else off today to get them chemical stripped.

Photos to follow before I move my ramblings onto chapter 2
 
OMG he's going to scrambler a GS...:eek::eek: But it's OK 'cos its a NZ import...:D There have been some really good scramblers out there and also some very good PD type replicas so we await the pics...:thumb The paint as you say is a bastard and either comes of in thick sheets with white powder underneath or won't budge at all... Also the good thing is that the Oilheads were pretty simple and robust underneath the GS bits so you can mess at will... Good luck with the pics...
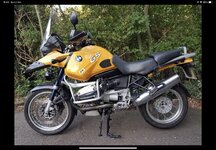
 
Photos

First of the photos
 

Attachments

  • ABA94327-7849-42EC-B778-098D24F58417_1_101_o.jpg
    ABA94327-7849-42EC-B778-098D24F58417_1_101_o.jpg
    260.6 KB · Views: 428
the goal

This is the look I am going for
 

Attachments

  • Unitgarage on Instagram_ “Want to build your own scrambler? We have all the parts to get you goi.jpg
    Unitgarage on Instagram_ “Want to build your own scrambler? We have all the parts to get you goi.jpg
    249.5 KB · Views: 413
and no one is gonna take him aside and "educate" him ?

ps that bike is too good to fuck up.
Ha ha... My immediate first thoughts... Like " I'd have bought that...!" :) If you're scrambler using it then two things that come to mind... I think they look weird with the back end of the subframe taken off and one that I know... They'd feckin windy with no screen at any great speed...;) Good luck...!
 
As another owner of an imported 2003 yellow r1159gs I shall follow this build with interest.

I’ve already drawn one important lesson from the OP’s labours….I shall leave mine in its current, somewhat tatty, state
b1ebf726737b27d6dc24ed35dc7b4f4a.jpg


Sent from my iPhone using Tapatalk
 
Pt 3

Just a few more , very poor photo's as I am struggling for space to get anything pretty !

Over the last couple of months everything has been stripped , sandblasted and coated with the air cure cerakote , I went with glacier black and dark bronze for all the parts , its the air cure cerakote so really easy to apply but not sure how robust it will be compared to the bake on stuff.

I have been fairly active on the forum for the last few weeks as I am at the reassembly stage so starting to find all the problems with things I lost or broke during the disassembly. Two things stand out

1. No cranking off the botton - traced that to a broken wire from the switch to the starter relay
2. lost the pins on the gearbox position sensor - stupid mistake that I didn't realise how it should be removed until it no longer worked and I needed to ask for help - new one installed and working fine
3. lost the spring loaded "pin thing" that provides resistance on the kill switch when tracing the cranking problem - Thanks Tufty for sorting a replacement - it wasn't a big deal but just thought without the resistance I may hit a bump and it would kill the engine


And this is the best "you idiot" moment , Once I had storted the cranking problem I attached the tank and it would start but cut out. fortunately I saved myself the embarrassment of posting this one - I had emptied the petrol out - so putting petrol in fixed that

As the ABS had been removed I was guessing a little on what the correct replacement brake lines would be - got one wrong so ordered a slightly longer one - so win for today is I have the front brakes fitted and working again
 

Attachments

  • 73B00924-5376-4C43-A71E-904310072155.jpg
    73B00924-5376-4C43-A71E-904310072155.jpg
    221.8 KB · Views: 346
  • 6326B133-15ED-4C7C-94B1-2EC4D0D6D6FC.jpg
    6326B133-15ED-4C7C-94B1-2EC4D0D6D6FC.jpg
    230.7 KB · Views: 344
  • 94552C76-B3E9-4BB1-AFAA-37866511A6D5.jpg
    94552C76-B3E9-4BB1-AFAA-37866511A6D5.jpg
    223 KB · Views: 334
  • 1A92D0B6-6372-465D-A2CD-266F4B359B37.jpg
    1A92D0B6-6372-465D-A2CD-266F4B359B37.jpg
    225.6 KB · Views: 341
Nice project Michaelwhy,
I made a scrambler from my 2003 GS in 2012. I'm still very happy with it.
I left the rear alone, which gives me the advantage of equipping my motorcycle with the BMW luggage provided for a GS.
I'm not a fan of any windshield on a motorcycle, so no loss.
There has also been a time when I used my bike for spicy off-road trips, it is bomb proof in this version without a silly duckbill etcetera..
 
I like the Bronze cerakote, how easy is it to use? Does it come in a rattle can or can it be brushed? Be interested to see how it lasts, hopefully you wont scrape it before assembly is complete, I know I would:blast Cheers:beerjug:John B
 
I like the Bronze cerakote, how easy is it to use? Does it come in a rattle can or can it be brushed? Be interested to see how it lasts, hopefully you wont scrape it before assembly is complete, I know I would:blast Cheers:beerjug:John B

It’s only available for spray guns , I have tried brushing on in small areas like nut heads after they have been tightened and it works fine but I suspect brush painting a larger item wouldn’t work very well. The bronze seems to be more robust than the black and I tried re spraying a small area that I damaged, didn’t look right so had to strip it off and redo the whole thing.

I suspect it won’t be anywhere near as tough as powder coat , but kinda started so either got to finish or strip everything I have done and start again

Got the last of the parts back from being acid stripped today so got a lot of spaying to do tomorrow, the cerakote seems to be dry after about 2 hours but it states a few days to cure so I tend to do it in batches and then leave it drying for at least 3 days

Cheers
Mike
 
Hi All

Had to take a break from finishing the bike but hopefully will get out in the next couple of weeks

I am having the problem with the clutch , before the bike was torn down the clutch was working fine and no signs of any slave cylinder or clutch wear issues. Basically the clutch is not disengaging. I have bled it several times and have now stripped the slave cylinder out

The bearing in the slave does seem quiet loose but its spins fine and no signs of it grinding - so first question is this ok and does the pressure of the rod pushing against the bearing tighten everything up or is the bearing shot and i just need to fit a new slave

The only other thing i could think of is as the engine was standing for sometime, could the clutch plates have a bit of corrosion on them so while the clutch may be trying to open and close the plates are stuck. Any thoughts on how to free them up without splitting the engine and gear box again

Cheers
Mike
 
Looking forward to seeing your progress on this build.


Back
Top Bottom