M1KAZ
Registered user
For my Christmas present I decided to get myself some decent lights and decided on Hella micro DE HID fog lights and Hella FF50 high beams. Got the HID lights on e-bay only to discover that despite the photo on the web page and every other light on the page being a fog light the micro DEs are spotlights and Hella do not make a HID running light, at least that I could find. I therefore decided to cut my losses and buy micro DE fog lights as well and have a complete micro DE set. That leaves me with an un-opened pair of FF50 lights for sale on the for sale and wanted section.
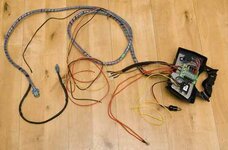
The micro DE HIDs come with a very well made wiring loom. Its complete and you can get the lights going just by plugging together the ballasts, lights, loom and a power supply. For this reason I decided to use as much of the loom as possible without modification. If the relays fuses etc are mounted under the seat the wires are about the right length to go to ballasts at the front of the bike. The connections to the battery are far too long for this arrangement so I cut them down to size. The fog lights come with wire connectors and relay but you have to make the whole thing yourself. I decided to mount the relay for this on the same bolt as the HID relay and have all the electronics under the seat. I also mounted a minature fuse box also from NN. The HIDS have a sense wire that can be connected to the high beam wire in the headlight (it’s the white wire) and this switches the HID relay with no bad effects on canbus etc. I also used the signal to toggle the fog lights with an electronic gizmo from Nippy Normans. A one second flash on the high beam toggles the state of the fog lights. An LED supplied with the kit tells you when to switch and whether the fog light is on fulfilling any legal requirements. I assembled all the electrics and tested them off the bike. Wiring loom is shown (without ballasts) below. Everything worked fine.
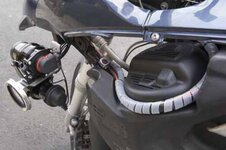
That’s when the problems began. Having built the loom I then had to get the main quite thick harness under the tank. The harness would not go under the tank on the left side of the bike. It would also not go under the plastic fairing panels. I had thoughts of having to abandon the project, however the harness does go under the tank on the right hand side if you take a bit of care. I did this all without taking the tank off. I do not have a driveway, let alone a garage, so taking the tank off was a step too far. The harness then crosses back to the left of the bike and around the fuel pump.
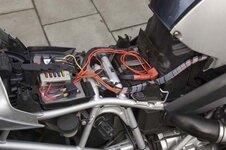
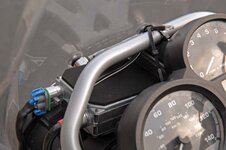
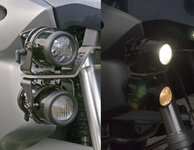
The ballasts are velcroed to the top of the instruments. This works better than expected and even provided a little vibration damping for the ballasts. There is no chance of them coming loose and they cannot be removed without removing the screen etc. The high voltage wires from the ballasts to the lights are very short. They just reach in the configuration shown. This arrangement allows removal of the tank and almost every other servicing that is common without having to mess with the lights wiring. The LED for the fog light switch is currently just cable tied to the instruments. I will have to find a more professional way of mounting it.
Once installed everything worked first time except one of the fog lights. I took an earth connection to the Migsel light bar and then just connected the fog light earth returns to the mounting brackets. This doesn’t work well because the brackets are painted and do not necessarily make good electrical contact with the bar. I added two extra earth leads to the fog lights and everything from then has been fine.
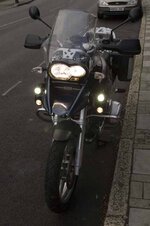
Performance of the HID lights is fantastic. All the pictures were taken at around 2pm on quite a bright day. The lights are so bright that pictures of them lit make it look like dusk. The HIDs come on immediately but take 3-4 seconds to reach full brightness. The bikes lights have PIAA bulbs which are much brighter than standard anyway, but they still look weak compared to the HIDs. The fog lights look particularly anaemic next to the HIDs. All the photos are taken from outside of the lights beam. Attempting to take photos from in front of the bike just gets you white dots on a black background.
I’m very happy with the result but don’t think this is an afternoons work. I had to cut out the mounting plate for the relays and soldered and heat shrunk sleeved all the joints. Threading the wiring around the bike is also time consuming. Mounting the light bar and the lights is actually the easiest part. If doing it again I might have just used a simple switch for the fog lights.
If anyone is planning a similar project I hope you find this useful. I tend not to post much here but I lurk quite a lot.
The micro DE HIDs come with a very well made wiring loom. Its complete and you can get the lights going just by plugging together the ballasts, lights, loom and a power supply. For this reason I decided to use as much of the loom as possible without modification. If the relays fuses etc are mounted under the seat the wires are about the right length to go to ballasts at the front of the bike. The connections to the battery are far too long for this arrangement so I cut them down to size. The fog lights come with wire connectors and relay but you have to make the whole thing yourself. I decided to mount the relay for this on the same bolt as the HID relay and have all the electronics under the seat. I also mounted a minature fuse box also from NN. The HIDS have a sense wire that can be connected to the high beam wire in the headlight (it’s the white wire) and this switches the HID relay with no bad effects on canbus etc. I also used the signal to toggle the fog lights with an electronic gizmo from Nippy Normans. A one second flash on the high beam toggles the state of the fog lights. An LED supplied with the kit tells you when to switch and whether the fog light is on fulfilling any legal requirements. I assembled all the electrics and tested them off the bike. Wiring loom is shown (without ballasts) below. Everything worked fine.
That’s when the problems began. Having built the loom I then had to get the main quite thick harness under the tank. The harness would not go under the tank on the left side of the bike. It would also not go under the plastic fairing panels. I had thoughts of having to abandon the project, however the harness does go under the tank on the right hand side if you take a bit of care. I did this all without taking the tank off. I do not have a driveway, let alone a garage, so taking the tank off was a step too far. The harness then crosses back to the left of the bike and around the fuel pump.
The ballasts are velcroed to the top of the instruments. This works better than expected and even provided a little vibration damping for the ballasts. There is no chance of them coming loose and they cannot be removed without removing the screen etc. The high voltage wires from the ballasts to the lights are very short. They just reach in the configuration shown. This arrangement allows removal of the tank and almost every other servicing that is common without having to mess with the lights wiring. The LED for the fog light switch is currently just cable tied to the instruments. I will have to find a more professional way of mounting it.
Once installed everything worked first time except one of the fog lights. I took an earth connection to the Migsel light bar and then just connected the fog light earth returns to the mounting brackets. This doesn’t work well because the brackets are painted and do not necessarily make good electrical contact with the bar. I added two extra earth leads to the fog lights and everything from then has been fine.
Performance of the HID lights is fantastic. All the pictures were taken at around 2pm on quite a bright day. The lights are so bright that pictures of them lit make it look like dusk. The HIDs come on immediately but take 3-4 seconds to reach full brightness. The bikes lights have PIAA bulbs which are much brighter than standard anyway, but they still look weak compared to the HIDs. The fog lights look particularly anaemic next to the HIDs. All the photos are taken from outside of the lights beam. Attempting to take photos from in front of the bike just gets you white dots on a black background.
I’m very happy with the result but don’t think this is an afternoons work. I had to cut out the mounting plate for the relays and soldered and heat shrunk sleeved all the joints. Threading the wiring around the bike is also time consuming. Mounting the light bar and the lights is actually the easiest part. If doing it again I might have just used a simple switch for the fog lights.
If anyone is planning a similar project I hope you find this useful. I tend not to post much here but I lurk quite a lot.