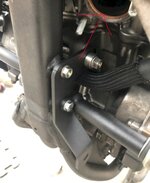
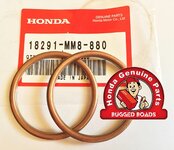
The exhaust gaskets are a copper ring as located and marked with an arrow in your picture. See below.
They'll be squashed tight onto the exhaust port and need to be carefully prised out, not damaging the alloy block housing. I wiggle mine out with a small pick, or flat head screwdriver (but be careful). If you do accidentally scratch the surface of the exhaust port, carefully smooth off any scratch burr with very fine grade wet and dry grit-paper (but don't go mad, it's supposed to be flat and even).
Once old gasket is removed you'll see how squashed flat they are, and they don't look anything like the new ones (which are round). The surface of the exhaust being bolted back on will have squashed them into a unique seal against the pipework. It's highly unlikely you'll get that exact position again, so it's best just replace them with new ones each time. £10 from Honda for the pair. job done

Wipe over the gasket housing making sure all the carbon deposits are cleaned away with a damp cloth.
Use some general purpose grease spread evenly on one side of the copper crush gasket (the edge that's smooth, not the side with the ridge on it). Then the grease will help stick the gasket in place while you refit the exhaust. The grease will then burn off the first time you take the bike out.
Torque up the Header Bolts evenly and progressively to 20nm for each bolt (which is not a lot) but enough to snug down the bolts and crush the exhaust gasket into its new unique seal position.
My concern would be using the same gaskets, you'll end up overtightening the bolts to get a seal which could cause damage to the bolt threads, or worsen the situation trying to remove them again in the future? or gambling getting another seal without leaking which is probably 9/10 going to fail.
£10.... do it right


 .. its the great dustbin on the side even though it sound great, i recon you could shave 15-20kg with a nice exhaust, wheels, li battery
  looking at this end can, SC Project Ti Headers and get my mate to do the Ti connector Pipe