CaJa Sahel : Tourenkoffer :

timeandtide said:
Ditto on the 1200. Metal mules keep calling but I'd rather hang on for yours!

You wont have to wait much longer.

Oh , and you,ll all be interested to hear i have upped the list of
options.

Still working on the Quick release.
I have a system , but cant seem to perfect it , it works , OK, but
with the Quick release they leak a Bit , which aint on !.
Beaverin away ,
 
the civil one said:
You wont have to wait much longer.

Oh , and you,ll all be interested to hear i have upped the list of
options.

QUOTE]


but he's keepin' it a secret till he unveils it at his NEC stand :)
 
Got my Caja's on order, should be getting em next week sometime..... Can't wait :D

Philip is a top bloke to deal with and makes your stuff just as you want it. I'll up some piccies when they arrive.

BTW how do you pronounce "Caja Sahel" and what does it mean ?? :confused: lol
 
maddave said:
BTW how do you pronounce "Caja Sahel" and what does it mean ?? :confused: lol


it's pronounced... " Civils panniers" no one i've meet has ever tried to say the other name :D which doesn't work well for publicity outside this forum :)
 
maddave said:
BTW how do you pronounce "Caja Sahel" and what does it mean ?? :confused: lol


Caja Sahel ?

Caja = Spanish for "box"

The Sahel, or Sahelian Zone is an area south of the Sahara Desert in North Africa

So obviously a box desgned to be used in the Sahel????? :confused:
 
A Review

I bought a set of Cajasahel boxes from The Civil One.

Making the decision took some effort as the options are many and varied. Some of the information I could have used in making that decision is missing or hard to find. In an effort to make the decision easier for anyone having the same problems as me, here’s a review of the Cajasahel panniers and a guide to fitting them. He had no idea I was going to do this, the idea came to me after I’d placed the order and before they arrived.

The Ordering Process
Oh ghod, I find this difficult at the best of times and there was too much choice – this is a personal problem, you may like it. I could have had almost anything I wanted from Civil and he is extremely accommodating when discussing requirements. Unfortunately I get to spend time in front of telephones and computers (without constant interruption) at odd times. As a result all my negotiations with Civil were carried out over a number of days via email and the discussions were broken and extended. I got almost everything I wanted though, but if you want anything other than the standard stuff I strongly recommend talking to the man on the phone.

Civil doesn’t accept credit cards.

What do you get
Well I got a ‘kin huge box.

40210718-M.jpg


Extremely well packed with stuff.

40210721-M.jpg


With more stuff inside the stuff (so too speak).

40210726-M.jpg


The stuff inside the stuff unpacks to give a reasonably interesting spread.

40210731-M.jpg


You get two boxes as well. Very solid, very nicely put together and a good coloured finished. Here’s a view of the inside of one of them (with odd bits of polystyrene packaging) showing the quality of the powder coating and the welds. Sorry for the dodgy picture - photographing the inside of a glossy black box in a dark room with flash takes a couple of tries.

40210736-M.jpg


Bits and Bobs
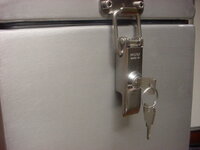
This is a clasp. It is mounted with a pair of M5 socket head bolts.

40210804-M.jpg


These are held in place with a standard nut and washer. There’s quite a length of thread left inside the box which I took advantage of by adding a Nyloc nut to each thread on the “belt and braces principle”. You need a total of 16 Nyloc nuts for this if you go the same way – Maplin sells them in packs of five. I also used a couple of threads on box and lid to add a retaining cable (see further down). I considered whacking the extra bit off with a Dremel but in the end decided there wasn’t much point.

40210714-M.jpg


Fitting and Associated Mucking Around
You may notice that while I got a lot of interesting bits and pieces a set of fitting instructions was conspicuous by their absence. In truth the setup is fairly self explanatory and there isn’t much that can go wrong (except for one thing I haven’t worked out and couldn’t be arsed to ring Civil about on a Sunday afternoon - see Problem 1 below).

The whole process took me three hours, start to finish. But then again I’m a pernickity cuss and stopped to take photographs and to listen to “Gardener’s Question Time”. I should point out that the latter activity is akin to “Pornography for Eunuchs” as gardening is anathema to me but there is always something bizarre on it to make me shout out “For f**** sake, what a stupid question to ask!”, and a five day weather forecast

The first step is shortening your indicators. The ways are many and varied – I went with Metal Mule on this.

40210800-M.jpg


Then lose the existing system case rails and the pillion footrests. No I don’t have the old rails for sale. One had a crack and the other I had to cut off and then welly off a bolt with mole grips. Bloody threadlock. The frames use two of the three mounting points for the system cases (the front point higher of the pair at the back) and the rear footpeg mount point. Here’s the nearside frame in place with the footpeg replaced. If you want to see the before, go take the bits off your own bike. I did photograph it before I fitted the frame but it was pointless. Follow Civil’s instruction to fit it loosely and tighten up once it is aligned and you will have no difficulties. The fit is bloody good anyway. I threadlocked all the bolts when I was happy and tightened ‘em up.

40210758-M.jpg


Problem 1. What to use to mount this and in which order?
Here is the set of bolts for mounting the nearside frame.

40210746-M.jpg


My final decision was:
Front, left to right - footpeg mount rear bolt, spacer for front footpeg mount, washer for forward system rail mount point, bolt for forward system rail mount point. Your mileage my vary. In the end I used some stainless socket head bolts of my own in these sizes and replaced a couple of these so I was happier. As I said, I’m a pernickity cuss.

Then stick on the exhaust extension. Still not sure about this. I’ll watch what it does to the running of the engine as I’m used to the idea that exhausts are, at least to an extent, “tuned” to scavenge properly from the cylinders. Whacking another foot on the end can’t be good for it.

40210764-M.jpg


These are by no means “quick release” boxes. They hold on with four M10 bolts and the holes are waterproofed by washers of some odd compound I didn’t recognize.

40210766-M.jpg


Effective though, three of them fix into threads pre-cut in the frame and the fourth, rearmost, bolt attaches the cross bar which runs between the two cases behind the number plate and is held in place with a Nyloc nut at each end . Again, I threadlocked them and stuck a nyloc nut onto the exposed ends of the forward three bolts. Each side is fixed similarly, I’ve shot pictures indiscriminately from both sides.

Problem 2 What happened to my flat lids?
I asked for flat lids. I didn’t get them. I asked Civil if I had the wrong set but apparently not. Just a cock-up. I actually decided I don’t mind the domed lids in the end. Here they are fitted.

40210782-M.jpg


You should note that they don’t touch the rest at the back of the pillion footrest. More space for the pillion.

Handmade boxes – each lid only fits one box, don’t try swapping them between boxes or rotating them front to back on the same side. In my experience they won’t go. For this reason I got me four lengths of nylon coated leader line, made some loops and bolted them onto them spare nuts in both case and lid. When a lid comes off it hangs down the side out of the way to make loading easier. I though of “hinging” it on these but fuggedaboutit. Too much fiddling with overhanging top boxes.

40210776-M.jpg


The Finished Article
Solid. I would copy Vern in his avatar and stand on these if I wasn’t (a) a fat bloke and (b) prone to vertigo.

From behind:

40210785-M.jpg


From the front with a Ford Fiesta behind mucking it up (terrible picture, concrete’s crap, drive's horrible, fence needs creosoting, etc)

40210791-M.jpg


Then a moment of inspiration – 2 wheel humvee’s Tank Stickers!

40210798-M.jpg


Even better – the reflective ones!

40210795-M.jpg


Created a whole new market there in two pictures!

In summary
Good cases, great build, recommended if you want that sort of thing. Civil isn’t a bad bloke to deal with either. Any questions? :thumb
 
Ian,

Great write up ! Good choice with the black finish, goes perfectly with the bike, (what about a matching top box ?) and pure genius with the GS stickers !!

Nice one :thumb

Andy
 
All Keyed up !

These are New.
I can now offer you a set of Locking Panniers.
One Key fits all. Incl Top Box.
All stainless.
And Can be Retro fitted.

These wee Gems cost
20 Notes each.
 

Attachments

  • KEY.jpg
    KEY.jpg
    60.2 KB · Views: 1,085
Me,Me,Me.....!!!! I'll e-mail you when I get back from France next week..... Crap timing tho' Philip.. I've just sorted out some rather natty, key coded, rubberised, weather proof padlocks... Ho hum.... :)
 
A really good write up :thumb

It makes the Panniers look a whole lot better than the pictures on Civils site does.

I like the way you did a step by step set of pictures and pointed out any of the problems with the install... none of which were that bad to be honest.

I like the curved lids... they may not be quite as practical as flat ones but they look a hell of a lot better and take away that bulky look they have with the flat lids fitted. Most stuff isn't flat that you would strap to the lids anyway.

The one bad thing i did see, but is easily changed is the length of the bolts and the lack of lock nuts on a product which will vibrate no one should have just plain stainless nuts :D

Note to Civil: Go out and buy the right size of bolts and Nylock nuts...and for the look of the thing i would get the dome head ones,every little bit of extra care in the product makes it look better. You also can get plastic covers that fit over the nuts....very cheap but would add to the overall finish of the thing.

Also fitting instructions... even though it seems easy a couple of printed sheets with fitting tips and the indicator problem (and the options to get round it) would be good.

Maybe a picture with the different lengths of bolts and washers sitting beside the places on the bracket where they go... simple and may save a lot of install time.

The exhaust extender.. I can't see it making much of a difference as long as it's inside diameter is greater than the end outlet on the can, not when a full AKRAPOVIC system can fit a GSXR600 and the 750 and i think the end can is the same on the 1000 too (thats K3 models before i get shot at..the K4 750 and 1000 are the same IIRC) :)
 
TUNED IN said:
Maybe a picture with the different lengths of bolts and washers sitting beside the places on the bracket where they go... simple and may save a lot of install time.

Bit of an update.

This weekend, time permitting, I'm going to go out and replace both bolts on the pillion footrest hanger and the two frame mounting bolts, with stainless socket heads from Namrick. I bought a couple of lengths as I want to see which works best. I'll post the size and length of each bolt that I end up using when I get it done. And pictures if I can get good ones.

I think that will solve the last remaining niggle that I have with the setup. Not happy with the way I fitted the mounting frames. I'm also going to experiment with dismounting the cases/frames/exhaust extension. I have a feeling that if I put a couple of blocks under the cases and disconnect the frames from the bike that a little bit of wiggling might let me simply push the bike out of the frame. Can I re-mount it as easily? Hmmm. Better quality bolts to fix the frames, and a few spares, will make me happier trying that.

I've had some positive comments from people who've seen the bike this week. I've been commuting in and out of London with the cases on on the basis of "If I can do that with them I can go most places..." Started off adding about five minutes to the journey because I was being extra careful but as I get used to the fact the rear is the same width as the front I think it is actually making me ride better and I'm starting to see no difference in travel times. Positioning and planning become much more important when you need to be sure of passing through a gap in a straight line. :P

I must say though that the "slightly further back than system cases" position seems to make it easier to get on and off without using the side stand. Note careful avoidance of "get your leg over" in that sentence.

I have noticed a bit of a change of weight distribution when I put it on the centre stand at home. There's a bit of an uphill slope where I park and getting a good grip to lift it onto the stand is a bit "interesting". Ordered a lifting handle from NippyNorman to see if it helps with this.

Other than that, found them excellent to use. Went shopping on the way home last night; beer, wine, dinner, cakes, general junk - two carrier bags worth. Dropped them both into one case and still had space for a lie down in it.
 
the civil one said:
These are New.
I can now offer you a set of Locking Panniers.
One Key fits all. Incl Top Box.
All stainless.
And Can be Retro fitted.

These wee Gems cost
20 Notes each.

like the locks ...but the retro fit bit???

i've seen you with more than one type of clasp..... would all the holes line up?

i wouldn't have thought so... worth checkin' first :thumb


Back
Top Bottom