Clips!!!

RedShanks

Registered user
Joined
Aug 10, 2010
Messages
106
Reaction score
0
Location
London, UK
Had the headlight, screen and instrument panel area of my 1200GS in pieces over the last couple of days, as part of the process of renewing a blown HID low beam (Thanks for all the help, Les!). I daresay next time I'll find it easier, but you have to do these things once before you know.

Anyway, in the course of removing the instrument panel, I lost one of those little push-on circlip jobbies. Anyone who's removed the instrument panel will know it's held in place by three posts, which go through the corresponding holes in the bracket, and are each secured by one of these clips. Well, one of them flew off, never to be recovered. So, I am just wondering whether anyone knows where to buy these clips. The two remaining ones will hold the instruments on OK, but I'd like to replace it sometime, just as a matter of form. Trouble is, in researching them I've found that, for as common and generic as they look, they're hard to find. There isn't even a concensus on what they're called... circlips, c-clips, retaining rings, washers, clamps. All these descriptions are used.

So... anyone know a) what they're called, and b) where to buy some?
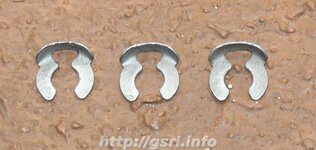
These are they...
 

Attachments

  • clips.jpg
    clips.jpg
    44.1 KB · Views: 306
order them from a bmw dealer?


i'm surprised you needed to remove all that stuff just to replace an HID burner :eek
 
Thanks, chaps. I'll go straight to the source. Good to know BMW sell anything for pennies.

Strictly speaking I probably didn't have to strip everything off. But not having done it before, and having bought the bike with the conversion already done, I was completely unfamiliar with it. So, with the luxury of time and daylight I decided to create maximum access room, so I could see what it was all about. That way I'll be more confident if I find myself having to do it in the dark by a Spanish roadside.

In fact I'm glad I went to the trouble. Mine was an extremely, err 'neat' job, with all wiring tucked behind plastic trim and tied down with cable ties. Neat, but ultra-fiddly.
 
PREACHING MODE ON :

Now go and take out the bulb without removing everything, and replace it again... use some LONG NOSED PLIERS to do the fiddley bit...

I also like to make sure I can do the little things before a trip on a new bike... and I do like to practice this at least twice a year, just incase...

PREACHING MODE OFF : :ronno


Are there any other thing like this you do as it's nice to see if anyone else is as Paranoid as myself...
 
MINOR HUFFY, ANTI-PREACHING MODE ON:

But it aint a bulb; it's an assembly of wires, cables, connectors, gromit and bulb (or burner, or whatevs...) all of which was neatly installed, run behind a section of trim and tethered down in several places with cables ties.

I'm not the most technically savvy of bike riders, but I can change a standard headlight bulb with eyes closed. But this was something entirely new to me. Apart from the 'bulb' itself, there are five - count 'em - different connectors involved.

I won't have to take the bike apart to do it again, but I'm glad I allowed time and space for the initial learning experience. And when I take a spare on tour, it will already be made up with a spare dust cap and the gromit and wiring already fed through it and in place, so I will just have to replace the entire assembly as a single piece.
 
In case of failure whilst on the road I just carry a spare H7 Halogen bulb and a new rear cap - I've got these in the small space under the tool tray. I think its that much easier to disconnect the burner and replace with a standard bulb rather than replace the burner.
 
In case of failure whilst on the road I just carry a spare H7 Halogen bulb and a new rear cap - I've got these in the small space under the tool tray. I think its that much easier to disconnect the burner and replace with a standard bulb rather than replace the burner.

that's what i do.
 
Disconnect the bur.... replace with a stan... damn, I'm going to have to take the front end of the bike apart again, now.

No, seriously, this sounds like something I need to know. So please indulge me: which connector goes to the burner; the male round one, the female round one, or the twin connector? And is disconnecting whichever is the correct one all I need to do to be able to use a standard H7?
 
I realise I didn't cover all possibilities, above. It might also be the two spade connectors inside the plastic light unit housing?
 
take the cap off. take out the burner and disconnect the 2 wires going to the original connector inside the headlamp shell.

put the H7 in and plug the connector onto the back of it. fit spare cap. tie the duff burner out of the way inside the bodywork somewhere.

proceed on journey.


BTW 30K+ miles on my HIDs now and they still work fine.

edit: now seen your latest post. it is the 2 spades you mention that need to be removed so that the original connector can be refitted as per stock.
 
I realise I didn't cover all possibilities, above. It might also be the two spade connectors inside the plastic light unit housing?

As Cookie has said these are the two to disconnect - they provide the power to the HID burner so by disconnecting these you also completely isolate the HID hardware. The connector you take these out of is the standard connector for the H7 bulb so its really quick and easy to do. The only problem I find is that the caps can be a pig to get off so I have put some silicon grease on these to make that part easier to.
 
And thanks, B'man. I think I'm getting the hang of this now. But when you start knowing as little as I do, you're likely to have lots of scales-falling-from-the-eyes moments.
 
When my low beam bulb went, I just swapped it over with the high beam bulb. No need to carry a spare.

This was pre-HID. I would still swap them over though...


Back
Top Bottom