Andy,
I replaced my clutch a couple of weeks ago when I rebuilt my gearbox. The standard clutch is 6mm thick when new, mine had gone down to 4.5mm (at 30K) so i figured at that wear rate it would need a new one at 40k so I may as well replace it while I had the chance.
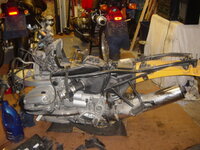
The worst part of the excercise was pulling the gearbox away from the engine. The battery tray sits on two rubber mounts, bolted to the top of the gearbox, there is an earth wire that loops round one of the rubber mounts and gets snagged when you pull the gearbox backwards this pushes the gearbox down and bends the clutch pushrod...don't ask how I know DOH!
It's best to try and remove the pushrod if you can because it's a bugger having to buy a new one.
Once you get the gearbox out of the way make sure you mark the clutch components with a felt pen or similar so that it can all be put back in the original positions. There are six cap head screws and star washers that need to be removed to remove the clutch. the bolts are stretch bolts and will need replacing. The bolts are BMW part number MC21.21.1.454.417 and the star washers are MC21.1.242.377 (total cost for 6 of each inc VAT £4.86) - Part numbers are for the 1100 bolts and washers it may be worth checking to see if the 1150 is different.
Putting it all back together is quite easy. I nipped the new friction plate up by finger tightening the bolts and then measured the centre boss so that it was pretty much centred then offered the gearbox up, again the earth wire is a pain so it helps to have somebody helping, once everything is in place I torqued the gearbox down and then took out the spark plugs and rotated the engine using a lever on the ringgear, from the starter motor mounting point, then torqued the clutch bolts down in stages to the correct setting.
If you haven't had the pleasure of removing the swinging arm and final drive pivots before - They are held in place with Loctite 2701 that sticks like buggery. If you heat it to 200°C, with a heat gun, it turns liquid and comes apart easily. When you get these pivot bearings out check the surface for wear. it seems quite common for them to have bad ridges in them, if they have then you need to replace them.
You wil need a torque wrench that goes to 160 ft/lb and perhaps another that goes down to 7ft/lb for the pivots bearings, a heat gun and a decent set of socket mounted allen keys (I got a great set from Halfords, with a lifetime guarentee for £16 ish) and also a long handled wrench to give them some welly.
Good Luck and watch that earth wire.
Rob