

You are using an out of date browser. It may not display this or other websites correctly.
You should upgrade or use an alternative browser.
You should upgrade or use an alternative browser.
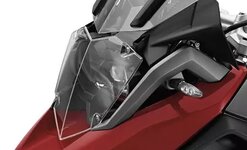
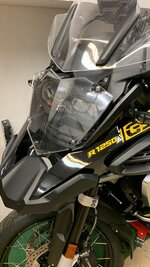
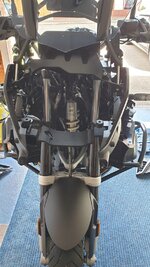
Fitting headlight protector
- Thread starter Smartbazza
- Start date


Installation Manual .pdf link (R1200GS) embedded within this link;
https://www.bmw-motorrad-bohling.co...einwerferschutz.html?LGWCODE=56404;86692;4971
https://www.bmw-motorrad-bohling.co...einwerferschutz.html?LGWCODE=56404;86692;4971
yorkshire whippet
Registered user
https://youtu.be/_Zk5wXwiWug
Not too conclusive but a good visual indicator to use alongside the manual posted by Alex. I'd remove front beak and side panels which I dont think this video shows from memory.
Not too conclusive but a good visual indicator to use alongside the manual posted by Alex. I'd remove front beak and side panels which I dont think this video shows from memory.
Fitted one of these on my last GS
Removed beak and plastic screen fairing
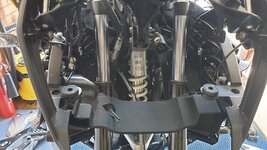
The 2 pins in the bottom of the headlight are plastic and could easily be snapped off if not careful
The retaining clips (circlips) for the headlight pins as per the BMW instructions are fiddly to get back on as a bit of compression is need to get the pins through enough to show the groove
3 hands were needed, someone to gently push the headlamp down to get the clips on
This shows a bit more but is in Italian
https://www.youtube.com/watch?v=EQeCr3ygT94
Left it on the bike when I sold it and went for an Alt Rider clear polycarbonate one with the same type of ball socket pins
https://www.youtube.com/watch?v=KlWZ6iD0u7Y
Removed beak and plastic screen fairing
The 2 pins in the bottom of the headlight are plastic and could easily be snapped off if not careful
The retaining clips (circlips) for the headlight pins as per the BMW instructions are fiddly to get back on as a bit of compression is need to get the pins through enough to show the groove
3 hands were needed, someone to gently push the headlamp down to get the clips on
This shows a bit more but is in Italian
https://www.youtube.com/watch?v=EQeCr3ygT94
Left it on the bike when I sold it and went for an Alt Rider clear polycarbonate one with the same type of ball socket pins
https://www.youtube.com/watch?v=KlWZ6iD0u7Y
thanks all, i will give it a go and report back on what i break in the process.
Barry
Barry
J-Wagon
Registered user
Thanks for that info HGS, invaluable. I'd purchased same guard, and that video link is incredibly helpful. I'm not sure that you have to remove the tank panel and bits etc, though. You can see those circlips from underneath, I'm not entirely sure the beak needs to come off either, but I'm happy to be corrected! I can understand now why it wasn't supplied with instructions! 
J-Wagon
Registered user
How did it go, Smartbazza?
In all honesty - it was a balls. Wish I’d never started it but glad when I had finished it. You do need to strip the tank sides and beak plus I needed the mrs to help when I was refitting the circlips under the headlight…just take yer time..
Barry
Barry
J-Wagon
Registered user
I was afraid you might say that! Yes, seems you need a third hand to compress the light fitting bushings down to get the circlips on. I shall set aside an afternoon when this cold weather's gone through (working outside). Cheers 
J-Wagon
Registered user
Dread to think what a dealer would charge to install?!
J-Wagon
Registered user
Ooh looks good though. I thought this one might help with the aero a bit, instead of the usual blunt guards.
Ooh looks good though. I thought this one might help with the aero a bit, instead of the usual blunt guards.
It helps reducing the draught up between the forks
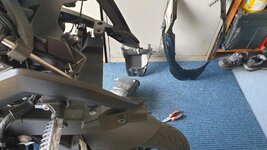
Was a bit daunting to fit as the BMW instructions were piss poor
Benefit of getting the front off was it got a good cleaning. Didn't take the tank panels off but did take the side radiator panels off
Having done it once, I would be fine doing one again
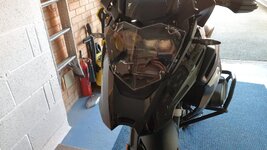
Did its job, easy to clean but decided on a different guard for the next bike
Attachments
J-Wagon
Registered user
Great pics HGS, very useful. That vid link you posted was good for the orientation of the lower arms and which way up the rubber bungs go. At least BMW sent you SOME instructions, when direct from China you're on your Jack Jones
They didn't include them got them off their website
https://www.bmw-motorrad.co.uk/en/service/manuals/install-manual0.html
not always in all the R 1200/1250 models but hopefully this link will work
https://manuals.bmw-motorrad.com/manuals/WEBA/IN/BA-INTERNET-COM/PDF/77015A3BBE6_Scheinwerferschutz_0M01_01_202011.pdf
I think if you choose the latest R1250GS (OM04) from the drop down, it has the most comprehensive list. But, I haven't checked them all
J-Wagon
Registered user
Super helpful links HGS, many thanks
yorkshire whippet
Registered user
Yes they are a bit of a faff but the most difficult bit is definitely getting the circlips back on trying to compress the rubber enough to show the groove. The circlips themselves haven't got too much tension in them. Do it in stages, strip the bodywork, cup of coffee sit down recover, unscrew side bolts of headlamp taking special care not to lose the washers and fit the lower brackets on the headlight / fight with circlips and refit headlight bolts, cup of coffee sit down recover, fit the upper brackets and guard itself, cup of coffee marvel at your handywork and announce your mechanical prowess to interested motogp teams or maybe the wife, refit panels wash any finger marks off and have a beer. They do look well.
J-Wagon
Registered user
I found using some DIY clamps helped me through this part. Compressed and held things in place whilst I pushed the clips back inYes they are a bit of a faff but the most difficult bit is definitely getting the circlips back on trying to compress the rubber enough to show the groove. The circlips themselves haven't got too much tension in them. Do it in stages, strip the bodywork, cup of coffee sit down recover, unscrew side bolts of headlamp taking special care not to lose the washers and fit the lower brackets on the headlight / fight with circlips and refit headlight bolts, cup of coffee sit down recover, fit the upper brackets and guard itself, cup of coffee marvel at your handywork and announce your mechanical prowess to interested motogp teams or maybe the wife, refit panels wash any finger marks off and have a beer. They do look well.
Thanks made fitting a lot simpler as didn’t realise I could remove one of the panels to get to the headlight clipsThey didn't include them got them off their website
https://www.bmw-motorrad.co.uk/en/service/manuals/install-manual0.html
not always in all the R 1200/1250 models but hopefully this link will work
https://manuals.bmw-motorrad.com/ma...5A3BBE6_Scheinwerferschutz_0M01_01_202011.pdf
I think if you choose the latest R1250GS (OM04) from the drop down, it has the most comprehensive list. But, I haven't checked them all

Similar threads
- Replies
- 1
- Views
- 79
- Replies
- 1
- Views
- 75
- Replies
- 6
- Views
- 435