Front cover corrosion pics

Has anyone tried using an Anti-Stonechip Primer (e.g. Schultz)??:nenau

Mines done 61k miles now and the engine front panel is getting a bit ropey.

Was thinkin of trying schultz to negate the stone chip creeping corrosion thing!
 
I removed my front cover and sent for powder coating.
Taking this route meant changing the alternator belt (due anyway) and I replaced the crank bearing & seal as good practice.
I binned the foam, but cant notice any noise difference anyway.
I also had the exhaust polished so that looks new too!
 
I would suggest fitting a fender extender, check for chips and clean and touch up as soon as spotted and occassionally remove the plastic cover for acheck also.
.

I fitted a fender extender and a further extension using a bit of rubber mat when I picked up my 07 bike. Liberal applications of WD40/ACF50 and jobs done. No problems with corrosion, even on Scottish salt covered roads.
 

Attachments

  • IMGP0847.jpg
    IMGP0847.jpg
    97 KB · Views: 2,838
This is how Oilhead GS front covers used to be:rob:augie

10 years old, 43,000 miles - no ACF50 (wasn't invented to be used on bikes back then), no fender extender or mudflap for extra protection to the front of the engine and probably used in all weathers, judging by the rusty BMW OE fasteners

10 years ago BMW used crap fasteners then as now though:augie .....however you can sort these for less than a fiver with some stainless

No need for a repaint on this 43,000 mile 11GS:augie

FrontCover1.jpg


FrontCover4.jpg


FrontCover3.jpg
 
Easyrider, thanks for the inspiration. :thumb2

I finally did something about mine.

4Lifted.jpg


15compare.jpg


19tasty.jpg

Great Job done "the beer hunter". Did you remove the cover or treat it en sit u? I have striped down to the alloy cover but not sure about removing it. Removing that little black square cover reveals what looks like a bearing in behind. Does that fall out if the alloy timing cover is removed?
I have an 05 that is badly corroded and spreading fast. Cannot believe that BMW have done such a bad job in this area.
Any input would be greatly appreciated.

You will have to remove the crankshaft pulley that drives the alternater belt (not easy with out tool to hold it while you undo the large nut)the cover should then pull forward with both bearings still in the cover (crankshaft and timing gear) provided you've undone all the bolts around the cover! you will need to replace the oil seal infront of the timing cover bearing before reassembly to be on the safe side.
 
2 1/2 years and two winters riding later & the jobs still a goodun, there are some minor stone chips which can be sorted with a bit of the original paint sprayed in the lid & a small modeling brush, I think it's stood the test of time and is a real alternative to stripping the cover off & powder coating.

Mark


.
.
.
.
.
 

Attachments

  • front cover.jpg
    front cover.jpg
    82 KB · Views: 2,352
Hi, just to add my bit for what its worth. Same problem, same solution, and thanks to you guys for all the technical info and motivation to get it done. I didn't want to take off the cover for same reasons: don't have the tool and didn't feel like wrestling with it since my workshop isn't that well equipped. At one stage i did consider it seriously since I do think the only way to get it done properly is get it powdercoated or just replace it with a refurbished part. But because its only a cosmetic problem i wasn't really that phazed. I can always still replace the damn thing. What worries me more is the other spots i discovered on the engine paint itself that looks to go the same way. Shame they couldn't do better.

Anyway, my job could have been better too and i'm not sure how long its going to last but for now i'm not losing any sleep over it anymore.
 

Attachments

  • Stirndeckel.jpg
    Stirndeckel.jpg
    112.5 KB · Views: 2,327
Stainless into alloy you need alumslip

I believe above is wrong, but I'm going only by my own experience. I'm no metallurgist, but I believe aluminium paste would improve electrical contact between the metals and may well aggravate the problem.

Copper works because its index is on the low side of stainless. When sandwiched between aluminium and stainless it effectively cancels out the battery (galvanic) effect. Nickel would be better and available for high temperature anti seize pastes.

http://www.inoxbolt.co.uk/zen/index.php?main_page=page&id=2
They also say that stainless is fine for disc and caliper mounts because it's stronger then the base aluminium metal. No need for quick corrode high tensile fasteners.

Anodic index -
Nickel, solid or plated, titanium, Monel -0.30
Copper, low brasses or bronzes; silver solder; German silvery high copper-nickel alloys; nickel-chromium alloys -0.35
18% chromium type corrosion-resistant steels -0.50
Aluminum, cast alloys other than silicon type, cadmium, plated and chromate -0.95
Graphite -1.0​

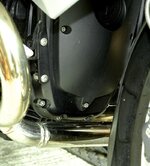
My bike had a dry stainless bolt on the side carrier clamps. Trying to move it made zero attempt to turn and simply sheared off. The other side was galvanised steel which came out but looked ropey. Both were replaced with stainless and a good quality copper/graphite grease. There has been no sign of corrosion since then. I believe the copper and graphite being above and below the indices of stainless and aluminium just short the "battery".

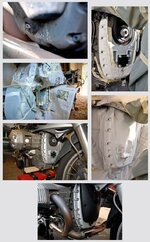
My front cover was a mess under the paint. The very worst was under the alternator belt cover where the steel bottom screw had reacted and corrosion spread under the paint. Other exposed (ferrous) screws had also reacted with the aluminium. Belt cover fretting away at the paint hadn't helped. I filed off the thin flange so the cover only touches under its screws.

The refinished cover was fitted with stainless screws with copper washers and coated with end to end with copper/graphite paste. A year later living near the sea, there are no signs of any corrosion.

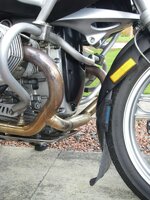
These were my crash bar bolts - plated ferrous bolts into stainless steel, fitted dry by BMW showing how important it is to get paste all the way up. I replaced with stainless and the usual anti seize paste. No galling thankfully.

IMAG0855_zpsf308ba15.jpg
 
Are we not all ignoring the fact that these engine cases are not aluminum in the true sense, they are almost certainly a Magnesium aluminum alloy.
This is a game changer regarding the way you prevent corrosion or galvanic reactions.
Il ask our metallurgist monday when I see him.
 
There is no indication the front cover has any magnesium.

Wikipedia shows the following
Aluminum, wrought alloys other than 2000 series aluminum, cast alloys of the silicon type −0.90
Aluminum, cast alloys other than silicon type, cadmium, plated and chromate −0.95​

Pure magnesium is even further negative but it's still the right side of copper compared to stainless so copper paste grease will interrupt the battery effect. Pure Mg would be better served with Al paste but Cu will do.

PS I was wrong about carbon it's at the zero end of the scale below copper. If used on it's own between Al and SS the corrosion would be worse - better conductivity. But with copper between SS and Al the corrosion gets cancelled.


Back
Top Bottom