Emoto
Registered user
Similar to the earlier generation R1200GS, the 2013 GS-W has a long filler neck that reaches several inches down into the tank. This long filler neck impedes the rider's ability to quickly fill the tank all the way to the top. Unlike in the earlier generation, the new one is not a soft rubber piece that can be removed with needlenose pliers. I am sure that this long filler neck serves some valid purpose, perhaps even safety-related. For that reason, I do not advocate these modifications and present them for entertainment only. If you do these mods, I accept no responsibility for the consequences. 
The upside of making these mods are that it is easier to fill the gas tank all the way up, which may extend your range somewhat.
So...
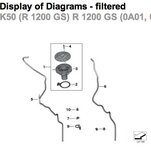
Remove the 6 bolts from around the fuel filler. I also found it easiest to remove the tank center panel. You can't see them in this picture, but there are a couple of hoses attached under the filler assembly. When you pull up on the filler assembly, those hoses need to move, and I think the tank panel blocks them a little, making it more difficult with the center panel in place.

It will take a little careful wiggling, but eventually the assembly will pull out. It will not require a lot of force, so exercise caution.

Grasp the lower filler neck, twist a bit and pull down to separate. Note that when you reassemble, the rubber gasket must be positioned so one of the mounting bolts can pass through a hole molded into it.

One good way to keep them lined up is to slip the bolt through beforehand.

If you want to make the second mod and drill an air relief hole in the part of the filler neck that is not removed, do it before reassembling.
I recommend using something like a spring-loaded center punch to dimple the plastic in order to provide your drill bit a good start without skating all over when you apply force. About a half inch down, or roughly the same height as the notch tab has been suggested.

Easy enough to drill a small hole after dimpling. I used a 3/16" bit. Having a shop towel spread out over the tank helps to prevent any debris from falling into the tank. Be sure to clear out the inside of the neck of any lingering drilling debris.

Then, just bolt it all back to the tank and re-affix the center panel. Remember, those bolts that hold the gas cap and filler neck assembly do not need a lot of torque; be gentle with them.
The upside of making these mods are that it is easier to fill the gas tank all the way up, which may extend your range somewhat.
So...
Remove the 6 bolts from around the fuel filler. I also found it easiest to remove the tank center panel. You can't see them in this picture, but there are a couple of hoses attached under the filler assembly. When you pull up on the filler assembly, those hoses need to move, and I think the tank panel blocks them a little, making it more difficult with the center panel in place.
It will take a little careful wiggling, but eventually the assembly will pull out. It will not require a lot of force, so exercise caution.
Grasp the lower filler neck, twist a bit and pull down to separate. Note that when you reassemble, the rubber gasket must be positioned so one of the mounting bolts can pass through a hole molded into it.
One good way to keep them lined up is to slip the bolt through beforehand.
If you want to make the second mod and drill an air relief hole in the part of the filler neck that is not removed, do it before reassembling.
I recommend using something like a spring-loaded center punch to dimple the plastic in order to provide your drill bit a good start without skating all over when you apply force. About a half inch down, or roughly the same height as the notch tab has been suggested.
Easy enough to drill a small hole after dimpling. I used a 3/16" bit. Having a shop towel spread out over the tank helps to prevent any debris from falling into the tank. Be sure to clear out the inside of the neck of any lingering drilling debris.
Then, just bolt it all back to the tank and re-affix the center panel. Remember, those bolts that hold the gas cap and filler neck assembly do not need a lot of torque; be gentle with them.


")