help. Fitting Vario screen on 1100GS

gazuk

Active member
UKGSer Subscriber
Joined
Sep 12, 2007
Messages
226
Reaction score
2
Location
Horsham West Sussex
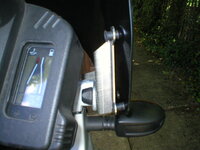
Pretty simple instructions:

1.Fit metal brackets to GS
2.Fit rubber nuts (top hat like) on the inside and insert screws from the outside of the lower part of the vario screen
3. Attach lower part of screen to metal brackets by slightly expanding the screen and pushing the rubber nuts into the holes in the metal brackets.
4. Tighten screws into rubber nuts

Not word for word but thats my interpretation.
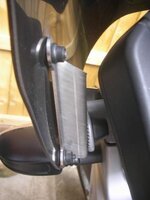
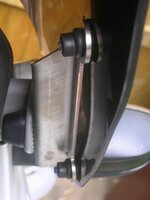
But, it don't look right :confused: The screen is basically just resting on the metal brackets. The Rubber nuts (top hot things) can just pop out of the holes in the metal bracket, which looks like it could happen under wind resistance, or easily by an oppertunist thief
 

Attachments

  • P1010031.JPG
    P1010031.JPG
    106.9 KB · Views: 158
  • P1010032.JPG
    P1010032.JPG
    112.5 KB · Views: 142
Hi Gazuk,
Hmm, interesting; didn't realise you could get a vario for an 1100; might have to think about that one.

As for the fitting; the 'top-hat' things as you call them, if they're what I'm thinking of, I've used them before, to fit a screen to a Polaris fairing on my old CX500. If they are the same things, then they work by expanding in the hole as you tighten the screw; tightening pulls the nut inside the top hat towards the screw, but it can't go anywhere, and pushes the rubber out, sort of 'flairs' it. This means the rubber grips very tightly, either within, or preferably just outside the inside of the hole, if that makes sense.

If they are the same things, you shouldn't have any problems; did 40k+ with that set up on the CX, no probs.

Cheers,

Dave.

Just had a bit more thought on this. If they are the same things, then going from your pic, you've got the top hat things fitted wrong, if I'm remembering right. From what I recall, you push the top hats in to the bracket from the outside; they lip stops them going all the way in. Fit the screen and tighten the screws, and the 'top hat' expands inside the hole in the bracket. The lip also forms a bit of a cushion between the plastic screen and the metal bracket. They do grip very tight; no theif could just whip the screen off.

D.

P.S. Sorry for the sh1t spelling, but it is Sunday morning....just...
 
Yup mines the same, the top hat things actually locate the screen fine, it just looks floppy, I have thought about making some rubber spacers out of some pipe but the thing actually works better than it looks.
Stewart
 
Thanks DM, I'll try and tighten them a little more.

BTW, JAWS on this site sells them and I think he may have a few left, but he said he's not ordering any more in just yet, so get in quick.
 
Thanks DM, I'll try and tighten them a little more.

BTW, JAWS on this site sells them and I think he may have a few left, but he said he's not ordering any more in just yet, so get in quick.

Ref the top hats, see the bit I added; should get rid of the floppyness.

Ta for the info re Jaws; I'll give him a shout, but I'm thinking more winter project to go with my new plastics and tank, when I can get them.

Dave.
 
I did think at one point that the rubber top hat nuts might expand to get a snug fit in the holes, they dont, you risk cracking the screen if you overtighen, perhaps a dab of loctite.
Stewart
 
I did think at one point that the rubber top hat nuts might expand to get a snug fit in the holes, they dont, you risk cracking the screen if you overtighen, perhaps a dab of loctite.
Stewart
Hi Stewart,

Hope I'm making sense; it is Sunday morning, following a bottle of Grenache Shiraz at 3 am, and I'm trying to remember back about fifteen years to the 'fun' I had figuring out just how these things worked on the CX.

Basically top hat goes in to the bracket from the outside. Going off the thickness of the bracket, this should put the internal nut comfortably on the otherside (inside) of the hole. Screen then goes on, sitting on the 'brim' of the top hat, and screw follows.

Yes, beware of over tightening, cracked the Polaris screen doing that. But they shouldn't need it when you get it right. Have a play about. By the way, if you lose/destroy any of the top hats, you can get them from Halfrauds.

If I'm not making sense, or getting boring/repetitive, tell me and I'll get my coat...:D

Dave.
 
I fail to understand what the problem is... I have a VARIO fitted to my 1100 and its tight... wont move. Been on now for about 6 months... and is fantastic.

no need for loctite... or similar nonsense.

this is what the top hats should look like - when fitted as per the instructions. (I've taken it off a couple of times too and refitted for a proper clean - still with no problems)
 

Attachments

  • top hats.jpg
    top hats.jpg
    18.2 KB · Views: 143
Do halfrauds have anything like the plastic M5 nuts that hold the top part of the screen on? I have been adjusting the top part up and down looking for the sweet spot and just noticed one of the nut/washer combo is gone, found a nut/washer and a slice of fuel hose for now.
Stewart
 
Heres a better picture..

As you can see... as you tighten the nut - the top hat collapses and spreads - this is what holds the screen to the bracket.. you tighten it slowly and progressively and watch the top hat collapse - once its firm enough - you're done.

easy peasy.

BTW - I can kinda understand your nervousness about cracking the screen - but there really is no danger of that - the top hat is much softer than the screen is and will spread quite nicely.. it doesn't take much to give a nice firm fit. (as I said above I have removed and refitted the screen a couple of times and had no problems)


GAZZ - Just looked at your picture again - YOU HAVE THE TOP HATS FITTED THE WRONG WAY ROUND!!!!!!!!! ----- The 'BRIM' goes between the screen and the metal bracket!!!!

NO WONDER you're having problems.
 

Attachments

  • top hats closer.jpg
    top hats closer.jpg
    16.1 KB · Views: 277
'A picture paints a thousand words'... Good pics Tony, much better than my feeble mutterings!:D:D Still, nice to know I was remembering right after fifteen years, and said bottle of Grenache Shiraz..:augie

Dave.
 
Well you learn something new every day! I have just been out to the garage and correctly fitted the screen, thanks for the pictures Tony:thumb
Stewart
 
:beerjug: :thumb


I have to say that a Vario is just about the best way to improve the quality of the ride on an 1100.


And I recommend everyone to go to JAWS... he sells these at an unbeatable price.. including postage £20 or so - less than the price of the screen alone from the 'usual suspects'.
 
Tony, DM,

Thanks for your help. Just refitted as per your instructions and is now nice and secure :blast

Stewart,

Thank for letting me know I'm not the only one to get it wrong:P


How did we cope before forums :nenau
 
Gazuk; No probs!:thumb2

Tony;
And I recommend everyone to go to JAWS... he sells these at an unbeatable price.. including postage £20 or so - less than the price of the screen alone from the 'usual suspects'.

Bloody hell, at that price I'll have to check the finances; might get one next week!
Cheers,

Dave.
 
Gazuk; No probs!:thumb2

Tony;


Bloody hell, at that price I'll have to check the finances; might get one next week!
Cheers,

Dave.


His prices may have changed in the meantime.. but when I got mine. I paid a little more to send the money quickly by paypal. in the end it came to £104 all in. I paid on the Friday and the screen arrived on the following monday.

The usual suspects sell the screen for approx £114 PLUS postage.
 
Fitting vario

Hi

Looking at the picture i believe that you have the screws for the outer screen the adjustable one the wrong way round, the adjuster screws should be on the outside.

Regards
 
DR,

Just checked the instructions and it definately shows the adjusting screw for the top screen going in from the outside to the inside with the big hand tightening nut on the inside, which is what it shows in my picture.
 
DR,

Just checked the instructions and it definately shows the adjusting screw for the top screen going in from the outside to the inside with the big hand tightening nut on the inside, which is what it shows in my picture.


you're right... 'dizzy' is living up to his name.


Back
Top Bottom