HID lamps £99.00 for 1150

Boxertools said:
Twot,
If you get the kits or kit, I'll help you do it.
Ray S also is about to fit some, so we could have a East Anglia group hid fitting here if you want.

Mike.

That sounds great Mike, thanks for the offer. :thumb
 
Hi all

How do you get by when touring in europe, when you should carry a spare bulb to be legal?? How much are spare bulbs?

Regards Shep
 
Shep said:
Hi all

How do you get by when touring in europe, when you should carry a spare bulb to be legal?? How much are spare bulbs?

Regards Shep

a spare buld is approx £40

but i believe they are very different as they are not the same type of filiment as in halogen bulbs, the way it was explained to me was that it was more like a spark plug in a glass envelope

Is it a legal requirement ?, it makes good sense , but not sure how many car drivers are aware of this

Imagine going into a mercedes garage and buying one as a spare , poss cost you a couple of hundred

:beer:
 
Reference spare bulbs for HID mod, why not just carry the standard bulb. When you fit the hid units from HIDSforU, the power lead plugs in to the normal bulb fitting so you should be able to swap out the xenon "bulb" unit for the halogen one. remove the two power leads from the cap and push the cap back on to the halogen bulb. I have the X5-H1 double kit (still waiting to be fitted) for which I am manufacturing a plate to carry the ballasts under the beak.
 
HID bulbs are gas filled, no filament.

Install bulb in as normal, there's a couple of additional wires that connect the bulb to the ballast box. The lighting current is bumped up to 23,000v by the ballast box which then arcs the gas inside the bulb.

No electrical surgery to the bike's loom required. You should be able to install a regular bulb very easily by the roadside in case the HID bulb is damaged.
 
pomm001 said:
Les


all leads, and a HID bulb, the kit you need will be for a H1
the HID bulb,allegedly fits into the same fitting as the standard, but it is approx 5 mm longer at the back ,so some modification needed there, a few folks on the board have already done the conversion.

No it didn't need any changes.

The HID lamp fitted straight in to the original H1 fitting.

The only reason that you need to drill a hole in the black plastic cover at the rear of the lamp housing is to route the power cables.
 
Tony T said:
Reference spare bulbs for HID mod, why not just carry the standard bulb. When you fit the hid units from HIDSforU, the power lead plugs in to the normal bulb fitting so you should be able to swap out the xenon "bulb" unit for the halogen one. remove the two power leads from the cap and push the cap back on to the halogen bulb.

Spot on.
Mike.
 
got my kit today,doesnt look too complicated!
look forward to the report and pics when you have fitted yours


:beer:
 
Sorry if its been covered - but are the kits being installed on 1100, 1150 or 1200? I'd love to upgrade my 1200 but don't have the technical savvy to be a trailblazer. I'm more of a nervous follower!
 
I hope to get my arse in to gear very soon & order three lights for dip beam on three 1150's.

Not sure about 1200's because of the Canbus???????
 
Steve Pickford said:
I hope to get my arse in to gear very soon & order three lights for dip beam on three 1150's.

Not sure about 1200's because of the Canbus???????
Well then, lay off the canbus for a while. ;)
 
HID fitted

Finally got round to fit my HID kit
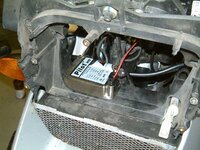
I decided to mount the ballast under the main beam lamp on the plastic shelf, it just goes in and clears all steering and speedo cable etc, only Just! The kit I used was the Pilot, which I believe the ballast is slightly smaller that some other ( hid 1)

To fit it in place securely I took off the screen, and the deflector, which is underneath it, remove the headlamp bezel type cover from the front. pop out the adjuster ball from its socket on the bottom right hand corner
( as you look at the bike ) and remove the complete lamp unit.
I also took out the allen screw from the centre of the upper instrument panel, and pull the cover off taking care not to snap the push fit locators on each side of the instrument panel.
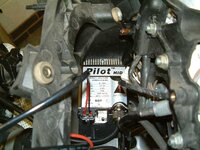
Now I could hold the unit in place with a self-tapper through the plastic frame ( hid6)
It fits but only just , still poss to remove bulb and does not foul adjustment( hid 2) so be careful when you locate it.
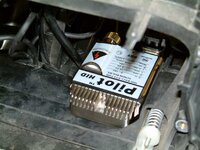
There is a possible option to mount it on the other side too (hid3)
Mounting the bulb is straight forward, one tip ! to retain the standard end cap and wiring if you want to remove and convert back to standard, is you will have to replace the earth tag connector on the end cap as it small spade connector and will not plug into the wires of the ballast feed, but the bigger spade will still function OK on the original earth tag in the lamp.
It also a good idea to put some tape on these connections so they don’t touch anything when the end cap is re fitted.
Put it all back together, and hey presto.
The difference is amazing, with the hid dip light on , flick to main beam, in comparison its now a very yellow fuzzy light.
Out in the dark its fantastic, but does show up the piss poor V pattern in the dip lens.
The other problem is that the main beam is now pathetic , so if you can save the hassle and fit both at the same time, my method may become cluttered and untidy if using two units, any other folks have pic or suggestions
 

Attachments

  • hid1.jpg
    hid1.jpg
    63.6 KB · Views: 158
  • hid6.jpg
    hid6.jpg
    49.9 KB · Views: 134
  • hid3.JPG
    hid3.JPG
    48.5 KB · Views: 127
  • hid2.jpg
    hid2.jpg
    47.9 KB · Views: 140
Centralise the V pattern, don't have it set to dip to the left. :tosser Big difference, even on the pleb. non HID :bow std. type.

Who's going to submit the before & after pics then? :thumb
 
ELIMINATOR said:
Centralise the V pattern, don't have it set to dip to the left. :tosser Big difference, even on the pleb. non HID :bow std. type.

Who's going to submit the before & after pics then? :thumb

I did have a look at that, i saw the two allen screws locking the bezel but would only rotate a 'nats' before it hit came up to a plastic peg.
Does it need to go further than that? how have you set yours ?when i tried moving mine i must have been too close to the wall to notice the pattern difference.
With the hid the pattern is more noticeable as the light is very bright and blue white, and makes the masked area very black in comparison, if that makes sense ?

There are no before and after pics,tried it but camera gave poor results

:beer:
 
HIDS4U

Just bought a Pilot H7 kit from them. Hasn't arrived yet, but will let you all know what its like.

CM
 
I don't quite get how you are up to the plastic stop. I have only one cap head to loosen, also found that the light unit needs to be wiggled back slightly to allow rotation. But my dipped beam definitely throws a shallow "V" light pattern, wheras before it was a central horizontal bit, with a 45 degree section wasted to the left. Used to light up the nearside motorway road signs when I was in the outside lane.
 
Any one here have experience of fitting these units to the 1200gs? Not so much the location of the ballast, but conection to the can bus system :o
 
Bit o'caution

Just thought it worth mentioning that if you fit an HID in replacement of your dipped beam I am led to believe your bike will be illegal. HID's require self levelling suspension and headlight washing/wiping facility (not your hand and a grubby glove).

Fitment as a main beam or spots don't suffer the same penalty.

Unlikely to be pulled up by a less than tyrannical MOT tester, but could tip the balance if in conjuntion with a dark visor/noisy zorst/small plate or if you total your bike during hours of darkness and Mr insurance assessor gets a bit curious...

LC


Back
Top Bottom