I broke my headlamp

chipsonfriday

Registered user
Joined
Apr 6, 2009
Messages
336
Reaction score
0
Location
Weston super Mare
ARRGGHHHH!!!

Fitted a new bulb in my headlamp unit this afternoon... (1200GS)

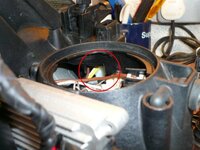
Pushed the bulb just a little too firmly into its location when there was a distinct click :eek and the inner parts of the headlamp (reflecter bit) became loose. I managed to pop it back into place - or so I thought.

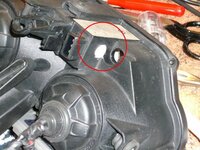
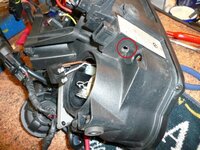
The beam pattern is now too high and attempting to adjust it results in zero movement. Looking into the back I think I can just see some white plastic bits that probably need to align with the black platic bits. Not a hope of getting my fingers in there so I think I will have to dismantle the whole unit (remove the lens) to fix it.

Has anyone else had a similar problem?

Chips :tears
 
yes, last week.

ended up drilling and cutting the unit and also buying a new one of a fellow

tosser

see all headlamp threads in the 1200 section.

there is a nylon ball and socket that pops out
 
Did the same with mine

Hi there did the same with mine but I managed to fix it by drilling 3.5mm hole the sealing it back up with hot glue job done so don't throw it away, worse case scenario send it to me and I will fix it unless you are in Essex then pop in.

Good luck

Mark.
 
Thanks guys.

I have trawled the previous posts and will be removing the unit to 'repair' it. Will not be forking out to BMW for a new one.

Interested in the drilling the hole to fix it. Where do I drill the hole? I read a post where a nail was used to push the ball back into the socket. I have tried looking on the interweb for a diagram to show the layout with zero success.

Same thing with the wire job. I can't see too well into the beast until I get it off the bike. So what am I looking for - exactly?

Don't feel such a numpty now that it appears to be a common issue. Ha! who'd buy a GS anyway...


...Me :clap
 
Well I fixed it. (Thought some description and photos might help someone else in a similar position.)

Spent about an hour peering into both holes in the back of the unit with a torch and at one point a small mirror just to work out how the b****y thing worked. I eventually realised that what I thought was the ball (white) was in fact the socket. :blast

I drilled a small hole in the side of the unit by the 'side/pilot light hole' which allowed me to see a little bit more and in fact with the use of a torch and while turning the headlamp beam adjuster saw the black ball come into view.

With the aid of a slim long blade screwdriver it was amazingly easy to leaver the socket over the ball. :clap

Fixed a plastic cover over the hole with some mastic (hot glue would do it) - job done. :JB
 

Attachments

  • ballsocketA.jpg
    ballsocketA.jpg
    36.8 KB · Views: 130
  • coveredholeA.jpg
    coveredholeA.jpg
    47.1 KB · Views: 139
  • holeA.jpg
    holeA.jpg
    53.4 KB · Views: 134
Thanks guys.


Interested in the drilling the hole to fix it. Where do I drill the hole? I read a post where a nail was used to push the ball back into the socket. I have tried looking on the interweb for a diagram to show the layout with zero success.


...Me :clap

That post was probably me. You need to take the headlight unit out. From memory, if you look down one of the holes where the rear bulb covers locate you can see the offending white plastic socket that has popped off. The ball and socket sits close to the base of the headlight unit, in the middle, above a flat section in the base of the headlamp moulding. I seem to recall there's a sticky label attached here (In fact yes, it's shown on the picture above - thanks chipsonfriday). The idea is you drill the hole (only needs to be about 3mm diameter) through the flat bit of plastic in the base of the headlamp unit so that the nail you subsequently poke through it can push against the white plastic of the socket - it's a springy strip thingummie which, when bent up by the nail allows the black plastic ball to which the two headlamp reflectors are attached, to be relocated. Make sure the other 2 fixings are in place first, leaving just the lower one ready to pop back.

In the same thread as my post there's one from a guy who used a bent coathanger to spring the socket. Fair play to him, if that works it's probaby a better method. After a hour of figuring out the hole and nail method, it only took 2 mins to actually make it work. I guess whichever works for you is all that matters.


Back
Top Bottom