Lara's having some cosmetic surgery.

I dont know about the last post :rolleyes: , I take me hat off to yer !! :clap . Do it yerself, anyone can go to a fabricator :thumb 
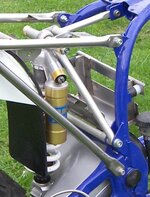
. Only comment on your engineering from me would be the chance of the top mounting of the shock trying to rotate. Make a new back subframe ( 1 hour with your caperbility ) incorperating a brace which goes through the top of the shock - bit of stiffnin in it - job may look better, but what do I know, I am only a plumber !! :thumb
 
Garry Holloway said:
That looks horrendus :eek:
Correct way to do it as per HPN :thumb
Swinging arm is narrower and needs a threaded spacer welding to the frame too :bow

But yours looks all the more beautiful because of our crass attempt ;) .
 
Hi Chris,

I'd be very careful with that shock mount,that area takes a hell of a lot of different forces,and that doesn't look very well thought out at all.Just the torque load on that bracket when on full bump is going to be teriffic.Are you sure it's butch enough?

I'd sling the driveshaft as far as possible as well,that's just going to cause real problems(unless of course it just looks evil,and has been made properly and balanced!)

Looks good though :thumb
 
Vern said:
Hi Chris,

I'd be very careful with that shock mount,that area takes a hell of a lot of different forces,and that doesn't look very well thought out at all.Just the torque load on that bracket when on full bump is going to be teriffic.Are you sure it's butch enough?

I'd sling the driveshaft as far as possible as well,that's just going to cause real problems(unless of course it just looks evil,and has been made properly and balanced!)

Looks good though :thumb

Which mount and shaft Vern, mine or post #20 Garry's HPN beauty?
 
Interesting project, it will be nice to follow your progress!
Err, are you sure an 18” wheel will fit?
 
Chris That Fat Twat said:
Which mount and shaft Vern, mine or post #20 Garry's HPN beauty?

The shaft in post 9#.If that's just cut and welded,and not balanced,it'll shake itself apart eventually,and remove anything near it in the process.Even if it doesn't break,it'll still cause a hell of a lot of trouble through vibration.If your happy that the welding man enough for the job :rolleyes: at least get it balanced.

I don't like the look of the HPN shock mounting much either,is there another tie rod on the other side of the shock that you can't see in the picture?On yours,when the shock is on full bump,that's going to put a huge forward twisting force on that bracket it's bolted to.It might work,but I'd go for overkill on it
 
Other side of a HPN type mount...Are you saying HPN don't know what they are doing Vern :eek:
 

Attachments

  • s2.jpg
    s2.jpg
    60.8 KB · Views: 1,357
Civil the thread in the spacer and original swinging arm mount is 20mm. You weld a spacer in place and then use the original thread as a lead to tap through your new spacer. The spacer needs a centre hole of 18.5mm - standard hole size for a 20mm thread and will need to be welded accurately. I was going to sleeve a standard swinging arm spigot and use that to position the spacer so that it could be welded accurately.
 
Garry Holloway said:
Other side of a HPN type mount...Are you saying HPN don't know what they are doing Vern :eek:

Not at all mate,That's a really nice way of doing it.I couldn't see the other tie rod in the last photo.That looks like the mutts :thumb
 
Vern said:
The shaft in post 9#.If that's just cut and welded,and not balanced,it'll shake itself apart eventually,and remove anything near it in the process.Even if it doesn't break,it'll still cause a hell of a lot of trouble through vibration.If your happy that the welding man enough for the job :rolleyes: at least get it balanced.

I don't like the look of the HPN shock mounting much either,is there another tie rod on the other side of the shock that you can't see in the picture?On yours,when the shock is on full bump,that's going to put a huge forward twisting force on that bracket it's bolted to.It might work,but I'd go for overkill on it
Thanks Vern, the shaft has been balanced and tested by Williams in Wantage and we'll have them stress test the bracket and mount when it's ready.


AliBaba said:
Interesting project, it will be nice to follow your progress!
Err, are you sure an 18” wheel will fit?
Yes as I already use them, but for this the 1100 hub is being laced to an Excel rim.


Keith Chapman said:
Chris, your not giving all your money to that nice man in Aylesbury again are you?
He is doing a tidy job :thumb
...of course :) .
 
Chris 18" Excell rim is interesting... Are you going to use a dimpled rim or a flat rim ? And have you managed to locate a rim..Because they are not very easy to get in 40 hole
 
Chris - what Vern is pointing out and HPN have done is triangulate the compression forces from the top of the shock forward to the end of the top tank tube to stop the bracket twisting - due to off-centre loading.

I'd advise the same :thumb

It would also stop the stainless bracket acting as a torsion spring
 
Paralever !

Garry Holloway said:
That looks horrendus :eek:
Correct way to do it as per HPN :thumb
Swinging arm is narrower and needs a threaded spacer welding to the frame too :bow

This Spacer Garry .
Some Say that its welded to the LHS and this is a 13mm Off set ?
Would it not be better centered 2 X 6.5mm.
Have you acesss to a Paralever HPN bike ?.
 
On HPN the spacer (welded to frame) is on the left side, the engine is also moved slightly to the right. The reason is that they want to move the swingarm to the right to give more space for the tire (spoked with offset).

If you want longer suspensiontravel combined with an 18” wheel, and it looks like you do, you also have to make sure that the wheel doesn’t hit the mudguard when suspension is compressed. My bike has a special sub frame and it was quite some job to fix this, your setup might work. From the picture it looks like your shock is mounted a bit higher and if that’s true it will make it a bit worse, depending on the shock.

The HPN mount for the shock is in more or less like a three-sided pyramid (using the frame as two sides in the pyramid). Pyramids are pretty stable constructions, so that’s why they don’t need oversized parts.

For some reason, I can’t remember which; HPN does not recommend using 18” wheel with the 1100 swing arm. It might be space related.
 
It's not rocket science civil :rolleyes:
Get a 1100 swing arm
Get a airhead swing arm
Measure the difference
Thats how big the spacer wants to be :bow
It is welded on the left and threaded the same as the r100gs frame

Where have you got the correct measurements for your cardan shaft adapter... :nenau
Because it needs to be exact and is a lot more difficult to work out than the swingarm spacer :eek:
 
The right attachment point for the swing arm is usually bent on “used” airheads so the distances might differ from bike to bike. One option is to straighten the frame and use standard measurements (like HPN). Other options will be to make measurements and calculate everything for your bike. If you don’t want to do this you can use a procedure like this:

1) Find the smallest offset you can have on the rear wheel (which gives you room for the tire you want, spokes not hitting the brake caliper ++)
2) Make a prototype of the wheel (use maybe 10-16 spokes)
3) Fit a wheel to the rim
4) Fit the rear swing with driveshaft, brake and all other parts
5) Fit the rear wheel
6) Adjust the swing arm so the rear wheel is in line with the front wheel
7) Check that you don’t have any clearance problems and that the shaft and wheel rotates freely.
8) Lift the wheel up to the highest point it will be (like when the suspension is compressed) and repeat #6
9) Repeat #7 with several heights
10) If #6, #7 #8 was okay then continue, else go back to #1
11) Make spacer and weld to frame (thickness = distance between swing arm and frame on the left side - distance between swingarm and frame on the right side)
12) Make mount for shock
13) Fit shock
14) Fit rest of spokes

If you get problems sideways with the shaft you can move the engine slightly sideways.

The spacer itself is not a very important part; it’s mostly to make it easier to adjust the swing arm next time.

…… or you can simply use Garry Holloways method and hope everything is lining up.


My bike has a special HPN-Rallyesport swing arm, but the principle is the same.
 

Similar threads


Back
Top Bottom