R1150GS - replacing the Ignition/Light Switch

johnhorsley5

Registered user
Joined
Jun 12, 2008
Messages
72
Reaction score
0
Location
IP9 and Mons Belgium
Hi, all
Can anyone offer me the procedure for replacing the Ignition/Light switch for a 99 R1150GS
At extortionate BMW dealer costs, they claim to have fixed my random failure to-start-problem - taking 4 hours to find out it was the coil unit - we shall see!
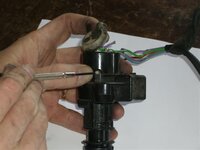
Anyway, looking at the wires coming from the switch I notice that the insulation on one wire is cracked.
How do I replace the switch without having to replace the key barrel etc?

John
PS does any one have one to sell?
 
easy

look at the housing where the ignition key fits and you should see a small piece of red paint close to the bottom. Pick that off and you will see a small hole with a grub screw inside. remove the screw with a small flat screwdriver and the bottom of the ignition will be easily removed along with the wiring loom which if memory serves me right is plugged in under the tank. Simply replace with a new one from motorworks or somewhere similar and Robert is your sisters brother.:thumb
 
Photo

My ignition wires cracked recently and the unit went kaput (fortunately just as I got home). I took a couple of shots as I fitted the replacement unit. You can see the small bolt and the cracked wires. The new unit slots in very easily. I didn't replace the red waxy stuff - didn't know what to use. Any suggestions welcome.

Please note that I have removed the ignition barrel to make it easier. To do this normally you have to drill out two security bolts - a right, royal pain in the a**e (for me anyway). I drilled them out to move the barrel to a different triple clamp on an earlier occasion.

For anyone else - I suggest that it is worth checking these wires on your bike from time to time to see if constant wear and tear has made them vulnerable.

Cheers,

Psyko
 

Attachments

  • CIMG3141 (Small) (2).JPG
    CIMG3141 (Small) (2).JPG
    38.3 KB · Views: 7,594
look at the housing where the ignition key fits and you should see a small piece of red paint close to the bottom. Pick that off and you will see a small hole with a grub screw inside. remove the screw with a small flat screwdriver and the bottom of the ignition will be easily removed along with the wiring loom which if memory serves me right is plugged in under the tank. Simply replace with a new one from motorworks or somewhere similar and Robert is your sisters brother.:thumb

It sounds so easy, and yet I can't seem to get that screw out - in fact i can't even see it clearly.

Can anyone offer some additional advice on getting the screw out?

thanks
 
ignition loom wiring replacement

ignition loom red cable snapped just as about to get on ferry back to Blighty (didn't know precisely that at the time, although it was obvious it was an ignition fault - no time to analyse - had to get the heavy beastie up that big ramp on to the boat ! :eek ) Just as well there were a few of us.

Nice AA man soldered it together once I'd pushed the bike off the boat at Portsmouth to get me home. What larks. :D

Anyhooooo .......

The new cable which was £45.99 in January was £61.92 last week :eek:

I have been able, thanks to the ever handy hints on here :comfort to get the old cable out from below the ignition, but can't get the yellow/orangey plastic multi plug doofer (the other end of the same cable) out from under the tank - is this job do-able with the tank on and is there a knack to it? I'd much rather leave the tank on if at all possible.
 
iv never took mine off, but, why cant new wires be soldered on instead of a new ignition??
 
is this job do-able with the tank on and is there a knack to it? I'd much rather leave the tank on if at all possible.

You don't have to remove the tank completely. Just undo the tank securing nut/bolt and pull the tank back back so you can get to the multi plug.
 
iv never took mine off, but, why cant new wires be soldered on instead of a new ignition??

they probably can, but my break is VERY close to the ignition end and the soldering was a temporary patch up job. If it broke in one place, it may break in others, so I thought I'd replace with new, then maybe do a better patch up on the old cable, once it's off the bike, to use as a spare.

However, as the new cable won't be cable tied to within an inch of its life like the original was, it should last for donkey's shouldn't it ? - maybe I won't need that spare :rolleyes: :nenau


Back
Top Bottom