Slow motion project - Guzzi V7 700

xsgraham

Active member
UKGSer Subscriber
Joined
Jan 20, 2022
Messages
135
Reaction score
180
Location
Sussex
Thought I'd better give this thread a title that's going to match my likely rate of progress. :rolleyes:.

I bought an old Guzzi V7 about 3-4 years ago from a now defunct bike importer / seller of Italian exotica. This old thing was certainly the cheapest in the showroom at the time and was just about a runner. As a long time Guzzi fan I'd fancied one for a while having previously scratched the T3 California, Le Mans and "funny little Guzzi single" itch.

I did get busy straight away and sent the old km speedo off to be rebuilt, replaced the knackered brake shoes and tyres and generally tinkered about. The walrus in the room was that it was on the original chrome bores so running around on it was out of the question until I got that sorted. Also as an ex-police bike the wiring loom was very messed about with. The carnage caused by the various loom 'add-ons' like a feed for a siren and radio was quite something and the main wiring was pretty buggered as a result of this, age and 'Italian style'. So a new loom has been lurking in the corner of the shed for a while, direct from the wonderful Greg Bender (real name) in the US who also collates the www.thisoldtractor.com website which is a brilliant source of info.

So there we have it... the old beastie has sat for (at least) a couple of years whilst life and other projects got in the way. I've now decided to get on with it as I miss riding an old Guzzi and have to keep reminding myself I've actually got one if only I'd get my act together! This is intended to be a straightforward project to get the bores replated and fit a new loom - who knows what it'll become !

Wish me luck - I'm going in.....
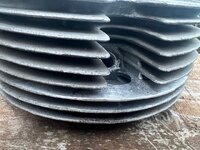
Before:
e758eb_bcac101a33eb4cd5becf857c75ced5be_mv2.jpg

New tyre day...
V7 garden.jpg

Speedo before and after
e758eb_e4e23b4bc9f045fa893995ed61128005_mv2.jpg
speedo.jpg
 
Minor progress this weekend revolved around getting the heads ready to take off so I can tug the barrels prior to sending off the the platers.
Bike view.jpgBarrels.jpghead 1.jpgSlide out out.jpg


What has given me a little bit of a pause is not having the right tool for the castellated exhaust collets (piccy below). I did start to have a go with a punch and a big hammer but I was just stating to muller it. I've given it a liberal squirt of penetrating oil and ordered a new tool (gotta love new tools :DD ). Lets see if I can get the exhausts off in the next few days when I have something sensible to attack it with.... MAP gas at the ready !!
Exhaust collet.jpg
 
Fabulous Graham - I just caught a glimpse of the soles of your boots as you disappeared down the rabbit hole of Guzzi restoration... :giggle:

I'll watch this with interest - the speedo restoration sets a very high standard for the rest of the bike!
 
Those exhaust collets have a habit of unscrewing themselves in use, you can get aftermarket items with a locknut that help.

The old ones should come out alright with the correct tool.
 
I have an old moto morini tool that fits the castellated nuts that you can borrow if you want. ( Morini had same idea on the exhausts)
I’m only in north Surrey, so not too far away.
 
I’m in, yeahhh. 👍


Great purchase Graham, I do love those older V7s and I’m really looking forward to seeing your progress no matter how slow.

You are right to completely change the loom, our police bikes over here got chopped about a fair bit and I can’t imagine that US bikes being any different.

👍
 
I have an old moto morini tool that fits the castellated nuts that you can borrow if you want. ( Morini had same idea on the exhausts)
I’m only in north Surrey, so not too far away.
Thanks Bubb - I have something on the way to deal with it, but if that doesn't arrive for any reason I will be in touch (y)
 
I'll watch this with interest - the speedo restoration sets a very high standard for the rest of the bike!
Yes - I'm afraid to disappoint but the speedo will be a jewel amongst the 'patina' (or whatever you wish to call it). Only equalled I expect by the fresh barrels which will come back nicely bead-blasted as part of the plating process. My target is to have a dodgy old looking bike which runs well and doesn't break down every 5 minutes..... we shall see ! I did have the same thought when I rebuilt my Z1000 a couple of years back and ended up with a 'crank - upwards' rebuild which cost a fortune !
 
Well today THE TOOL arrived. I did see a picture of it - but only in the flesh could I appreciate the majesty of the huge handle designed to give the exhaust nut no chance in fannying about and pretending to be stuck!

64bc81ee7dbf92c0b3ec301ecaae6586.jpg


So to cut a short story shorter… it gave up with barely a squeal. Heads and barrels off at the weekend then


Sent from my iPhone using Tapatalk
 
So to start..... I'm an idiot. You'll see why below !

Weekend shed time was severely restricted by mates coming over for the weekend to play and something my wife described as our wedding anniversary on Monday which I was supposed to attend ! In reality, she did tell me to go off into the shed for a few hours before we went out, so I got some spanner twiddling time - and put some good swear words in now and again to help.

The rocker support from came out fine, head nuts unfastened, including the hidden allen nut one beneath a large bolt on the centre top of the head (have a look from the pics from 18th August if you're interested). But.... I'm an idiot, so I had a look at the nut down next to the spark plug hole and decided that my conventional socket could tackle it. What I didn't fully appreciate was that the nut doesn't project much above the cooling fin, which has a hole in it for access. The access must be for a very thin walled socket... my resulting ham fisted attempted naturally broke the fin - bugger. :cry:.

G1.jpg

G2.jpg

Looks like I will be making friends with the engineering shop up the road soon who seem to have some classic bike / car experience and list aluminium welding under their skills. Anyone know of a tried and tested aluminium welding repair place in the Sussex/Surrey area please let me know !

In other news, the existing chrome bore on this side (RHS), looks good and hasn't started breaking down and filling all the important little places with hard chrome particles (phew). I'm still sending the cylinders off to the platers for the peace of mind that a nice new coating will bring.

G4.jpg

Pistons a bit black with carbon as was the spark plug on this side, so a bit rich on this side. Carbs will be rebuilt and fiddled with so hoping for better running when its back together.

G5.jpg

Crank rod feels nice on the bearing so I'm going to leave the bottom end alone unless the other side is in distress.

G7.jpg

I'll be repeating the process for the other pot after another new tool (Yay) arrives this week. This is an extra slim 17mm spanner which fits between the fins and will get the head nut off on the other side without boll@xing them again ! :rolleyes:
 
If you're re-plating the cylinders, are you fitting new pistons? How does that compare price wise with a cylinder piston kit from Gilardoni?

On the plus side, some cylinders i've seen just wear out the top part of the plating. The chrome doesn't seem to flaked off, but maybe it has, and what's left blends into the ali of the cylinder. Piston seems to run quite happily like that though i wouldn't recommend it.

What are the cam followers like? They are usually knackered as will likely be the valves and guides. And have a look at the dynamo mounting studs.

Many of these bikes run surprisingly well in what would be an utterly worn out state for any other bike, once you start fixing things properly you descend it to a massive money pit DAMHIK :D
Cheers for that Cookie

The piston that I've retrieved is in good condition so I'm planning to reuse them pending having a look at the other side. I have a new set of rings to fit to help things along. Gilardoni don't do kits for the 700cc engine and the 750 barrels are a bigger diameter into the 'mouth' of the crankcases I hear, so need some opening out at the crank. I wouldn't do that without engine out and bottom end apart so its a no go for me.

Haven't looked into the cam followers yet.... may poke about later this week and take a look. I see that the usual suspects offer new ones so maybe sensible to do at this stage.

Yes - good point about the dynamo mountings - I've heard the stories / seen the pictures too! Trying not to create too much a money pit out of the old girl :)
 
Thanks to Cookies prompting I had a quick squint at the cam followers from the right pot I took off. Surprisingly they look pretty good. Certainly circular witness marks showing which I’d expect, but nothing significant .

To replace or not to replace that is the question. I’m leaning towards the “whilst I’m in there” school of tinkering. What do you reckon ??

4f18c2af2d15a44325cfc768d18e9ec4.jpg


Sent from my iPhone using Tapatalk
 
Looking at the photo, they don't look too bad. Usually they are flat or even concave, with chunks of hardening flaked off.

Hard to tell from the photo, but those look to be still convex and relatively smooth?
 
Looking at the photo, they don't look too bad. Usually they are flat or even concave, with chunks of hardening flaked off.

Hard to tell from the photo, but those look to be still convex and relatively smooth?
Indeed - they do look good. Hmmm tempting to put 'em back in !
 
Progress has been predictably slow - but its moving forwards a little at a time.

A couple of weeks ago I went back to Exactweld in East Grinstead to pick up my cylinder head. If you remember I did a proper job in buggering the fin trying to get at the front head bolt. Thankfully they've done an excellent job covering up my cack-handedness.

weld1.jpg

The postie has also been popping things through the letterbox now and again - including some now cam tappets. Studying the ones I took out of the bike they didn't desperately need changing, but I thought it'd be silly not to put some new ones in whilst I was in there. Good ol' Stein Dinse got them over to me from stock. Been using them for years for old Guzzi parts, recommended if you need bits for your Guzzi and Ducatis I think.

lifter.jpg

Tonights job is having ANOTHER crack at trying to get the base gasket from the cylinder. The existing gasket is just not coming off in more than tiny scraps. I am scraping off with a blunt edge and a razor blade and have been at it for far too long. Soaking in brake cleaner and / or Loctite gasket remover is helping, but not much !

Gasket.jpg

Once that's done I'm headed towards putting the motor back together as barrels have already been replated so that's one job not needed before we get it back on the road. Then its on to fitting a new wiring loom - which should be a doddle right?
 

Attachments

  • weld1.jpg
    weld1.jpg
    109.8 KB · Views: 6
Few hours in the shed this weekend - nice and cosy with the fan heater on and an Ozzy Osbourn Audible book to keep me amused.

H3.jpg

Time to get the pistons back on, barrels back and try to remember where all the pesky o-rings go before popping the head back on. Had a bit more time inspecting the cylinders and came across a cast in detail I'd failed to see before. Looks like I have a pair of Gilardoni cylinders after all, which explains the nice Nicasil coating on view. From what I can gather the 700cc Gilardoni's haven't been available for years, so this must have been an update from a while back. Potentially without too many miles on them though.

H2.jpg

So it was back on with the RHS piston for this installment..... lots of rag around to catch the new gudgeon pin circlips that I was bound to drop and then teasing the barrel over the rings. Four bl@&%y rings on these old things, some more challenging than others. From previous engines I've worked on I've been comfortable with a method of pressing the rings in by hand one at a time and gradually slipping the barrel down. This one nearly had me beat.... but I got there after applying the correct "garage language" to help the process ;)

H6.jpg

For anyone else messing with one of these - don't forget that 2 of the o-rings go under the barrels on the shorter crank studs.

Had a brief scrape around of the head around the valves - there was good compression before so I'm not going to take the valves out and grind 'em in again. Once a bit of the soot was removed I noticed that the centre of the inlet valve had what appeared to be a copper centre. Very weird and not something I've seen before. After some poking around it I decided that it was very much part of the valve and had survived the engine running previously so am leaving alone. I may regret this...... but hopefully it will all hold together :oops:.

H7.jpg

Head popped back on with four more o-rings under the rocker arm supports, torque wrench out of its box briefly and Roberts your fathers brother.

H8.jpg

So that's about where I am right now, may attack the other side one evening this week as we have house guests at the weekend which will severely impact my shed time !
 
Had a bit of time back in the shed at the weekend. Plan A was to build up the LHS barrel / head so that I can start to concentrate on the wiring loom - the more I squint at it the more I see that its definitely a goner with perished insulation, nasty choc-box connectors and lots of other mayhem. It will certainly give me grief trying to run the bike like that.

As always when working on old bikes.... Plan A doesn't last long ! I remembered that I'd got some washers for the oil feed line to the heads so could pop the RH head feed on and finish that off. Washer in, bolt through and.... what's that? A hair or something on the banjo at the end of the oil line? Nope - darn things cracked ! Sigh - OK better get that off then and take a proper look - probably needs a new one. To get the other end off it needs the generator off so I got stuck in. Worth it to have a poke around and check for anything else that needs attention.

V11.jpg

Genny out and bolt out of the crank case end of the oil line - its a double feed for both heads. A new one was ordered from one of the usual Guzzi part suppliers, this time not quite the same and will involve braded hose sections, how very modern ! You can also see in the pic below a raised bit in the crank case casting with a hole in just in front of the oil line banjo - it looks a bit hammered. That's where a mounting pin from the genny drops into the hole to position it. Looks to me like the bracket has been slightly loose and the heavy genny body has been wearing the ally away. Not sure its something I should be worried about - it's not cracking and breaking up after 44 years so maybe OK for a bit longer.

V14.jpg

I read on Greg Benders fantastic website (www.thisoldtractor.com) that's its recommended to replace the mounting bolts for the generator support bracket with studs into the aluminium of the crank case. So - bracket out and I had an M8 stud bar search around the shed.... there's some in here somewhere!

V15.jpg

Final tinkering - now I was completely distracted from getting the LHS barrel and head back on, was to have a look at the carb rubber from the airbox. As predicted it's perished and cracked. Had a scout around the suppliers sites again and these are not available right now, but one or two promise stock is coming soon. Shall I wait and put it back with a standard airbox or do I see pod filters in my future.. hmmmm decisions decisions. :unsure:

V23.jpg

It feels like its all going forwards - I'm trying to do this as a "repair and make reliable" exercise for me to ride in the future rather than "repair / restore and make it pretty" project. As its an old dodgy bike to begin with I'm sure there's a lot more to do than I've bargained for, but these projects for me are not about rushing or turning bikes around to sell. Anyway - I enjoy some solitary time in the shed getting an old crock back on the road.
 
When you put the generator back on, you might consider shimming any gap between the top of the crank case and the generator to take any stress out of the fixing bolts. I used a bit of nylon sheet, cut to size. You're quite lucky that the two bolts are still there as they very often shear or take the thread in the crank case out.
Welding a strap between the generator carrier and one of the distributor bolts is a belt and braces approach I did on my own bike.

I'm trying to do this as a "repair and make reliable" exercise for me to ride in the future rather than "repair / restore and make it pretty" project.

IMO these bikes look great in a much used or even distressed condition. I like them solid mechanically though.


Back
Top Bottom