Tearing The Mistress's clothes off to give her a good seeing to!

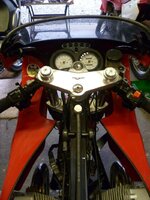
Slow but steady progress.

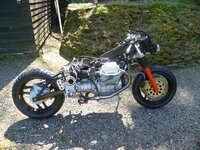
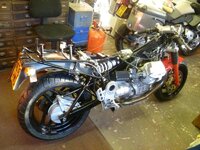
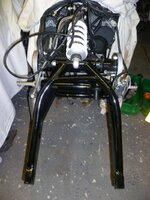
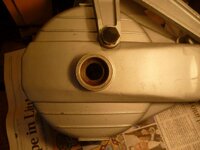
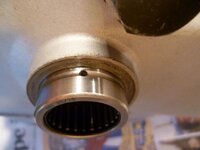
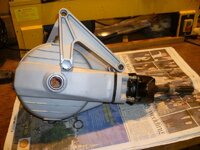
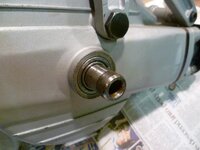
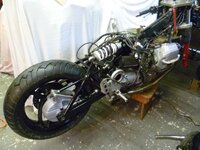
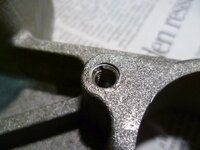
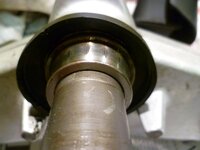
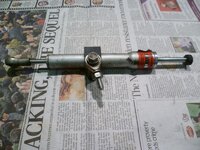
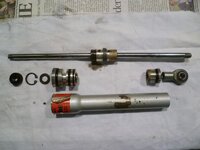
Starting to put her back together again, at least, I've made a start on the rear end by reinstalling the swing arm. First job was to clean up the locating lugs for either side and checking they run all the way through the threaded bosses in each boomerang. Its important that they go back equidistant into the bearings. I measured them before removal and the left one was 72mm and the right 77mm! So much for the factory doing it. Both sides were comfy at 75mm so that's where they stayed.
 

Attachments

  • P1000479.jpg
    P1000479.jpg
    110.2 KB · Views: 419
Bevel box

Here we have it. Cleaned up and waiting to be inspected.
 

Attachments

  • P1000482.jpg
    P1000482.jpg
    63.7 KB · Views: 419
Bevel Box

All seemed to be OK until I checked the outer bearing and the sleeve that runs in it. You can see what a mess they are despite the care taken to grease both the bearing and the sleeve at service time or when the wheel is removed for tyres etc. Clearly not good enough or often enough. Water ingress would seem to be the main culprit here and when I attempted to re grease the needles in the bearing the new grease took on a distinctly red appearance so they are scrap if I didn't know it already.
 

Attachments

  • P1000480.jpg
    P1000480.jpg
    52.5 KB · Views: 416
  • P1000485.jpg
    P1000485.jpg
    32.7 KB · Views: 408
Bevel box bearings

You will have to forgive the 3 attempts to submit this thread but I can't get to grips with fitting text around the photos yet.

The bearing and sleeve are available from two well known Guzzi spares sites but are expensive with the sleeve alone priced at £29.00 and the bearing at £11.67. Plus postage.

Good news:- Simply Bearings (http://simplybearings.co.uk/shop/) list them both, separately and as a pair with varying degrees of quality.

The bearing you are looking for is HK 2516 2RS. They do a budget set at £12.31 (TAFI 203216) and a better quality one at £18.25 (NKI 2016) both with free carriage.

The question that's puzzling me is why does the sleeve have a hole in it? It's not for drainage as it won't. Possibly it's to allow the grease to expand when the bevel box gets warm and fortunately one of the options has an annular recess coinciding with the hole, so that's alright. The factory manual shows the hole installed uppermost so its definitely not for drainage. It would drain straight into the needles if it was downwards!

The other slightly mystifying thing is that to drive the bearing out from the other (in) side of the casting there is a washer/shim in the way which almost entirely hides the bearing.... and being a drawn cup type outer race I won take much abuse before bending all shapes if you're ham fisted with it. Fortunately the washer moves slightly radially exposing a bit more of the bearing but its going to be an interesting journey.

Let you know how I get on shortly.

Fluff
 
Bevel box outer bearing cont.

I managed to get an hour in the garage this afternoon (Sat 21/2) so attacked the outer bearing and learned a couple of things. The bearing comes out from the inboard side but, as I said before, there is a substantial washer in the way which almost covers the whole bearing, making life difficult to punch it out. A sharp tap on the washer was enough to learn the first thing and that is; the washer is captive, stays put and does not come out with the bearing, so I had to tease it out of the way and go surgical.There is just enough radial play to get to the inner edge of the bearing which is more like a tight push fit than an true interference fit so it pops out easy-peasy
Here we see it removed:
 

Attachments

  • P1000486.jpg
    P1000486.jpg
    45.5 KB · Views: 366
Bevel box cont.

Remembering to place the hole uppermost, the new bearing taps in...

The movement this bearing has to deal with is very small. It's the change in angle relative to the swing arm when the suspension is deflected - only a few degrees at most hence the reason its a push fit, I suppose. I now understand why the 'box should be supported when the wheel is removed, not only for the sake of the uj's but also as the strain on this bearing is quite high. It's some thing I've always done anyway.
 

Attachments

  • P1000489.jpg
    P1000489.jpg
    38.2 KB · Views: 366
  • P1000482.jpg
    P1000482.jpg
    63.7 KB · Views: 370
Bevel box bearing cont.

And here is the whole thing ready to go back in with the inner spacer back in place and greased up, ready.

The discolouration on the end of the inner spacer is just that. I've mic'd it up and there is no wear so it says.

Next job is to carefully clean the axle holes of paint and put it all back together.

Fluff.
 

Attachments

  • P1000490.jpg
    P1000490.jpg
    48.8 KB · Views: 360
Some progress

Pissing with rain today so before I get roped in to help someone move I thought I'd just hang a few bits back on.

Here's the evidence...
 

Attachments

  • P1000491.jpg
    P1000491.jpg
    68.3 KB · Views: 338
And so to the front..

Time to drop the forks out.

But first my mate, Mr Woppit, needs to get off the bike for a bit and have a bath. He's been on The Mistress for as long as I've had her and if you'd not washed for 20 years you'd be a bit mucky an' all!

Right hand fork slid out lovely with a bit of persuasion. Left hand one will follow suit but the left hand bar lock screw will not budge. The bugger is shown below. Strictly speaking it doesn't have to come out. The handle bar pinch screws just need slackening off like the rest but no doubt it will have to come out sometime and whilst it's stripped down "sometime" might as well be now.
 

Attachments

  • P1000493.jpg
    P1000493.jpg
    39.5 KB · Views: 621
  • P1000492.jpg
    P1000492.jpg
    49.6 KB · Views: 616
Top tripple clamp

Drilled the bolt head in the last post off in situ and what would you believe, the remaining threaded section just unscrewed right out, easy-peasy! However, I took the top clamp off to run a bottom tap down through it to clean the threads up which showed it to be cross threaded at some point so I helicoiled it to do the job properly.
 

Attachments

  • Top tripple.jpg
    Top tripple.jpg
    48.6 KB · Views: 573
Headstock bearings

Whilst I was practically there I dropped the headstock pin and bottom clamp out to check the bearings and grease them up.

Just as well as the bottom bearing races had worn something horrid but it wasn't felt through the bars when I turned them in the usual checks so I don't know what that was about. I've cleaned these up so you can see the evidence. I don't suppose standing around doing not much for a while as helped.

Quick call to Simply Bearings sourced replacements...
 

Attachments

  • Lower brng inner.jpg
    Lower brng inner.jpg
    38.7 KB · Views: 521
  • Lower brng.jpg
    Lower brng.jpg
    51.3 KB · Views: 527
In the mean while...

Whilst the headstock bearings are on their way I thought I'd have a look at this....

Oh dear. Better off without it, really. But it's going to get the treatment anyway. It took me ages to find the importer/servicing people but spares have to come from Italy so heaven knows when they will arrive, if at all. The o rings I can source, but the end cap seals might be a bit trickier. Its full of shite but the rod only shows signs of slight wear so in the meantime I'll clean it out, fill it with 5 grade fork oil then paint it again. I suspect the oil will seep out as it did before but it's easily refilled..

Fluff.

Ps if any body's got a small block of Tuffnol kicking about that they don't want I'll make a new clamp for it. You can see where the buggers split (that probably was me...). Doh!
 

Attachments

  • St D complete.jpg
    St D complete.jpg
    78.4 KB · Views: 551
  • St D Mount.jpg
    St D Mount.jpg
    41.1 KB · Views: 525
  • St D Stripped.jpg
    St D Stripped.jpg
    49 KB · Views: 547
Slow progress

Progress has stuttered to a bit of a halt of late. Lots going on outside The Shed but I should be back on it again this week.

Sent the headstock off to have the lower bearing pressed out and the couriers managed to lose it. :blast Absolutely mortified and very badly timed as it coincided with the Old Man's appointment at Yeovil crem. Spent an hour going round the estate looking for it and asking anybody I could find if it had been delivered to the wrong place. Not a sign. Gutted isn't the word for it. The POD stated it was delivered but no one knew the signatory so the driver was sent to sort it out. Turns out the he left it behind a shed as he was too early and made up a signature. Bastard.
It took a fortnight to get what should have been an hours work done. Its back on the bike now with fresh lacquer on so drama over and feeling very lucky in the end.
Nearly got hold of Reboot to source another as they are breaking an 1100SPT to.

The other hold up has been the right hand fork slider that has defied any attempt to keep paint on it due to a brake fluid spill years ago that must have been washed off many, many times but despite rubbing down to bare metal in places still crinkles the new paint. However I might have cracked it this w/e so will post some pictures later.

Fluff
 
Sunbathing naked...

I now have her on her wheels washed off and drying in the sun.

Matching the paint colour has been tricky and as I am not brilliant on colours (red/green colour blind) but Fiat orange red seems to be the nearest thing so the sliders have been refinished in that.

The front of the motor has a definite patina (read tatty-ish) so I'm thinking of dropping the motor and gearbox out and having it vapour blasted and leaving the surface bare bar a coat of ACF. I won't do it till later in the year as I want to ride her this summer. Has anybody any had any experience of this process?

Back in the garage, the fork brace, mudguard, subframe are back on, The rear splash guard is positioned ready for bolting in place and the wiring thought through. I have a rear hugger to go back on that needs a splash of satin black which I will do next week. The hugger has saved much of the rear from the ravages of the weather and flying stones.

She looks a right short-arse next to the GSA!
 

Attachments

  • P1000511.jpg
    P1000511.jpg
    114.9 KB · Views: 500
  • P1000512.jpg
    P1000512.jpg
    86.2 KB · Views: 438
Had a bit of a blittz

Got fed up of waiting for myself so have cracked on a bit.
The wiring is back in place and zip tied, battery fitted and ign switched on. All good, lights checked, brake micro switches ACF'd, horn squeeked ready for MOT which I will try to get done later next week - because:

The exhaust has yet to be put back on and will stay not on until two new fire rings for the header pipes and two bobbins that do the anti-vibe thing on the x-over pipe mounting turn up.

Been polishing the pipes too, so have a quick pic whilst I get F&C for Mrs Fluff and I for tea..
 

Attachments

  • Cans.jpg
    Cans.jpg
    76.1 KB · Views: 474
Bit of a blitz.

Also on order are a pair of rubber carb sleeves as the originals are starting to crack.

When I removed the airbox and fitted K&N's, years ago, the engine breather that runs from a banjo bolt on the top of the frame down the spine to the airbox had nowhere to end. So instead of extending it down past the gearbox (which might have been more sensible) I terminated it on an empty bottle of Brasso which had the lid drilled to tightly take a cartridge from a garden gun I had at the time, the end of which was drilled through, and so the engine breathes into that which acts as a catch tank of sorts. The Brasso tin is vented. That's gone back on as well...

Before the tank goes back on I shall repaint the rocker boxes. So she won't be long before she's ready for a run..

Fluff.
 

Attachments

  • Brasso.jpg
    Brasso.jpg
    73.2 KB · Views: 458
Odd bits

Fairing on and covered in polish.

Yes, I know the ft. brake reservoir is a mess. That's on the painting list as well as the exhaust hangers. When it stops raining I'll wheel her out for a pic of the whole ensemble.
 

Attachments

  • P1000515.jpg
    P1000515.jpg
    110.5 KB · Views: 465
Last edited:
Back in one piece, but lasted 3 mins.

All complete and back together! Hurrah!

Lets fire her up..

Mr Whoppit AWOL. Disaster! Sent out search party who came back with escapee.

Choke lever won't move. Metallic "Ting" from the tank missing from the o/s when ign turned on. No life from the o/s electric petcock, which is a shame as its lasted this long and the other one is fine, but just to be an arse it's died. Rung Guzzibits this morning and two manual ones are winging their way to Lester Mansions as we speak. TBF this is a job I was thinking of doing years ago so now's the time, so it seems. I'll post pics later.

Play with choke cables and find out pretty quick that its the plunger in the carb body that's seized in its little housing and it ain't budging. Off with the tank. Off with the carb. This was at 10 o'clock last night so I filled all the holes I could find with WD40 and retired to the kitchen for a cuppa. This morning at 7am (frost inside the garage, Mike) saw 10 mins of farting about rewarded with movement and out the plunger came. The brass piston polished up with a bit of Tcut and the bore cleaned up with a soft brush on a Dremel. All good but the n/s side one probably needs the same treatment so I'll do that tonight. It's not a bad little job but the new rubber manifolds I've put on are 'king tight when the carb goes back on... No pics as I didn't think about it and I needed to get to work.

Fluff.


Back
Top Bottom