The Desierto 3 Fairing and my 05 1200GS

  • Thread starter Thread starter Bullitproof
  • Start date Start date

Bullitproof

Guest
Hi all,

So there I was, at a crossroads. Do I buy a new bike or maybe just pimp mine out a little??
I went for the latter as it’s easier and cheaper :)

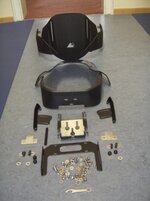
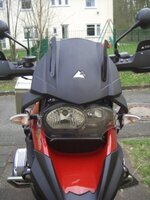
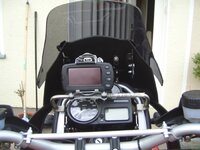
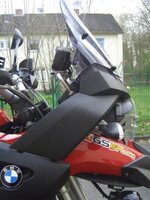
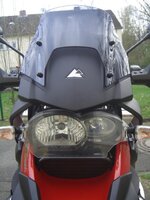
As I thumbed through "The" catalogue the only real improvement that I desired was the Desierto Fairing, but it comes with a hefty price. Still I want one, so I bought one.

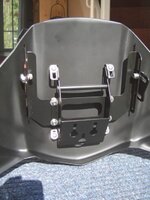
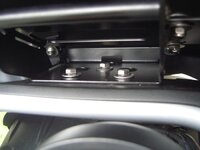
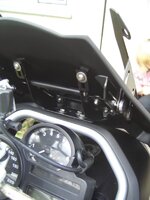
I thought I would do a diary of the event in case anyone else decides they want one too. By the way, the German/English destruction booklet is a bit odd. As a bi-linguist I noticed quite a few mistakes in translation.
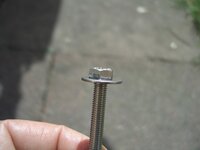
Where the English say to use a dome headed screw the German would say to use a hex or something different. Still once you start assembly it becomes easier.

So step 1.
 

Attachments

  • 1.JPG
    1.JPG
    95.7 KB · Views: 2,215
Step 2: Prepare your tools (lol)
 

Attachments

  • 2.JPG
    2.JPG
    116.3 KB · Views: 1,198
Step 3: The Begining

Quite simple really
 

Attachments

  • 3.JPG
    3.JPG
    102.8 KB · Views: 1,437
Step 4: Assembly

Once I had the metal bracketry done then I mounted it onto the main frame, I left all screws loosish for fine adjustments n stuff
 

Attachments

  • 4.JPG
    4.JPG
    118.2 KB · Views: 1,620
Step 5: The 3 Bolts

Use superglue to hold the washers up, this will make it alot easier to mount the main frame onto the bike, leave quite a bit of screw sticking out and seek the help of someone with small hand to then help push the 3 screws through
 

Attachments

  • 5.JPG
    5.JPG
    57.3 KB · Views: 1,215
  • 6.JPG
    6.JPG
    82 KB · Views: 1,169
Step 6: Tighten up

So the frame is on, time to tighten up all the little nuts n bolts
 

Attachments

  • 7.JPG
    7.JPG
    110 KB · Views: 1,201
  • 8.JPG
    8.JPG
    108.1 KB · Views: 1,164
Step 7: The Fiddley Side bits

The Left and Right Side bits proved tricky. I would attach the side hooks to the main frame first before attaching it to the bike, cause there isn't much room to bend or move them once the frame is on.
 

Attachments

  • 9.JPG
    9.JPG
    110 KB · Views: 1,154
Step 8: The Windscreen

Easy. One on you can move it up, down, tilt up, down or push it out or in. very versatile.
 

Attachments

  • 10.JPG
    10.JPG
    108.1 KB · Views: 1,153
Finished

Thats about it, it was only about 2 hours really from start to finish, now its off for a long ride to adjust it for height etc.
 

Attachments

  • Finished 1.JPG
    Finished 1.JPG
    110.3 KB · Views: 1,172
  • Finished 2.JPG
    Finished 2.JPG
    113.4 KB · Views: 1,154
  • Finished 3.JPG
    Finished 3.JPG
    105.9 KB · Views: 1,268
Step 9

move the sat nav bracket so you can see the speedo and rev counter and perhaps hide some of those ugly cheap looking nuts and bolts! just a sugestion..;)
 
Step 9: Cant move the GPS Bracket any more back as I wont be able to open the catch on top of it (key has to fit too).

Ref the Slippers, yea I know, but they were a gift from the missus and they are warm! still silly looking tho, thanks for noticing:o
 
I installed the Desierto III on my bike as well. Did not like the looks from behind, so I painted the bolts as well. Looked much better afterward.

Although the looks can hardly be improved
(look here .. the windprotection is just about averige. A GSA screen does that job much better.
 
Thats about it, it was only about 2 hours really from start to finish, now its off for a long ride to adjust it for height etc.
Hi,

How the bike goes with this modification on high speed?


Luiz Carlos, from Brazil


Back
Top Bottom