Why I use powder coat

Bendy toy

Registered user
Joined
Sep 19, 2012
Messages
28,029
Reaction score
8
Location
Torbay, England
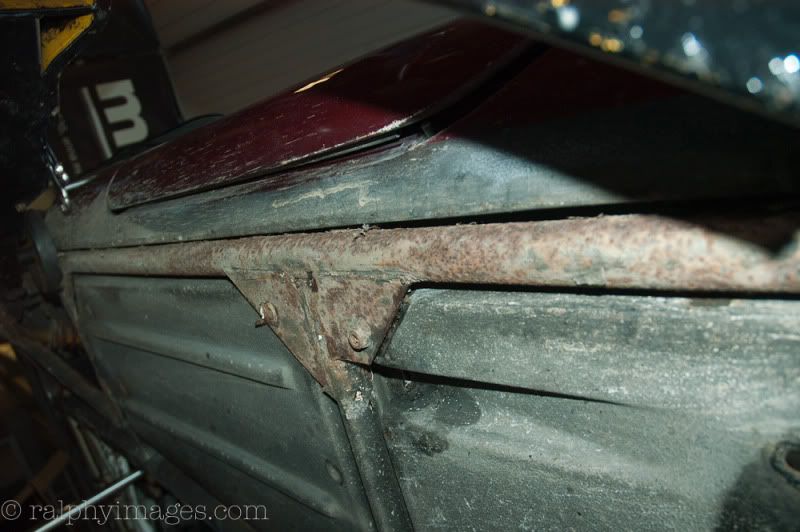
This is my front subframe after a chemical strip clean
The paint didn't look bad and major rusty bit could have been cleaned and repainted.
But look at what was going on under the apparently good paint.

Before
46b6f33280c5a9e0aa516d99c0a5d5e6.jpg


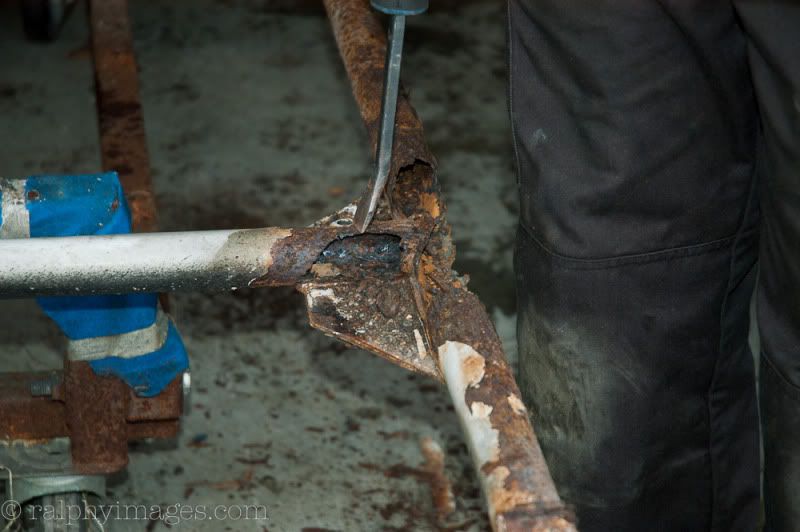
The bad bit
ded41ca6f8fe6baf7b65c4f33ee44145.jpg


Hidden rust straight out of the dip tank.
46bd4a832e10e5346fbd5933be465770.jpg


It's not terminal by any means but it would have been quietly doing the dirty if left untouched.

All steel parts are getting dipped and shot blasted. Then a zinc base coat with black powder coat finish over the top.
 
That subframe strut leg looks like it has lost a fair amount of metal in the middle picture, is it that bad in reality?

Presumably its still up to coping with the stresses involved ??

A good job you are doing it now, and not in a year or twos time when it has been munching away beneath the paint. Good to see a thorough job too and not just the usual "slap some smooth hammerite on it" bollocks.
 
Trust me fella, powder coat will only compound this problem, it hardens to a thick shell rather than relying on gripping the metal surface like paint does.
I've seen tubes which look perfectly sound literally fall to pieces during blasting. The powder coat remains intact while the steel underneath literally rusts away!
 
Trust me fella, powder coat will only compound this problem, it hardens to a thick shell rather than relying on gripping the metal surface like paint does.
I've seen tubes which look perfectly sound literally fall to pieces during blasting. The powder coat remains intact while the steel underneath literally rusts away!

I must admit I am beginning to fall in to the paint rather than powder coat brigade, it's all the edges that get me where the PC does wear and let's the water in. Also the variety of colours you can get in spray form the world is you oyster. My rear wheel is being stripped soon do to corrision and that will be re sprayed using my local yacht yard probably with cold enamel as that lasts for years in a fully salt environment.
 
Trust me fella, powder coat will only compound this problem, it hardens to a thick shell rather than relying on gripping the metal surface like paint does.
I've seen tubes which look perfectly sound literally fall to pieces during blasting. The powder coat remains intact while the steel underneath literally rusts away!
Quite. It’s bloody good at hiding rust, far more so than paint.

How it looked:

3cb12832.jpg


How it was:

3a7b39fb.jpg


R
 
The rust on the strut was caught just in time. Cleaned with an angle bringer flap wheel it looks fine. It will then get grit blasted and a zinc base layer.
My Yamaha 900 bottom fork yoke was red rusty underneath. I cleaned it with small flap wheels zinc primed and painted with Smoothrite. In a year the stuff was bubbling away.
I had it grit blasted zinc primed and powder coated. 2 years later it was as good as new.
The swing arm on the same bike was powder coated by the previous owner. They are noted for rust. It was bubbling back in 18 months. It's not good enough to simply clean the metal and coat it over. Minimum needs shot blasting and preheat to dry the metal. But without a zinc primer it's always going to come back.
My GS alloy wheels were bubbling under the paint. It was def paint with at least thee layers and VERY hard. Chemical removal was the only option. We will know in 5 years or so if powder lasts better than the original paint.
 
Hi Mr Bendy Toy

I've got a replacement sub-frame for my 2008 adventure and was thinking of going down the powder coating route, before I do the swap over. Can I pick you brains on what I should request from the powder coaters in terms of preparation and any specific areas to mask off.

Thanks

Rob
 
First job strip the back of the bike. It looks complicated but really quite straightforward.
1 Remove battery, all plastics and bolt-ons. Put everything into small freezer bags
2 Disconnect brakes at the junction piece above the swing arm Ive put suitable bags over the pipe ends.
3 Remove air box. This means taking off the throttle cable splitter and possibly RHS throttle body if the cable is too short.
4 Take off swing arm complete with FD. Haynes manual shows how though you can remove the RHS trunion by knocking through from LHS with a long rod.
5 Remove the four M10 bolts holding rear subframe to engine.
6 Take off all plastic clips and widgets use photos for reference. Dont forget the plastic bushes where the gear shift lever runs. New bushes are £5 a pair from BMW.
7 The various brackets all have one side which is relatively sharp cornered. This enough to thin any coating allowing new corrosion to begin. File all edges smooth. Be fussy, the ones you miss could are more likely to cause trouble in years to come.
8 Put suitable bolts into every threaded hole. Leave the back side just proud so the coating wont clog the thread. Use a bolt long enough for its head to not shade that side of the hole.
Dont bother to protect the centre stand bolt holes. The countersinks will be difficult to mask and its not a precision fit.
9 Heat the area around the colour chart sticker with a hot air gun and carefully peel off the frame. Stick it onto some suitable non-stick backing paper
10 Ask coating company to protect all exposed threads and fitted sleeves such as swing arm bushes.
11 Ask for a chemical dip and shot blast. If its all being shot blasted only, they need to take extra care to protect anywhere that bearings have to fit. If its got the older tough paint it might have to be chemical dipped.
12 Pre-coat with zinc primer. This can be whatever system the coating company use, but you need a zinc-rich base layer. You could even consider electro plating (not hot dip!). Zinc isnt "that" costly but ask the powder coaters if their product works over zinc. If you go that way you might want to consider etch primer over the zinc plate and paint.
13 Finish coat in whatever colour you fancy
14 Protect new frame with bubble wrap
15 Back home take out the protective bolts and clean the holes as needed. Any taped over areas will need solvent to clean off the protective tape glue.
16 Put all the clips etc back
17 Stick the colour chart sticker back on the frame
18 Replace swing arm bearings. Order the correct type (how would I know that?)
19 Rebuild bike. If using stainless washers, fit the rounded side towards the paint because the sharper edge can fret though the new finish.
20 Make a sideboard ornament with left over parts. ;)

Comment on step 11 - The finish used on alloy parts is extremely tough but one damaged, corrosion can run a long way underneath. This has to be chemical dipped - too tough for grit blast removal. The frame paint isnt so tough and the steel is harder than aluminium alloy, so can probably be blast stripped only.

Overall comment.
Choose your coating company carefully. The big commercial outfits will produce a good looking job, but might not be so fussy about fully blast cleaning every nook & cranny. I now use Wing & Son near Totnes Devon. I used to use CJ Ward of Burton on Trent. The latter are more industrial finishers but they really do understand bikes.

Hope this helps

Dave

 
Dave

Thanks very much, that's a great help. When I was looking some time ago I found good set of pic's from a subscriber showing the disassembly of the frame from the bike - typical me, can't remember how I found the thread.

Regards

Rob
 
Bendy as you seem to be into this powder coating have you ever tried coating the crash bars on the 1200 adv? Just had my Touratech light grill done not to everyone's taste but I like it.

b31b2c1c5fc696f76b059fba5df17f34_zps3509422b.jpg
 
The yellow doesn't do it for me but what do I know. ;)

I had the crash bars done in 70% gloss black. It's bling to be honest because they are stainless and don't really rust. But I preferred them in black.

Just don't let the bike fall over.

I prefer powder because for most stuff its cheaper than paint. Its not a cure-all and needs a meticulous approach by the enamelers and ferrous parts need a zinc base layer. Tubes that can rust from inside will rust regardless of paint or powder. Parts that are not fully cleared of rust will carry on going under the coating. However, apart from internal corrosion, I don't believe the metal damage is invisible under the coating. Corrosion oxides are larger volume than the base metal so bulges will appear. Always zinc prime and even better electro plate.
 
Lol looking at doing the crash bars in the same yellow as it is quite striking, no problems with the powder coat peeling off the stainless?
 
Had a couple more bits done looking great, all edges rubbed down etc etc and the colour is a gun metal grey which I will now use elsewhere on the bits I refurb. Certainty looks better than the stock silver/grey. Just waiting on new stainless torx bolts to start rebuilding, next week the fuel cap is being coated the same colour.

361e6e62d24e189729f481d97c1a0bd5_zpsacb9eabd.jpg


Probably will do the engine bars in the same colour... :cool:
 
Few more bits sorted out


I know the colour is not to everyone's taste but the finish is so much better than the original.
 
i would be inclined to stay away from stainless bolts, especially bolting into aluminium parts. Zinc plated steel is the way to go to avoid corrosion. :rob


Back
Top Bottom