Thunder
Registered user
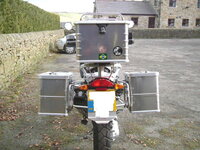
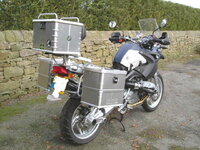
Decided to fit a Hepco and Becker 35L top box to the bike and thought I’d record the process for anyone who may be considering a similar installation. I found the instructions that came from H and B pretty basic so took some pictures as it might hopefully speed things up for anyone fitting an H and B rack or one of the other makes which requires trimming the rear bodywork.
Starting point was to remove the bikes rear carrier plate, its held in place by three bolts as marked, watch out for the spacer on the top mount, you need to lift it out before removing the rear seat plate or it can go rolling across the floor.

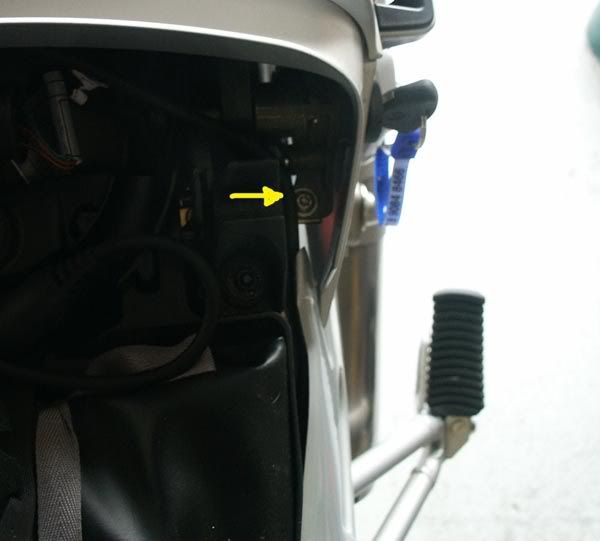
Next the rear seat carrier plate, remove the six screws and unclip the trim round the edges, it’s worth while removing the 2 aluminium spacers (yellow arrows) before taking the plate off.

The base plate is secured by 7 bolts, the 4 on the “top” are easy to get at, if you have the BMW pannier mounting rails fitted it’s simpler to remove them to get access to the 2 screws n the side. The final screw holds the lock assembly in place; it’s easy to miss being tucked in under the rider seat area.

The base plate can now be lifted clear ready to trim the rear plastic to enable the braces of the top box frame to be bolted to the chassis. Hepco and Becker supply a template to mark the area to be removed. I positioned this with masking tape to secure it in place and also protect the paint work in case of a shaky hand while wielding the Dremel,

I used a small sanding drum watching the speed to prevent burning the plastic. Took about five minutes with some final gentle smoothing of the newly cut edges.

Once finished the plate can be refitted on the bike, I found it easier to remove the blanking screws on the ends of the chassis prior to fitting it.

Refit the rear seat carrier at this point, ready to receive the bikes original rack.
The Hepco and Becker carrier fits on top of the original rack and is secured using the 2 longer allen headed bolts and washers supplied with it, the shorter screws are used to fit the bracing struts to the end of the chassis. I used a drop of Loc-tite to keep them in place.


Once the bolts are tightened it’s simply a case of refitting the original rack and bolting the new carriers braces to the chassis. Owing to the angle involved it can be a bit tricky getting into the allen bolts, I would recommend covering the top of the brake light to prevent possible scratching.
Finally tighten all the bolts before sliding the box into place.
For reference the torque values for the the various bolts are as follows:
Luggage carrier
Luggage rack to rear frame, center, M6 x 25 8 Nm (6 ft-lbs)
Luggage rack to rear frame, at sides, M6 x 30 8 Nm (6 ft-lbs)
Rear carrier to rear frame section, M6 x 20 8 Nm (6 ft-lbs)
Luggage carrier to rear carrier, M5 x 16 2 Nm (1 ft-lbs)
Lock, seat latch, to rear carrier 2 Nm (1 ft-lbs)
Clamp, case holder to rear frame, M6 x 50 12 Nm (9 ft-lbs)
Case holder through rear carrier to rear frame at top, M6 x 35 12 Nm (9 ft-lbs)
Adapter plate to luggage rack, M6 x 40 8 Nm (6 ft-lbs)
Adapter plate to topcase support, M6 x 14 8 Nm (6 ft-lbs)
Topcase support to rear frame, M6 x 20 8 Nm (6 ft-lbs)
Hook retainer to adapter plate, M6 x 14 8 Nm (6 ft-lbs)
Retaining pin for seat, rear, M6 8 Nm (6 ft-lbs)
Hepco and Becker do not provide torque values for their rack.


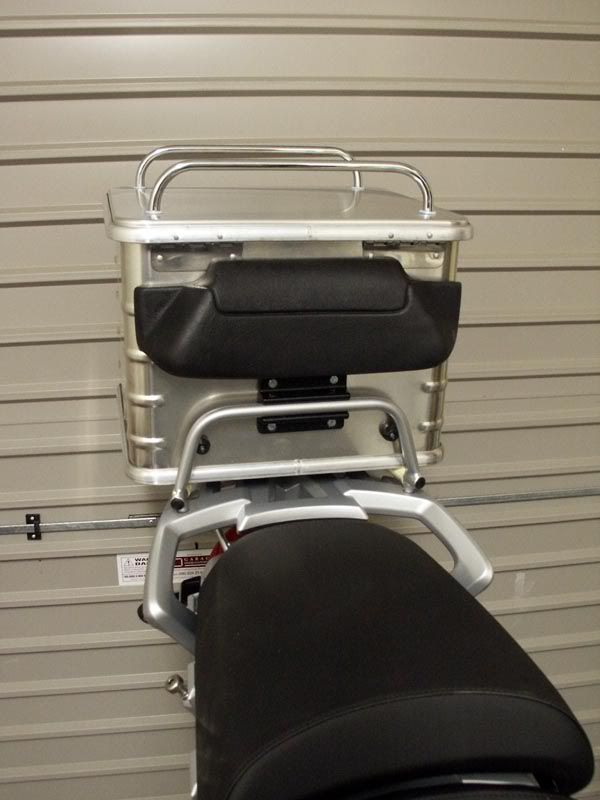
I had ordered an optional backrest for the top box, and I was supplied with a set of retaining bushes to stop lateral movement of the box. These require drilling the box to bolt them in place, there is no template provided so I centalised the box on the frame , locked it in position and ran a piece of masking tape over the area where the retainers would be fitted. This gave me a point of reference to position the retainers at the same height as well as a protective area when drilling.
I found the retainers did not quite extend enough to cover the inner edge of the frame so used rubber tap washers as spacers, perfect size and not noticeable.
The backrest again required drilling two mounting holes but a template was supplied for these which made it very simple once you got it lined up.
So that’s it, all fitted and ready to go.
Very impressed with the quality of the kit, feels rock solid on the bike and the locks and catches are very secure.
Hope this helps anyone considering fitting a box of any description on their 1200, if I’ve missed anything let me know.
Starting point was to remove the bikes rear carrier plate, its held in place by three bolts as marked, watch out for the spacer on the top mount, you need to lift it out before removing the rear seat plate or it can go rolling across the floor.
Next the rear seat carrier plate, remove the six screws and unclip the trim round the edges, it’s worth while removing the 2 aluminium spacers (yellow arrows) before taking the plate off.
The base plate is secured by 7 bolts, the 4 on the “top” are easy to get at, if you have the BMW pannier mounting rails fitted it’s simpler to remove them to get access to the 2 screws n the side. The final screw holds the lock assembly in place; it’s easy to miss being tucked in under the rider seat area.
The base plate can now be lifted clear ready to trim the rear plastic to enable the braces of the top box frame to be bolted to the chassis. Hepco and Becker supply a template to mark the area to be removed. I positioned this with masking tape to secure it in place and also protect the paint work in case of a shaky hand while wielding the Dremel,
I used a small sanding drum watching the speed to prevent burning the plastic. Took about five minutes with some final gentle smoothing of the newly cut edges.
Once finished the plate can be refitted on the bike, I found it easier to remove the blanking screws on the ends of the chassis prior to fitting it.
Refit the rear seat carrier at this point, ready to receive the bikes original rack.
The Hepco and Becker carrier fits on top of the original rack and is secured using the 2 longer allen headed bolts and washers supplied with it, the shorter screws are used to fit the bracing struts to the end of the chassis. I used a drop of Loc-tite to keep them in place.
Once the bolts are tightened it’s simply a case of refitting the original rack and bolting the new carriers braces to the chassis. Owing to the angle involved it can be a bit tricky getting into the allen bolts, I would recommend covering the top of the brake light to prevent possible scratching.
Finally tighten all the bolts before sliding the box into place.
For reference the torque values for the the various bolts are as follows:
Luggage carrier
Luggage rack to rear frame, center, M6 x 25 8 Nm (6 ft-lbs)
Luggage rack to rear frame, at sides, M6 x 30 8 Nm (6 ft-lbs)
Rear carrier to rear frame section, M6 x 20 8 Nm (6 ft-lbs)
Luggage carrier to rear carrier, M5 x 16 2 Nm (1 ft-lbs)
Lock, seat latch, to rear carrier 2 Nm (1 ft-lbs)
Clamp, case holder to rear frame, M6 x 50 12 Nm (9 ft-lbs)
Case holder through rear carrier to rear frame at top, M6 x 35 12 Nm (9 ft-lbs)
Adapter plate to luggage rack, M6 x 40 8 Nm (6 ft-lbs)
Adapter plate to topcase support, M6 x 14 8 Nm (6 ft-lbs)
Topcase support to rear frame, M6 x 20 8 Nm (6 ft-lbs)
Hook retainer to adapter plate, M6 x 14 8 Nm (6 ft-lbs)
Retaining pin for seat, rear, M6 8 Nm (6 ft-lbs)
Hepco and Becker do not provide torque values for their rack.
I had ordered an optional backrest for the top box, and I was supplied with a set of retaining bushes to stop lateral movement of the box. These require drilling the box to bolt them in place, there is no template provided so I centalised the box on the frame , locked it in position and ran a piece of masking tape over the area where the retainers would be fitted. This gave me a point of reference to position the retainers at the same height as well as a protective area when drilling.
I found the retainers did not quite extend enough to cover the inner edge of the frame so used rubber tap washers as spacers, perfect size and not noticeable.
The backrest again required drilling two mounting holes but a template was supplied for these which made it very simple once you got it lined up.
So that’s it, all fitted and ready to go.
Very impressed with the quality of the kit, feels rock solid on the bike and the locks and catches are very secure.
Hope this helps anyone considering fitting a box of any description on their 1200, if I’ve missed anything let me know.


")


")