Sebring Y-piece problems

  • Thread starter Thread starter goose
  • Start date Start date

goose

Guest
Sebring Y-piece came this week, missus taking kids to the m&m movie, so this evening decided to fit it.

As I had decided to disconnect lambda, unhooked petrol tank, disconnected petrol lines, pushed tank back, sensor disconnected, silencer off, cat off, sensor removed ... no problem. I am invinsible!:D

Now to fit the Sebring Y-piece, nice new part no problem.

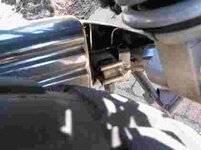
Y-piece pushed onto manifold, loosely inserted the mainstand screws, and then slotted the silencer onto Y-piece. Once I get the silencer to rear frame screw I can then tighten everything up and away I go. Well that's what I thought......that’s when the problem started.

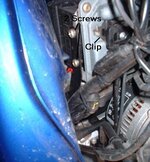
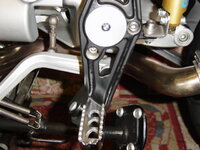
I can't get the silencer screw into the rear frame. The problem seems to be caused by brackets welded onto the bottom of the Y. There are 3 brackets at the bottom of the Y-piece, what for....I don't know, the cat just has a plain tube. Anyhow 2 of the brackets prevent me pushing the silencer far enough onto the Y to get the screw in.

The only option seems to be to hacksaw off 2 of the brackets tomorrow so I can push the silencer further down so I can fix the silencer to the frame.

Frustrated, any suggestions, anyone else had this problem.

And another thing...

RANT
Christmas week, time to give my love a present, so ordered Y-piece Touratech web site, week or so later nothing, emailed, nothing, phoned, nice chap, very nice chap, explained, he checked, no order, how ordered, web site, nice chap, we have been so busy we have had no time to check the online orders.
ENDRANT
 
Just cut the surplus brackets off, they dont appear to be any use on a GS, I used a cold chisel and a lump hammer as i didnt have a disc for my angle grinder and shops were shut when it was in bits....

Iain Mac
brute force and ignorance.. works for me
 
brackets

just cut them off like ian says,not sure about the cold chisel bit though I used a grinder and wet and dry to get all the marks out and it come up nice.Andy
 

Attachments

  • dsc00117.jpg
    dsc00117.jpg
    148.4 KB · Views: 507
Rust!

Andy

There appears to be a few spots of corrosion on your gear lever linkage - very poor show!!

:D


Greg
 
RUST

I just knew someone would pick that up. I am seeing someone wednesday about new linkages and possibly a new gear lever and rear footrest hangers made out of billet alloy but harris style he makes a lot of stuff for the SB teams and knows his beans so look out for the pics,depending on price of course!!
 
Re: RUST

andy malton said:
I am seeing someone wednesday about new linkages and possibly a new gear lever and rear footrest hangers made out of billet alloy but harris style he makes a lot of stuff for the SB teams and knows his beans so look out for the pics,depending on price of course!!


I was only joking ........!


:jester

Greg
 
Hi Goose!

Seems others have had the same problem but it surprises me a little, as I would have thought both the bike and the y-piece would all the the same from one to the next. Apparently not. :(

I saw that the silencer wouldn't bolt straight on, but with a little jiggling it did, but it was close. I guess you tried doing it all loosely and twisting the silencer maybe while getting someone to hold the y-piece up? I did that and got the missus to hold it while I put the silencer bolt in. Then tightened up the rest. I guess it doesn't make a difference apart from the work as if you keep the cover piece you don't see it anyway unless you look in from the right side like this - good luck anyway.

Julian :)
 
Must have hit preview again...:D
 

Attachments

  • 100-0099_img.jpg
    100-0099_img.jpg
    6.6 KB · Views: 467
Strange - my Sebring Y went on no probs in about 20 mins. No hacksawing, chiselling or bad language. Sorry to hear of your problem!
 
It has been one of those weekends were nothing seems to have gone right. I hacksawed away and got the brackets off and that did the trick.

Maybe it is using the Y-piece with the standard can.

Thanks everyone
Goose

:)
 
Ok, getting nervous now....

I have a Sebring Y piece sitting in its box in the garage waiting to be fitted. WAS looking forward to it, now getting very nervous about the process, what with posts on lugs, CCPs, resetting, idle speed probs, etc, etc....

Never mind, makes life interesting eh!:p

BLL
 
You are in good company

Stick with it brother. You are in good company but there is plenty of support to overcome the problems. I was going to throw in the towel after the performance just getting the standard silencer off but it ain't going to beat me now!!

Keep in touch, David:beerjug:
 
Took the bike on a short run to work this morning just to check everything was OK after fitting the silencer. I also put a BBPower chip in at the same time. Roads were damp so couldn't really say if it has made must difference yet. I was expecting a few pops and bangs on the overrun, but not a peep. Just pushed the pipes on a clamped up, so it was not all bad.

Goose
 
Power chip

Hi Goose, Likewise fitted the Y piece and Titanium Remus end can. Everything was a breeze and fitted perfectly weithout any bending straining, hack sawing or bashing. Result, bloody fantastic!!! Different bike.

Can you tell me more about the power chip. You say you fitted it yourself. Can you talk me through it? Is it 'plug and play', what other adjustments if ant etc.

Cheers David:beerjug:
 
David,
The bbpower chip was very easy to fit. The instructions are in machine translated German so you have to read them carefully. Simon Thomas has put the instructions for an R1100GS on his GS mods http://www.2ridetheworld.com Very similar for a R1150GS apart from the air funnel bit.

Briefly, remove seat, and pull off the side panel (held by 3 push fittings) so that you can unbolt the fuel tank, preferably not full. The fuel tank is held be on by a single bolt, the nut is not captive so be careful not to drop it like I did. Pull the tank back so that you can get at the Motronic Box. If you have a 02 1150 it should have quick release fuel lines that can be disconnected and give you a bit more room. These connectors are just above the o/s telelever pivot

Attached is a picture of the box looking from the o/s front under the tank. The silver box is where the chip goes.

Unhook the clip and pull the connector off. Then remove 2 screws on either side of the box and pull the box out.

Remove 4 torx screws from the box and gently prise it open with a screwdriver. Carefully lever the old chip out and replace with the new chip. Then put everything back together.

The final thing is to set remove the Codec plug and set the program with the spade connectors according to your bike's exhaust configuration.

After that turn on the ignition and listen for the fuel pump. If that is OK do a TPS reset and start the engine.

That was it.
 

Attachments

  • image5.jpg
    image5.jpg
    33.5 KB · Views: 341
what kind of price are you paying for the y pipe in the UK...I will be visiting London in Sept and might pick one up if he price is reasonable
 

Similar threads


Back
Top Bottom