950 Adventure Head Bearings

nevil280659

Active member
UKGSer Subscriber
Joined
May 7, 2013
Messages
181
Reaction score
1
Location
Kent
In an effort to sort out a very small low speed handling issue ( front wheel tracking when stopping at a junction etc) I thought I'd adjust my head bearings. I had done the 'front wheel off the ground, bars from side to side check' and not found any 'notchyness' but there was definitely something there in the ride that I wanted rid of.

I followed the service manual instructions, loosened off the pinch bolts and turned the blind nut perhaps a quarter of a turn (quite tight though) and had a tap round with the banjo mute, before pinching things back up - and what a result! My previously smooth and definitely un-notchy steering was transformed into the what can only be described as being as notchy as a very notchy thing, with a HUGE centre bias at the bars.

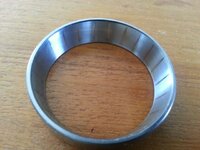
So, new head bearings it is then. I've got these on order (should be here mid-week) and will start tearing the front end down today.

I wondered whether anyone from the forum has done this job before and whether there are any tips / tricks in the collective consciousness? I've seen the 'garage night' video from the KTM HOW site.

Can I simply displace the bars, leaving the cables etc attached?
Getting the bottom race off?
Getting the new bottom race on?

Is there anything I should know or anything I should do whilst I'm in there?

Cheers

Nev
 
Well....

That was fun.

Here's a photo of the lower bearing cup / seat , classic scoring here. The top cup looks unmarked (new one going in anyway) both bearings feel grainy when you move them.


Getting to the bearings and driving the cups out took me (not a mechanic) about an hour. There were no significant issues along the way (save for a sheered off mudguard retaining nut) I used a tie down strap and a cushion to secure the bars to the clocks and was able to leave everything attached, making for an easier re-assembly.

The issue now is getting the old bearing off the shaft and getting the new cups to seat in the headstock.

But that's for another day.... (i.e. when the new parts turn up!)
 

Attachments

  • cup.jpg
    cup.jpg
    41.1 KB · Views: 158
As a matter of interest what front tyre are you using?
I tried an MT21 on a 950 and it was unrideable with the tyre trying to 'walk' in slow speed turn?

As far as getting the bearing off the shaft, careful use of a grinder then a tap with a chisel will sort it if you have no special tools.
 
Nev .... You almost sound like you know what you're talking about .... :D
 
Tyres are Continental attacks - They've both got a stack of tread in them but it did cross my mind to replace the front tyre to try and fix the low speed 'tracking'.

Getting the old bearing off is a problem for me as don't have a grinder and there's no vice set up here (temporary accomodation, whilst we wait to move to a new house) I've shown the bottom yolk to me metal working bloke who suggested that his grinders were a little too 'industrial' for the job - he suggested a Dremel (I don't have one of those either!) I'll get someone to get the bugger off for me in the next day or so.

Hopefully, with the new head bearings the problem will be sorted, watch this space!

If you're in my neck of the woods I'll happily give you a hand. It's not an easy task to get the bottom race off the stem but it's not impossible. I now have a split puller which does the trick in 99% of cases!
 
Hi - If I could take you up on the offer, that would be great. I'm in Whitstable and can be with in Maidstone within 40mins or so. When's a good time to catch you?

text me (or call) 07703328636

Thanks again for the kind offer

Nev
 
Well, a quick update.

A spin over to see Mr Tunbridge (of this parish) in Maidstone for a chinwag and a hand getting the old bottom bearing off, then this afternoon, into the shed to put the bike back together.

The new cups went in - I had to hold the top yoke away with a ratchet strap to get enough access and the bottom cup was tougher to get seated but after a few minutes tapping away (using the old cup as a drive) they were in.

I packed the new bottom bearing with grease and used an old wheel bearing to drive the new bearing onto the bottom yoke shaft. The top bearing was a doddle really and I just reassembled the headstock, bolted the handlebars back on and then refitted the forks.

I left everything very loose and after getting the wheel remounted I adjusted the new bearings and went round and torqued everything up (am I alone in finding the wheel mounting routine a bit of a black art?) The front mudguard was treated to a fender extender and then it was on with the glove box, side pods and screen.

It was still light, so there was time for a quick road test to find out just how wonderful my new steering bearings were. Click the seat on, key in slot, on with the ignition and.....

The lights are on but no-ones home! - Engine turns over but will not fire.

Worrying that I was already pushing the limits of a very restricted skill set, I retraced my steps. I had moved the fuel tank to retrieve a dropped air box bolt bolt - I'd forgotten to turn the fuel on! So, on with the taps and..... Nothing.

Kinked fuel line? Nope. Checked the fuses, nothing wrong here. Bugger. Off with the side pods, off with the glove box, and check the back of the fuse box and noticed a connector at the bottom of the CDi unit. Gave it a shove and it slid home.

Press button, starts first time.

The moral of the story.. It's easy to disturb the main connection to the CDi box when you displace the top yoke to change the head bearings.

I found this job fairly straightforward, although I needed a little help here and there, it all went quite well. Slight hiccough at the final fence had me stumped for a little while but I worked it out. I'm not a mechanic but I can take things to bits and put them back together again. I found the process quite enjoyable and have the satisfaction of knowing that the jobs been done. The total cost was £17.60 for the bearing / seal kit and a drink for a mate. I hate to think how much a dealer would charge.


Test ride tomorrow.

:)


Back
Top Bottom