Airhead timing chain question

Bubb

Dogsbody
UKGSer Subscriber
Joined
Nov 14, 2011
Messages
5,833
Reaction score
3,919
Location
London
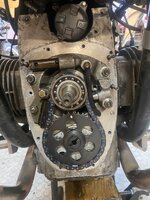
I recon it’s about time my timing chain was replaced ( 1983 R80st… circa 75000 miles plus) … bit rattly/ noisy for my liking.
Are there any pitfalls to consider before I dive in , and what else should I think about changing whilst in there?
I do have the bit to remove the alternator, don’t think I need any other special tools….. or do I?
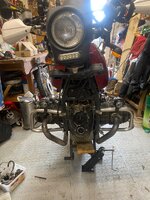
It doesn’t look too difficult, just time consuming getting the front parts off to gain access…. So I’m sure it’s within my capabilities ( which are not that good)

Thanks for any advice ( piss taking also accepted)
 
Battery disconnect before removing the alternator cover. You may wish to replace the 2 oil seals in the timing cover. Sometimes you have to heat up the timing cover to release the crank bearing. The chain split link can be fiddly. Assuming you buy a kit you'll get the tensioner, spring etc. It should all be straight forward; worth read of the Haynes before you start. Oh and you'll need a timing cover gasket, too. Worth taking photos of where all the diode board wires are plugged into and also the bean can so you get the timing close when you rebuild.
 
Wot he said 👆

Except that If it’s the original timing chain there won’t be a split link.

Fingers crossed it’s not the first time this job’s been done 🤞
 
Thanks Tim and Pete.

Will make sure i order gaskets, as hadn’t thought of that..
Also good tip re heating the cover.
Know about removing battery lead, so that’s okay.
Didn’t know original chain didn’t have a split link…. I will keep my fingers crossed mine has one….or I will have to think about cutting it somehow ( dremel maybe)

Will read Haynes and Clymer…and watch you tube before I dive in…. Not in a rush.

Thanks to you both
 
Use the old chain link to hold the new timing chain together. Push it in place with the two halves of the new chain together at the bottom of the lower sprocket. Turn engine by hand so the link is halfway on the run on the r/h side, then push the new link in from behind ..
you’ll understand what I mean when it’s all in front of you
:D
 
Just looked that up….. new crank sprocket needs a special puller to remove old one by looks of things…. But I don’t have the special puller……. Bugger.
Do I really need new crank sprocket.?
Don’t want to purchase a puller I will likely only use once….
 
Use the old chain link to hold the new timing chain together. Push it in place with the two halves of the new chain together at the bottom of the lower sprocket. Turn engine by hand so the link is halfway on the run on the r/h side, then push the new link in from behind ..
you’ll understand what I mean when it’s all in front of you
:D

Think i understand….the old link holds the two ends together from front… then new link is inserted from rear …pushing old link out of the way. Old link holds the ends together so you don’t struggle turning the chain to a location with more space behind….
Well….thats how I think you mean….and makes sense to me…thanks for the tip.
 
Just looked that up….. new crank sprocket needs a special puller to remove old one by looks of things…. But I don’t have the special puller……. Bugger.
Do I really need new crank sprocket.?
Don’t want to purchase a puller I will likely only use once….

I have the “special tool “.
But you don’t need it. It’s for the early twin row timing chains.
 
Will a standard three legged puller work?
Or a bearing puller?
 
I was wondering if i needed to replace the sprocket….wont know the state f it until i get all the front removed.
Just considering replacing it and the bearing whilst im in there….
Do it once, do it right!…..
 
I was wondering if i needed to replace the sprocket….wont know the state f it until i get all the front removed.
Just considering replacing it and the bearing whilst im in there….
Do it once, do it right!…..

I have never ever seen a worn sprocket.. damaged sprockets, yes. But only after the timing chain had snapped
 
Okay Neil….. thanks.
I will get around to stripping the front parts sometime soon ish…. Taking lots of notes where wires etc go.

I may well be back asking questions again …..
 
Well…. Started the timing chain replacement job.
Wheel and forks removed to give better access as I’m doing this on the garage floor ( would love a bike lift, but don’t have one…yet)
Photos taken of wiring etc, plus written notes where things go to-from..
Hope I’ve taken detained enough notes so I can get it all back together again afterwards.

Timing chain cover came off easier than I expected…. Result,
Didn’t even have to resort to heat….just a couple of taps on side with rubber hammer and off she came.

Cleaned up timing chest cover,
Cleaned off gasket…don’t know what someone used to stick the gasket on, but it was well stuck.
Gasket surface now cleaned, ready for new gasket.
 

Attachments

  • IMG_1107.jpeg
    IMG_1107.jpeg
    378.2 KB · Views: 29
  • IMG_1106.jpeg
    IMG_1106.jpeg
    406 KB · Views: 29
Good work 👍

See you have a timing chain with a split link - that should make fitting the new one much more straightforward.
 
FFS.
Used steptoes trickof inserting old joining link from the front to hold the two parts of the chain together….
But even on rotation it all round til there is more space at the rear, I am finding it impossible to insert the new joining link from the rear.

Bugger…… walked away from it twice now.
Time to Google and see if there are any tips to get the new link in from the rear ( apart from having tiny tiny fingers)
 
Last edited:
FFS.
Used step toes twice of inserting old joining link from the front to hold the two parts of the chain together….
But even on rotation it all round til there is more space at the rear, I am finding it impossible to insert the new joining link from the rear.

Bugger…… walked away from it twice now.
Time to Google and see if there are any tips to get the new link in from the rear ( apart from having tiny tiny fingers)
I’m trying to visualise it but would needle nosed pliers with an angled nose help to hold it up to the links’s?


Back
Top Bottom