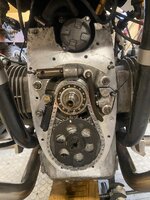
The method I used is to remove the left chain guide (just to improve access), line up the 2 timing marks and get the 2 loose ends off the new chain to meet on the bottom of the cam sprocket.
Hold the 2 ends together by partially inserting the old joiner from the front. Just enough to hold them together.
Then rotate the engine clockwise until the join is over the left crankcase aperture (as you’re looking at it) - gives you rear access. You can block the aperture with a rag or a bit of kitchen roll - just in case.
I then hold the new joiner on a magnetic rod to offer it up from behind and then push it through with a small screwdriver.
It is a fiddly job.
Happy to pop over for moral support
Last edited: