Check ya BALL joint

  • Thread starter Thread starter ozrockrat
  • Start date Start date
I've just caught-up on the story so far, and I can't see where you say you have got a new ball joint, only a nut.

If it was all tightened-up properly and there was play, how will the play be removed just by changing the nut?

Or am I missing something (again?) :confused:

Jay has sold me the fork bridge with ball joint already installed as shown earlier in the thread. All I need are the parts:D
 
I've just caught-up on the story so far, and I can't see where you say you have got a new ball joint, only a nut.

If it was all tightened-up properly and there was play, how will the play be removed just by changing the nut?

Or am I missing something (again?) :confused:

post 21 :thumb2


FFS - is this saga still going on ??

a decent rattle (air) gun would take it apart in 2 seconds - and refit - maybe 10 seconds.
 
post 21 :thumb2


FFS - is this saga still going on ??

a decent rattle (air) gun would take it apart in 2 seconds - and refit - maybe 10 seconds.

I don't have one.

I'm riding my other bike in the mean time. As soon as the part arrives I'll install it:thumb2
 
Nope won;t work that way!

You need to drop them DOWN thru

You need the dust seals off to clear the top of the fork leg

It isn;t that hard Honest You just gotta be methodical!

Kaister look away now:D

Can't get the bloody bridge off. it moves about an inch and I can't get it to go any further. I'm obviously doing something wrong.\

Should the ball joint be attached to the wishbone when I'm trying to drop the forks through the bridge? I've detached it from the wishbone at the moment and I'm trying to move the bridge up the forks bit by bit with a hammer and a block of wood. Do I need two screwdrivers? was thinking of two shock adjusters pulling the bridge apart whilst someone else is moving the bridge up. What's the best way of doing this? Is the mudguard attached to the bridge or does is it just supported by it? My extra pair of hands are very helpful but she's better with ladylike stuff and I'm not succeeding here as she's not great with the hammer. Tips other than getting some more useful help?

i started with the bridge attached to the wishbone but no joy there.

do i need to take the blasted wheel off?...thinking about this ... of course i've to take the wheel off!?

I've had enough for this evening. Time to put my helpers ladylike hands to work elsewhere!

Edit: No need to answer folks. I'll take the wheel and brakes off and slide the forks DOWN and out and I might even paint the lower part whilst their off. I WILL be the on the road by Saturday.
 
In the wods of our geru Mr S, walk awy from the bike NOW!.
Never heard any thing like this in my life.
 
In the wods of our geru Mr S, walk awy from the bike NOW!.
Never heard any thing like this in my life.

Thanks for the your help. To say I'm embarrassed to have to have ask is an understatement. I've asked because I don't want to damage anything by forcing it. Haynes doesn't help. Your not much either. Thanks for your time though.
 
Owen Remove the wheel and brakes and ABS sensor if you have one IF the sensor is tight just unplug the cable at the right hand side front of the frame and clip off the cable ties

NOTE Before you remove the front wheel tie the centre stand to the front EXH pipe so that the stand cannot collapse forward and things get very messy at that point a small trolley or bottle jack can also be a bonus just raised to touch the underside of the bash plate

Anyway Lift off the plastic caps on the TOP yoke

Under that is a 14 mm nut Just below the top yoke there is a 21mm hex that will allow you to hold against the top nut so you can remove it and free the top end of the forks

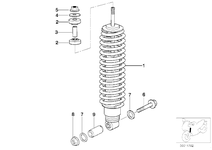
NB do not pull or try to compress the sliding fork parts there is a small allen screw with an o ring which seals the air in the tube, remove it and you can slide the tubes down to make them easier to handle Re install the small allen screw

Next Pop up the dust cap over the fork seal on the lower part of the fork get 2 WOODEN clothes pegs and GENTLY tap one in top and one in bottom (of the gap that the pinch bolts close) just open it enough so that the bridge will clear the upper part of the fork this will open the tube enough to slide the stanchion thru the fork with the dust cap loose

N.B. Do not hold the top sliding section of the fork or it will pop out and you will piss fork oil all over the place!

N.B. please do not guess torques on reassembly if you overdo it it will tear the alloy and if you underdo it it will become loose!

When you have replaced the bridge and have it all torqued up and reinserted your compressed forks undo the little allen key and extend them approximately up to the height they would be normally and reinsert the allen key compress gently and slide the spigot thru the top yoke and refit your nut and torque up

Wheel etc should be a doddle :D
 
Hands off the bars straight and true.
2e07d4d3-937f-4e67.jpg
thanks. Old bridge has noticeable wear.
 
Very pleased with the results after changing the lower fork bridge and ball joint. Vast improvement.

Unfortunatly, it has shown up other areas that have movement and wear:blast

I've got a half mm movement at the top of the front shock and plan on changing the bush's.
showparts.do


Of more concern, is a 1mm vertical movement of the front wheel on the front axle. The wheel visibly moves up by 1 mm when bounced off the ground and pushes against the springs on the calipers. The movement is within the hub.

showparts.do


If the internals of the wheel hub were damaged during the impact, would I be wise to replace the pipe (no 6 in diagram) and the bush's? as well as the bearings and seals? Anything I've read just mentions the bearings and the seals.

I found a link on here for cheap bearings but can't find it now. Anyone?

Cheers:aidan
 
Pix attached this time. Can't seem to link off the OEM parts site.
 

Attachments

  • front strut.PNG
    front strut.PNG
    10.4 KB · Views: 127
  • ftront jub.png
    ftront jub.png
    8.9 KB · Views: 127
Owen all there is to have movement is the wheel bearings

You must have great feel to be able to notice that

the "pipe" is a spacer so that the wheel bearings are not under pressure and has no wearing surfaces and is "unlikely" to be damaged

wheel bearings would be most likely in this instance
 
Owen all there is to have movement is the wheel bearings

You must have great feel to be able to notice that

the "pipe" is a spacer so that the wheel bearings are not under pressure and has no wearing surfaces and is "unlikely" to be damaged

wheel bearings would be most likely in this instance

Jay, I wish you were not so far away. I'm swapping my wheel for another adv wheel over the weekend to see if it's the same. It's only a short term (ten minute) loan and I'll stick new bearings in mine if the spare dosn't have movement.Thanks for the pipe info.

...Next time I have an accident I'm ringing the insurance company.
 
Load of shite. preload adjuster. Don't ask why I didnt buy it but if it worked consistently, it might be great. Really no idea. Come on hyper pro spare parts please
 
Very happy with the ball joint though. Makes a big difference. I'll be sorted soon...as I get a nylon bearing.

Rock on!


Back
Top Bottom