


You are using an out of date browser. It may not display this or other websites correctly.
You should upgrade or use an alternative browser.
You should upgrade or use an alternative browser.
DOES THIS COUNT?
- Thread starter The smudger
- Start date
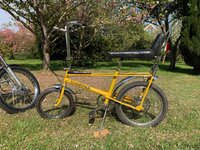

Definitely.I think they are quite sought after nowadays

We now have a separate section for peddle powered loveliness … Just saying 

We now have a separate section for peddle powered loveliness … Just saying
Pedal.


- Joined
- Nov 5, 2015
- Messages
- 13,439
- Reaction score
- 5,660
Mk 1 

Definitely.I think they are quite sought after nowadays
So Henry Cole tells us. What's the plan Steve?
They look stylish retro fun these days, but IIRC they weren't exactly a pleasure to ride any distance. Still I'm probably missing the point - perhaps I should get my 40 year old racing bike down from the garage loft & show it the oily rag. It's a shame some scrote stole my ultra-lightweight fixed wheel racer years back - it was a handbuilt special job originally & would be around 70 years old by now. Plod called me once, after about a 12 month, as they thought they had found mine amongst a huge haul of bikes that had all been stolen from the local University campus. Turned out to be a false alarm sadly, just a heavy shoppers bike in a similar colour, with an SA 3-speed.

Mk 1
Yes - the more dangerous one! Has the straight frame rail from seat to rear hub (not curved like later ones) so wheelies were easier! Happy days.
A
I had an emerald green MK1 

Pedant
The knob did the same to me with the same word last weak.
I said I was going to spell things rongly on purpose.

Thanks to whoever moved this! I didn't realise we had a forum for pedal bikes?
I bought the bike in January, from a chap in Scotland, and with the help of a couples of really nice helpful 'Tossers' got it back down here (Mike and Paul, many thanks chaps!). Mike (Schtum) went and viewed the bike for me, and Paul (Pablo1) bought the bike for me and kept it in his garage for a while! What a great site this is, goes without saying i guess but i would happily return the favour to any of you tossers!
Luck was with me, a good friend in our village was on business in Glasgow the following week, and his hotel was just around the corner from where Paul stays, result!
So, got it home and just looked at it for a week, had one as a kid, i remember my dad paid a tenner for it, should have bought a few... I specifically wanted a MK1, as i had one originally, an orange one, but the MK1's are rarer, and therefore more expensive, but i say if you want something, and can afford it (plus its an appreciating asset) then do it.
The rear wheel is wrong, as is the front. But i knew that and the price reflected it. On closer inspection the front forks were bent (normal, bash into a kerb, and soft mild steel forks will bend..). So, a quandary, do i leave it as is, or restore? I decided to restore for the following reasons;
1. The wheels were wrong plus a few non OE parts meant this bike was not an 'Original survivor'.
2. The front forks were bent so i was unsure if the frame was bent/cracked, so the paint really needed to come off.
3. In my humble opinion, it has just gone 'too far'.
4. It was the wrong colour!
5. The rear 'sissy bar' was seized absolutely solid in the rear uprights, and the only way i could successfully remove and free it up would be to use heat, which took the paint off anyway..
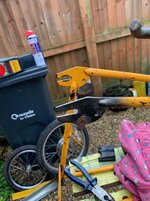
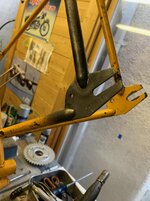
So, i stripped it down. 20 minutes later we are down to the bare frame and seized 'sissy bar'. Boy was it seized! I used a hot air gun first, not a chance.. The a small blow lamp. This unfortunately melted the braze where the upright attached before it came free, so, i decided to remove the upright completely from the frame. This meant i could put the whole thing in a vice and heat it up properly. I finally came out, and with a bit of sweet talking to an old mate I had the frame brazed back together.
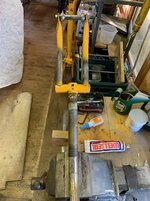
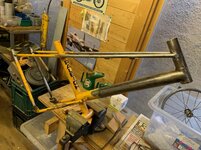
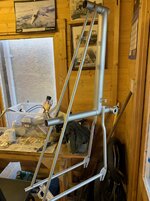
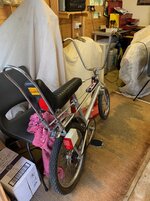
Pictures.
1. As i received it.
2. Strip and remove rear frame upright..
3. Sissy bar out, now the frame needs to be brazed.
4. Spent about 2 hours gently heating and straightening the front forks.
5. Paint hand stripped from the frame. This took 2 days in all and i have no finger prints now! Good news though, its not damaged.
6. Frame in primer.
Photo 6 will be in the next post.
More to come!
I bought the bike in January, from a chap in Scotland, and with the help of a couples of really nice helpful 'Tossers' got it back down here (Mike and Paul, many thanks chaps!). Mike (Schtum) went and viewed the bike for me, and Paul (Pablo1) bought the bike for me and kept it in his garage for a while! What a great site this is, goes without saying i guess but i would happily return the favour to any of you tossers!
Luck was with me, a good friend in our village was on business in Glasgow the following week, and his hotel was just around the corner from where Paul stays, result!
So, got it home and just looked at it for a week, had one as a kid, i remember my dad paid a tenner for it, should have bought a few... I specifically wanted a MK1, as i had one originally, an orange one, but the MK1's are rarer, and therefore more expensive, but i say if you want something, and can afford it (plus its an appreciating asset) then do it.
The rear wheel is wrong, as is the front. But i knew that and the price reflected it. On closer inspection the front forks were bent (normal, bash into a kerb, and soft mild steel forks will bend..). So, a quandary, do i leave it as is, or restore? I decided to restore for the following reasons;
1. The wheels were wrong plus a few non OE parts meant this bike was not an 'Original survivor'.
2. The front forks were bent so i was unsure if the frame was bent/cracked, so the paint really needed to come off.
3. In my humble opinion, it has just gone 'too far'.
4. It was the wrong colour!
5. The rear 'sissy bar' was seized absolutely solid in the rear uprights, and the only way i could successfully remove and free it up would be to use heat, which took the paint off anyway..
So, i stripped it down. 20 minutes later we are down to the bare frame and seized 'sissy bar'. Boy was it seized! I used a hot air gun first, not a chance.. The a small blow lamp. This unfortunately melted the braze where the upright attached before it came free, so, i decided to remove the upright completely from the frame. This meant i could put the whole thing in a vice and heat it up properly. I finally came out, and with a bit of sweet talking to an old mate I had the frame brazed back together.
Pictures.
1. As i received it.
2. Strip and remove rear frame upright..
3. Sissy bar out, now the frame needs to be brazed.
4. Spent about 2 hours gently heating and straightening the front forks.
5. Paint hand stripped from the frame. This took 2 days in all and i have no finger prints now! Good news though, its not damaged.
6. Frame in primer.
Photo 6 will be in the next post.
More to come!
Attachments
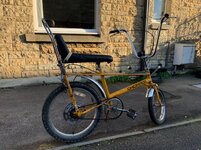
So, the frame is now repaired, and in silver primer. I used Hammerite straight to metal paint as i plan next year to get the bike professionally painted in orange, plus i had a tin or 2 floating about anyway.
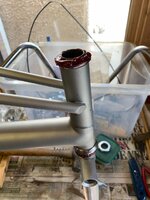
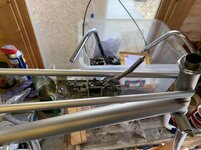
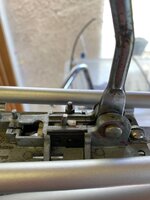
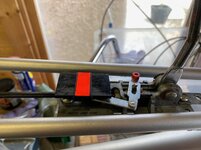
A few photos of the bike being re-built. I am a stickler for things being right, and working. So the bike was built as a sort of 'dry build' in the primer. I wanted to build it back up for another reason, too many parts in the garage anyway plus my memory isn't what it was! I looked for some orange Hammerite, to give me a 'flavour' of what it will be like, but they don't do it, so it settled on Hammerite smooth Yellow, which is almost an exact match for the original colour!
1. Front forks go in, with new ball bearings (£3 for a set, rude not too!).
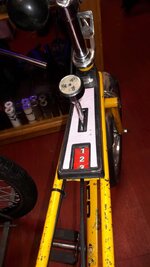
2. Gear shifter assembly in.
3. Look at the 'pin' in the centre. it should be plastic but they break off with age. Mine had so i drilled through and screwed an old spoke in, cutting it off to size.
4. New gear slider mechanism. These are often 'stolen' as they are not cheap to replace. You can buy aftermarket ones, but i found a NOS Raleigh one, £40! (ouch!).
5. How it should look. The gear 'window' was missing, another lucky 'find' £10..
More to follow.
A few photos of the bike being re-built. I am a stickler for things being right, and working. So the bike was built as a sort of 'dry build' in the primer. I wanted to build it back up for another reason, too many parts in the garage anyway plus my memory isn't what it was! I looked for some orange Hammerite, to give me a 'flavour' of what it will be like, but they don't do it, so it settled on Hammerite smooth Yellow, which is almost an exact match for the original colour!
1. Front forks go in, with new ball bearings (£3 for a set, rude not too!).
2. Gear shifter assembly in.
3. Look at the 'pin' in the centre. it should be plastic but they break off with age. Mine had so i drilled through and screwed an old spoke in, cutting it off to size.
4. New gear slider mechanism. These are often 'stolen' as they are not cheap to replace. You can buy aftermarket ones, but i found a NOS Raleigh one, £40! (ouch!).
5. How it should look. The gear 'window' was missing, another lucky 'find' £10..
More to follow.
Attachments
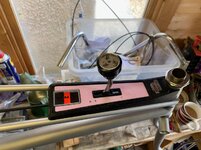
So, here is a photo of the gear shifter assembly when i bought it. It was a right lash up to be honest, like i said, i like things to be right, so although it cost c. 50 quid to get it sorted, at least its is 'correct' now. The silver trim has a couple of what look like fag burns in it, but it is OE so it will stay. Sure i can buy another, a copy, but it wouldn't look right in my opinion.
Attachments
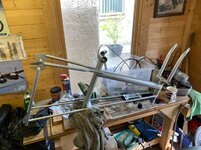
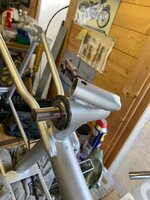
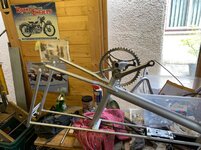
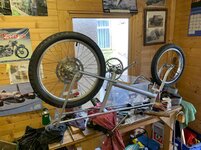
Here are a few more photos of the 'dry' build.
1. So, now the forks are in, and the gear lever assembly, i can flip the frame over and start at the bottom!
2. The crank goes in. The bearings were OK here, so i just cleaned and greased them.
3. Sprocket and pedal arms now. Sprocket is original. MK1's had a 48t front sprocket, this is the OE part so i spent a few hours and some solvol autosol and got it up quite well! The pedal arms are OE as well, so i spent a bit of time polishing and straightening them, they look good!
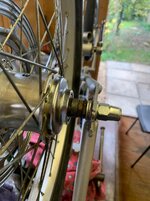
4. The wheels are given a good clean up, the front wheel was out of true so i spent a while trueing it up. I know its the wrong wheel but until i can get a 'correct' one it has to at least look good!
5. Like i said, with of the wheels are wrong. The rear is from a MK3 Chopper. The hub on the MK3 is narrower, the 'gorilla' who fitted it just tightened the nuts, which of course bent the frame. I just added 3/8 washers and spaced/centralised it. The front is also wrong, its from a Raleigh Tomahawk, only 20 spoke, and again a narrower hub, which again was just 'tightened up', which of course pulled the forks in and bent them, a few washers and it was centralised. Why people don't just do things properly is beyond my comprehension..
More to follow!
1. So, now the forks are in, and the gear lever assembly, i can flip the frame over and start at the bottom!
2. The crank goes in. The bearings were OK here, so i just cleaned and greased them.
3. Sprocket and pedal arms now. Sprocket is original. MK1's had a 48t front sprocket, this is the OE part so i spent a few hours and some solvol autosol and got it up quite well! The pedal arms are OE as well, so i spent a bit of time polishing and straightening them, they look good!
4. The wheels are given a good clean up, the front wheel was out of true so i spent a while trueing it up. I know its the wrong wheel but until i can get a 'correct' one it has to at least look good!
5. Like i said, with of the wheels are wrong. The rear is from a MK3 Chopper. The hub on the MK3 is narrower, the 'gorilla' who fitted it just tightened the nuts, which of course bent the frame. I just added 3/8 washers and spaced/centralised it. The front is also wrong, its from a Raleigh Tomahawk, only 20 spoke, and again a narrower hub, which again was just 'tightened up', which of course pulled the forks in and bent them, a few washers and it was centralised. Why people don't just do things properly is beyond my comprehension..
More to follow!
Attachments

When finished don't forget to peg some cards to the forks so they rub against the spokes
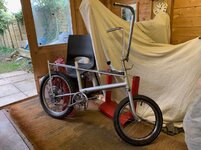
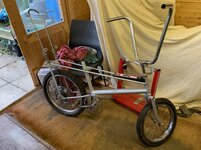
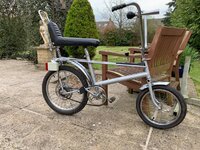
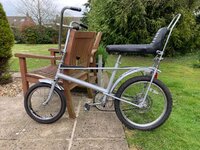
So, the bike is now on its wheels.
A few more shots of the build..
1. So its now on its wheels! Handlebars clean up nicely. Again, i think these are OE so a good clean up only for them!
2. Sissy bar in. MK1's had the rounded top sissy bar, so i think again looking at the condition this is OE. It has a few 'wheelie' battle scars, which adds to the authenticity?
3. Seat, post and rear mudguard in/on. The seat looks original, there were a coupe of holes on either side, just taped them up for now. The rear mudguard is definitely OE, no doubt. I have seen OE mudguards go on ebay for over £100! Madness, but it has to be OE for me! It took a bit of polishing up but it came up well.
4. So, front mudguard in now. this is an aftermarket part, but i have seen them on da bay for 30-50 quid, so one day...
5. A first road test round the garden, no brakes as yet, but it felt OK? 43 years and 8 stone have past since i last rode a Chopper, smile lasted a week...
A couple more later..
A few more shots of the build..
1. So its now on its wheels! Handlebars clean up nicely. Again, i think these are OE so a good clean up only for them!
2. Sissy bar in. MK1's had the rounded top sissy bar, so i think again looking at the condition this is OE. It has a few 'wheelie' battle scars, which adds to the authenticity?
3. Seat, post and rear mudguard in/on. The seat looks original, there were a coupe of holes on either side, just taped them up for now. The rear mudguard is definitely OE, no doubt. I have seen OE mudguards go on ebay for over £100! Madness, but it has to be OE for me! It took a bit of polishing up but it came up well.
4. So, front mudguard in now. this is an aftermarket part, but i have seen them on da bay for 30-50 quid, so one day...
5. A first road test round the garden, no brakes as yet, but it felt OK? 43 years and 8 stone have past since i last rode a Chopper, smile lasted a week...
A couple more later..
Attachments
Yes - the more dangerous one! Has the straight frame rail from seat to rear hub (not curved like later ones) so frame breaks easier! Happy days.
A
Fixed!!

Similar threads


- Replies
- 21
- Views
- 816
- Replies
- 4
- Views
- 338