

Fitting an Inforad Camera Detector to R 1200GS
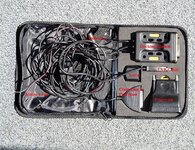
The unit arrived in its own zipped case.
It comprises: (See Photo below)
Docking Station
Processor
USB Cable and connector
Warning light
GPS Aerial
The manual advises first to contact the Inforad website online in order to register your unit and get one year’s free update for new camera locations. At the same time the processor is updated with any new items. You can also set the parameters for the approach and escape distances at a Speed camera – i.e. when the unit activates. I set mine a little longer than the preset figures so I get more warning. The processor is connected to the Docking Station and then fitted to your motorcycle, as seen in the photographs below.
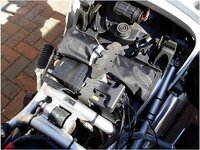
I positioned the Processor in the tool tray under the driver’s seat.(See Photo below) There is room in the tray alongside the tool kit and still room for my spare bulbs below. This is a good place on the GS as the rear socket is very close by (see photo).
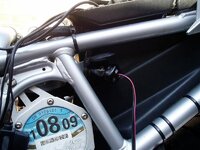
I attached a BMW plug to go into this socket.(See photo below). The Aerial and Warning unit where then fed past the tank on left hand side having first removed the side panel.
I positioned the Aerial on the centre metal bracket in the centre of the screen, after trying various locations to see it picked up the GPS signals through the screen, which it does. The unit uses 3 GPS signals to locate itself.(See photos below)
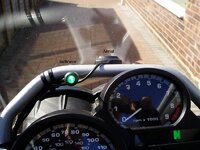
The Warning Light (Indicator) was position close to the speedo so it is in line with this when riding. The unit is fitted at the end of a flexible stalk so it is easy to bend it to the position you require.
When I was happy with the locations of all units, I secured all wires with cable ties.
To access the Docking station and processor it only requires the driver’s seat to be removed. Then the processor can be unplugged from the Docking Station and connected to your computer for updating – once a month is recommended.
Also by using the rear socket the unit can be unplugged if you need to plug something else in this socket. Fitted to the wires leading to the plug, the unit come with a 1 amp fuse fitted so there is no conflict with the Can Bus wiring on the GS or any other Can Bus fitted bike. I believe the sockets on Can Bus bikes are fused at 5 amps so anything larger will cause the system to shut off!
I then went out for a test ride, having fitted my BMW NAV II GPS (which has the speed camera locations overlaid in the map system) and used the GPS to check against the Inforad – it worked perfectly – all speed cameras showing up as they should with the Warning light changing from Green (active) to Flashing Red on approach to a camera and then Permanent Red as you close in on the camera.
For a hundred yards or so past the camera the unit continues in Permanent Red mode and then goes back to Green indicating you are out of range of the camera.
The unit arrived in its own zipped case.
It comprises: (See Photo below)
Docking Station
Processor
USB Cable and connector
Warning light
GPS Aerial
The manual advises first to contact the Inforad website online in order to register your unit and get one year’s free update for new camera locations. At the same time the processor is updated with any new items. You can also set the parameters for the approach and escape distances at a Speed camera – i.e. when the unit activates. I set mine a little longer than the preset figures so I get more warning. The processor is connected to the Docking Station and then fitted to your motorcycle, as seen in the photographs below.
I positioned the Processor in the tool tray under the driver’s seat.(See Photo below) There is room in the tray alongside the tool kit and still room for my spare bulbs below. This is a good place on the GS as the rear socket is very close by (see photo).
I attached a BMW plug to go into this socket.(See photo below). The Aerial and Warning unit where then fed past the tank on left hand side having first removed the side panel.
I positioned the Aerial on the centre metal bracket in the centre of the screen, after trying various locations to see it picked up the GPS signals through the screen, which it does. The unit uses 3 GPS signals to locate itself.(See photos below)
The Warning Light (Indicator) was position close to the speedo so it is in line with this when riding. The unit is fitted at the end of a flexible stalk so it is easy to bend it to the position you require.
When I was happy with the locations of all units, I secured all wires with cable ties.
To access the Docking station and processor it only requires the driver’s seat to be removed. Then the processor can be unplugged from the Docking Station and connected to your computer for updating – once a month is recommended.
Also by using the rear socket the unit can be unplugged if you need to plug something else in this socket. Fitted to the wires leading to the plug, the unit come with a 1 amp fuse fitted so there is no conflict with the Can Bus wiring on the GS or any other Can Bus fitted bike. I believe the sockets on Can Bus bikes are fused at 5 amps so anything larger will cause the system to shut off!
I then went out for a test ride, having fitted my BMW NAV II GPS (which has the speed camera locations overlaid in the map system) and used the GPS to check against the Inforad – it worked perfectly – all speed cameras showing up as they should with the Warning light changing from Green (active) to Flashing Red on approach to a camera and then Permanent Red as you close in on the camera.
For a hundred yards or so past the camera the unit continues in Permanent Red mode and then goes back to Green indicating you are out of range of the camera.

 have a few of these.

