

I have tried to remove the standard Adventure crash bars and replace them with those lovely castings of Steptoe origin.
Anyone else thinking of this, be prepared. It is not quite as straightforward as just undoing a few bolts and doing up a few again. I have just spent nearly 6 hours on this simple operation.
The crash bars require the removal of the tank to get them off - the top bolts are hidden very nicely up under the tank, they also hold the fairing and cockpit stanchions in place. These can simply be undone, move bar out of the way and then do the same bolt up again with a bit of grease on it while it is out, of course. Don't have a full tank of fuel when you come to take your crash bars off, like I did. It will tucker you out trying to hold it with one hand and undo the quick release clips with the other (no, I don't have somewhere to hang a piece of rope from, the sky is a long way up and there are no trees on the pavement.)
The rear mounting bolts for the crash bars look simple. An 8mm allen key is all it needs. Except for the right hand bar, whihc requires a 12" minimum extension bar and socket type allen key (I only have right angle allen keys ) and no long extension long enough to reach down inside the tube. So, I trooped the whole rattling lot (wasn't spending an age putting those bits back on again) down to my friendly garage man and borrowed some tools. Got the long extension, allen bit and got the offending bolt out.
These top rear mounting bolts also hold your subframe /seat frame on. They are too long without the crash bars. Be prepared to have to either hack saw the bolts down, or have some a bit shorter ready to fit - I did neither and have thad to temporarily screw them in as far as they will go but not tight against the frame rails....asty asty until I can get this sorted, probably the other side of Christmas......
Next up, the bash plate. The bottom of the crash bars use the bash plate as part of the structure and as a frame/bracket across the bottom. Without the crash bars, there is nowhere at the front for the bash plate to fit to, unless you do some fabrication or have long bolts and bits to make it fit. I didn't, so my bash plate is now also sat on the garage mans shelf along with the fixing bolts for it.
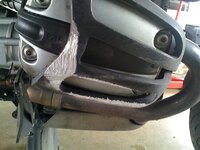
Then I came to fit Steptoe's cast crash protectors along with their stainless fasteners supplied with them. Could I get them to fit, could I hell. In the end I gave up and phoned him. He gave me a few more pointers, but I am actually now too tired to go and try. I will give it an hour or so and then go and see if I can get them to go on. What seemed like an easy enough operation has turned out to be an all day job, provided you are tooled up for it and know what to expect. Hence this little bit of info for anyone else. I can't give any tips or pointers as to how to get the cast protectors to fit, as I haven't succeeded yet - and then there are the rubber strips to fit. You need some kind of glue for this, silicon Steptoe suggests, I am not sure what kind of silicon though. Never used it. Might try Sikaflex - sticks anything to GRP in boat building, no idea of heat resistence though, it isn't designed for that.
So all I am saying is - be prepared before you try to start., and set aside a day to do it, then you'll do it in an hour.
Anyone else thinking of this, be prepared. It is not quite as straightforward as just undoing a few bolts and doing up a few again. I have just spent nearly 6 hours on this simple operation.
The crash bars require the removal of the tank to get them off - the top bolts are hidden very nicely up under the tank, they also hold the fairing and cockpit stanchions in place. These can simply be undone, move bar out of the way and then do the same bolt up again with a bit of grease on it while it is out, of course. Don't have a full tank of fuel when you come to take your crash bars off, like I did. It will tucker you out trying to hold it with one hand and undo the quick release clips with the other (no, I don't have somewhere to hang a piece of rope from, the sky is a long way up and there are no trees on the pavement.)
The rear mounting bolts for the crash bars look simple. An 8mm allen key is all it needs. Except for the right hand bar, whihc requires a 12" minimum extension bar and socket type allen key (I only have right angle allen keys
) and no long extension long enough to reach down inside the tube. So, I trooped the whole rattling lot (wasn't spending an age putting those bits back on again) down to my friendly garage man and borrowed some tools. Got the long extension, allen bit and got the offending bolt out. These top rear mounting bolts also hold your subframe /seat frame on. They are too long without the crash bars. Be prepared to have to either hack saw the bolts down, or have some a bit shorter ready to fit - I did neither and have thad to temporarily screw them in as far as they will go but not tight against the frame rails....asty asty until I can get this sorted, probably the other side of Christmas......
Next up, the bash plate. The bottom of the crash bars use the bash plate as part of the structure and as a frame/bracket across the bottom. Without the crash bars, there is nowhere at the front for the bash plate to fit to, unless you do some fabrication or have long bolts and bits to make it fit. I didn't, so my bash plate is now also sat on the garage mans shelf along with the fixing bolts for it.
Then I came to fit Steptoe's cast crash protectors along with their stainless fasteners supplied with them. Could I get them to fit, could I hell. In the end I gave up and phoned him. He gave me a few more pointers, but I am actually now too tired to go and try. I will give it an hour or so and then go and see if I can get them to go on. What seemed like an easy enough operation has turned out to be an all day job, provided you are tooled up for it and know what to expect. Hence this little bit of info for anyone else. I can't give any tips or pointers as to how to get the cast protectors to fit, as I haven't succeeded yet - and then there are the rubber strips to fit. You need some kind of glue for this, silicon Steptoe suggests, I am not sure what kind of silicon though. Never used it. Might try Sikaflex - sticks anything to GRP in boat building, no idea of heat resistence though, it isn't designed for that.
So all I am saying is - be prepared before you try to start., and set aside a day to do it, then you'll do it in an hour.

 no. no - it would be so unfair......


")
") I haven't. And the guards will still stay in place if you slide along the road as they encase and grip the rocker cover harder; As mine did when i slid off
I haven't. And the guards will still stay in place if you slide along the road as they encase and grip the rocker cover harder; As mine did when i slid off 