

Greggers
Registered user
- Joined
- Dec 22, 2008
- Messages
- 1,285
- Reaction score
- 0
I've been meaning to do this for a while... finally got round to it last night.
The bodywork and battery bollocks all come off fairly easily, then with a couple of screws and 10mm nuts the airbox will lift off - don't forget to release the vacuum hoses at the back end as well as the breather hose, and the electrical connectors at the front - revealing this little lot... (the air-box is on the floor behind the bike..)

To get the cover off took a little jiggly-pokery, as it's very very tight in the frame rails, and I had to unhook the throttle cable, the clutch cable and the main bundle of the wiring harness to get enough clearance to slip the cover out. Make sure you clean the old goo off thoroughly though, you'll find there's plenty on the left side of the head but not much on the right. It's a hard clear silicone type, so use your fingernails to feel where it is and scrape it off.
Close -up of Wall-Ee

I had to take the plugs out to be able to rotate the engine - the plugs are 16mm and the recess is verrrrry deep - you'll need a long plug spanner to reach the plugs but there's minimal clearance in the plug hole, so you'll probably need to grind off the corners of the plug wrench too like this:

Perfect plugs ...

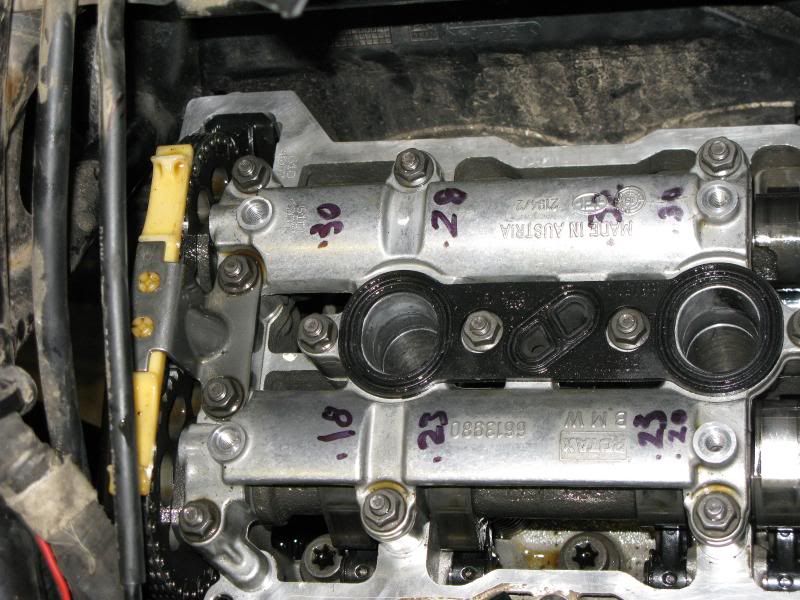
12000 mile valve clearance check...
The lovely orange goo that will solve all my problems... I used a good helping of it on the other side of the cover too - the side you can see mates with a flat machined face but the other has a lip that engages in a channel on the cam cover. Sealant in there was probably unnecessary but I gooed it up anyway.

I didn't take a pic of the cover back on, but it's nice and black now. However ... you will need to be careful putting it all back together. Some say it's best to put the gasket on the head first then install the cover, but the lip on the gasket would make it hard to get the cover on without disturbing the gasket ... clearly this is all pre-assembled before the engine goes in the chassis... I put the gasket on the cam cover first then wriggled it into place on the head - the first time I knocked off the 'half-moon' bits (you can see them on the right hand side of the pic above) so I had to really move ALL the crap out of the way like throttle and clutch cables, unclip the harness blah blah ... before I had enough room to drop the cover onto the head.
Now, over on the F800 site, someone's done this too, and the problem seems to be that the shouldered bolts they use to secure the cover don't allow the cover to squeeze the gasket sufficiently. I slipped an appropriately sized 'o' ring between the head of the bolt and the rubber washer .. hopefully this will give the bolt another bit of squeeze and will put a little more compression on the gasket. While everything was off, I took the opportunity to tidy up my wires too (and enjoy a quick Bounty Bar!)

The hardest part after that is re-attaching the vacuum hoses at the back of the airbox ... I used a set of right-angled needle-nosed pliers just to squeeze them back on ..
After that assembly is the reverse of disassembly...
Best of luck!
Greg
The bodywork and battery bollocks all come off fairly easily, then with a couple of screws and 10mm nuts the airbox will lift off - don't forget to release the vacuum hoses at the back end as well as the breather hose, and the electrical connectors at the front - revealing this little lot... (the air-box is on the floor behind the bike..)
To get the cover off took a little jiggly-pokery, as it's very very tight in the frame rails, and I had to unhook the throttle cable, the clutch cable and the main bundle of the wiring harness to get enough clearance to slip the cover out. Make sure you clean the old goo off thoroughly though, you'll find there's plenty on the left side of the head but not much on the right. It's a hard clear silicone type, so use your fingernails to feel where it is and scrape it off.
Close -up of Wall-Ee
I had to take the plugs out to be able to rotate the engine - the plugs are 16mm and the recess is verrrrry deep - you'll need a long plug spanner to reach the plugs but there's minimal clearance in the plug hole, so you'll probably need to grind off the corners of the plug wrench too like this:
Perfect plugs ...
12000 mile valve clearance check...
The lovely orange goo that will solve all my problems... I used a good helping of it on the other side of the cover too - the side you can see mates with a flat machined face but the other has a lip that engages in a channel on the cam cover. Sealant in there was probably unnecessary but I gooed it up anyway.
I didn't take a pic of the cover back on, but it's nice and black now. However ... you will need to be careful putting it all back together. Some say it's best to put the gasket on the head first then install the cover, but the lip on the gasket would make it hard to get the cover on without disturbing the gasket ... clearly this is all pre-assembled before the engine goes in the chassis... I put the gasket on the cam cover first then wriggled it into place on the head - the first time I knocked off the 'half-moon' bits (you can see them on the right hand side of the pic above) so I had to really move ALL the crap out of the way like throttle and clutch cables, unclip the harness blah blah ... before I had enough room to drop the cover onto the head.
Now, over on the F800 site, someone's done this too, and the problem seems to be that the shouldered bolts they use to secure the cover don't allow the cover to squeeze the gasket sufficiently. I slipped an appropriately sized 'o' ring between the head of the bolt and the rubber washer .. hopefully this will give the bolt another bit of squeeze and will put a little more compression on the gasket. While everything was off, I took the opportunity to tidy up my wires too (and enjoy a quick Bounty Bar!)
The hardest part after that is re-attaching the vacuum hoses at the back of the airbox ... I used a set of right-angled needle-nosed pliers just to squeeze them back on ..
After that assembly is the reverse of disassembly...
Best of luck!
Greg


 , i had the same model, had bonnies most of my life in one guise or another,
  )
)  . It's held in place simply with one screw and a clip, but if the screw mounting breaks (which mine did) then the cover falls off and sits on top of the exhaust pipes. What kind of plastic/composite this is I haven't a clue - it didn't melt into a gooey mess, but charred more like Bakelite does when it burns. I managed to reach into the space and push the broken part of the mounting behind what was left bolted onto the fan housing (you'll know what I mean if you see it) but to do the job properly would mean a complete disassembly of the radiator and fan unit. I'm not really looking forward to that so am keeping fingers crossed that simply wedging it in place applies enough force on it to keep it where it should be ...