Is this what your after?
This article was taken from Classic Bike Guide
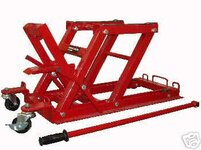
BUILD A BIKE BENCH FOR £30
Fancy taking your restorations to new heights?
Mike J Ryan shows you how lift yourself off the floor
If you’ve used a bike bench before, you already know what an invaluable piece of equipment it is. If, however, you have never used one, then let me tell you that accessibility enters a new dimension and never again will those joints ache from all the bending and kneeling required when working on your bike at ground level. Even cleaning your bike is so much easier, as all those difficult to access areas are now right where you want them to be.
I have been involved with amphibious vehicle design for longer than I care to remember —
www.SeaRoader.com — and with a growing classic bike collection I felt that a bike ramp was necessary. Looking at what was commercially available, I decided that I could do the job much cheaper if I designed and built my own.
First, let’s get a few things clear Mig welders are extremely cheap and easy to use, but do not attempt to build this bike bench if you are not 100 per cent sure of your welding. A failed weld can result in serious injury from a collapsed bench, if you are unsure about your welding capabilities, practice on some off-cuts and take them to an experienced welder for advice. Alternatively, cut all the metal and take it to a professional welder. Lastly, to orientate the drawings the ‘rear’ refers to the jack end of the bench. So, can you really build a bike bench for £30? Well... yes, my bench actually cost me £28.60 but I already had the required 3 or 5 tonne trolley jack, as well as the various consumables and sundries, in the workshop.
We have a steel reclamation depot in Cheltenham and I purchased the 50 x 50 x 3mm square tube for the frame and the 5mm steel checker plate for the top for £25. The extra £3.60 was for the bolts required. So yes, it is possible — unless you want to quibble about the electricity and paint that I used! Even if you go to a steel stockholders for new steel and buy a new trolley jack, you will still end up with a superb bench at a fraction of the cost of a commercial one. And don’t forget, the jack is removable even with the bench up - and can be used for other purposes. 1 have not worked out the weight capacity of this bench but it easily raises my ZZR 1100 which weighs in at 5l4lbs (dry) plus I can stand on it as well and I weigh around 13 stone.
OK, let’s get started.
Refer to Diagram 1 and cut two lengths of 50 x 50 x 3mm square tube to 44in, three lengths at 18.5in and a further four lengths at 4.25in. Weld them into a rectangle, as shown, and weld on the four lowered stops. These keep the upper ramp section at a height to allow the jack to be removed in the fully lowered position.
Two points to bear in mind are that the steel can be butt welded and plastic blanking plugs used to seal the ends or they can be mitered. And the overall width shown was dictated by the 5mm thick steel checkerplate that I had acquired. There is no need to use 5mm BUT thinner material will require more cross support.
Diagram 2 shows the lower frame and is fabricated, as shown, again using 50 x 50 x 3mm square tube. Use 5mm steel plate and weld in as shown, flush with the underside of the frame, in effect forming a trough for the trolley jack to sit in.
It is a good idea to fit some wheels unless you have enough space for a static bench. I used some from a broken jack, as they were steel and I fitted castor wheels on the rear. Do not be tempted to use nylon wheels, or rubber tyred ones, they will not carry the weight. You will also notice two bolts sticking up by the castor wheels. These are attached with welded nuts and are screwed down just enough to the ground to remove some weight from the wheels and stop the ramp skating forward when a bike is run up it.
Diagram 3 shows the hole positions for the legs in both the top and bottom frames. Offset the top frame holes to the bottom and the base frame holes towards the top as this gives more clearance for the legs to swivel. Use M12 bolts x 125mm with washers and nylocs and use sleeves inside the frames and legs to prevent the tube collapsing when you tighten the bolts. Do not over tighten the bolts. it is a good idea to use some grease, after painting, during final assembly.
Cut four legs as shown in Diagram 4 and drill bin from the ends to Ml2 bolt size. To give the legs clearance, diagonally cut off the uppermost corners of the top of the legs and the lowest corners on the bottom of the legs. Once you have reached this stage, assemble the legs to the top and bottom frame and raise up the top ramp section and support at around two feet from the ground. Cut and weld in some 50 x 50mm box to form an ‘H’ on the front and rear legs as shown.
The lifting beam now needs to be fabricated and, as it sits on the trolley jack saddle, it must rotate as the jack rises. I used some 50 x 50mm square tube, that fitted between the jack’s saddle perfectly, and welded inside the box a matching length of tube. I then used an old fork stanchion which slid inside and this was welded to the rear legs as shown and I added a 5mm strap down the side to add more strength. As this lifting beam must be super-strong, please do not skimp in this area. Again, grease all moving parts before final assembly.
Diagram 5 shows an overview, it is a good idea to add four ‘tie down’ areas and I used some lengths of chain welded to the ramp as chain will hang down out of the way when not in use. In the photos you will notice a tube with two pieces of angle on either end laid on the floor, this is the safety stay and is fabricated to fit between the middle cross member — diagram 2 — and up to the rear leg brace — diagram 4. With this in place the trolley jack can be removed if required.
As a final caution, while this design is well proven and 1 have used my bench for almost seven years without any problems, please note that if you build your own bench, you build and use it entirely at your own risk, so do ensure that you do it properly first time. lf you do, you will have years of great service from it and constantly wonder how you ever managed without it.
BASIC PARTS LIST
50 x 50 x 3mm Square tube
2 x 84” / 2 x 61.25” / 4 x 36” / 6 x 18.5” / 3 x 14.5” / 4 x 4.25”
Various steel for Top and Jack base (see text) tube for jack swivel (see text and diagram)
Various sundry Items
Bolts: 8 x M12x128 Hi—Tensile, Nyloc Nuts and Plain Washers
Trolley jack (see text)


")
