Main output seal from Engine (behind clutch)

fritz

Well-known member
UKGSer Subscriber
Joined
Jan 3, 2002
Messages
1,483
Reaction score
3
Location
North Yorkshire - but the map isn't the territory
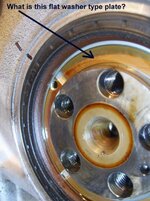
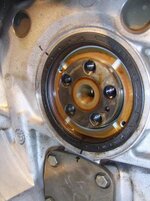
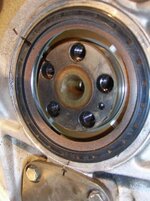
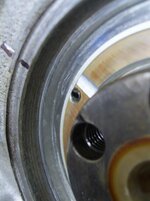
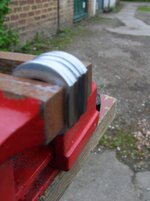
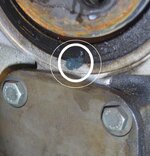
Changing plate for the oil resistant one and norticed misting in there so going top replace - any details on an implement to place new seal back in properly? Done a search and doesn't seem to come up with anything much.

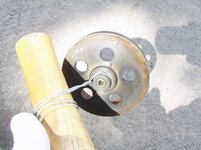
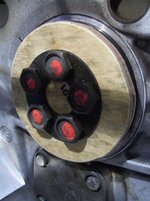
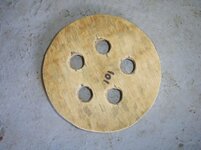
I'm NOT after a BMW part at ££££ - want a practical alternative or measurements to get something knocked up (surely even a bit of turned timber could work :nenau

Feel free to point me to posts I've missed.

It's the one that goes and ruins yer clutch, not the gearbox one that floods your shaft.

Am I not looking forward to extracting the old seal, or re attaching the flywheel either come to think of it (hard hard hard!), but placing the seal I would like to it be 'right first time' :D

Ta ;)
 
What year and model?

Personally I just used a standard double lip seal instead of that stupid "skirt" seal

100 X 80 X 10
 
1995 PD Classic, pic attached.

I thought maybe the neutral switch was leaking, but there is some misting at mail seal so I may 'wish' to change while I've got thus far :rolleyes:

It doesn't look to be the source of the majority of the oil there - and I'm one for 'if not broke don't fix' so hesitant to replace, though suspect I'm about to :augie 
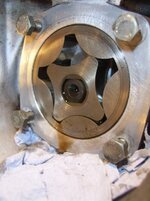
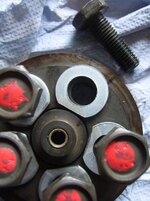
I'll not bother dislonging the oil pump cover either...or should I :nenau

Why the blob of blue/green stuff overlapping the seal / engine case?

Anyone have any dimensions for a driver type thing (forgotten the word!) :confused:

questions questions! :thumb
 

Attachments

  • leakin.jpg
    leakin.jpg
    71.4 KB · Views: 357
Looking at your pic there is a weep from the oil pump cover

Just clean off well all round and rinse down and then remove the cover replace the O ring and refit cover and nip up bolts

Well worth that effort ! i.e. If oil can get out air can get in!
 
And is it necessary to stop the 'crankshaft falling out' once flywheel is off? Not sure I saw anything in manuals, but I have on web posts and being a touch paranoid I did as shown 'in case'. I suppose in theory the crankshaft could move forward if lots of tugging at seal or something which would be very unpleasant indeed :eek 
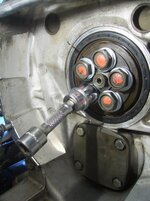
Anyway, stapped up anyway to prevent forward movement ;)
 

Attachments

  • SV105329a.jpg
    SV105329a.jpg
    77.9 KB · Views: 324
simple job make sure you put the flywheel to tdc or mark where the fly wheel is and the bolts are with a punch, take off front cover put a block of wood/ spacer between alternator and front cover or longer bolt put front cover back on and make sure you don't over tighten cover bolts, this will stop crank from movin.

crank seal is easy make sure once you remove clutch flywheel there should be paint blobs on clutch fly wheel etc keep them lined up and you need to take what appears to be a spacer off the crank end the things that the bolts go through into the crank flip old seal out and very carefully tap the new one in until it is seated be careful and steady y should be ok, check out a guy called snowbum Google it, all you need to know is there.

steve
 
The flywheel does not stop the crankshaft from moving axially.
 
???? What are you two on about ??

At the rear of the crank on the inside of the crankcase there are two shims with locating pegs if you haul and mess about with the flywheel off
you can knock the crank forward enough to dislodge the shims and when you try bolting it together it locks up the motor


The flywheel does not stop the crankshaft from moving axially.

^^^^^ that^^^^^^
 
It looks like a marker to detect whether the oil seal is moving in the crankcase :nenau.

Bob.

hmmm I wondered that too, :confused: lot of work to find out though - you could see the mark through assembled clutch, but still have to take gearbox etc off.
And I guess if it does move, it might start gaining momentum and then you'd know alright. :rolleyes: Strange business!
 
???? What are you two on about ??

At the rear of the crank on the inside of the crankcase there are two shims with locating pegs if you haul and mess about with the flywheel off
you can knock the crank forward enough to dislodge the shims and when you try bolting it together it locks up the motor

Aha - I was worried it might be something like that, I didn't have it strapped until after the flywheel was off, but no excessive hauling about or levering, just concern at effort to 'free' the five 'stretch' bolts ahem! hadn't taken the other cap thing etc off end of crank or disturbed anything else so hope OK.

I'd marked up flywheel positions and alignments so if the crank 'turned' you'd be able to align correctly (unless crank turned more than once of course :eek:
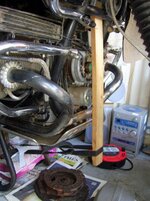
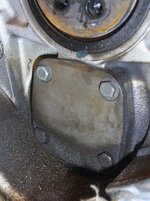
) so assumed it couldn't be for that reason.

Now if bike rolled off centre stand without something restraining crank longitudinal movement...

Do people go with the oil on stretch bolts recommendation that BM seem to give now? Bolts came out with signs of oil so guess even dry new ones won't be when I put them in the 'oles?

ta all :thumb
 
Its 25 years since I did one of these seals...and I hope it's another 25 years :(

Having a bugger of a job to get old seal out, trying self-tapers and claw hammer and seem to be getting nownere. It is very very tricky (motor still in bike).

One question - preferably answered by those in the know rather than guess work - what is the plate indicated in the picture below - I assume it is the stop disk'

It's called a 'stop disk' here http://www.maxbmwmotorcycles.com/fiche/DiagramsMain.aspx?vid=51691&rnd=04282014

I've read this bit

"The REAR thrust washer can come off its locating pegs. It must be on its pegs, and not be rotatable by your fingers (check!) before you reinstall the flywheel! Sometimes the pegs do not stick rearward very much. You can use a very thin amount of a soft grease to 'stick' the rear thrust washer to the boss/pins"

which has me paranoid enough - it doesn't look equally spaced around the crank, and it can be rotated - am I ****ed?

I blocked the engine, but I had removed some of the clutch before I started, I think I'd also loosened the flywheel, in the order here http://jhau.maliwi.de/mot/r80gs.html#cseal

But it was definately blocked before I atempted to take off the 'guide ring'

The seal is a b*stard of a job to get out without the other issues :(

Any top tips or words of comfort?
 

Attachments

  • what is this plate.jpg
    what is this plate.jpg
    78.8 KB · Views: 268
That dear fritz is the "thrust" shim

That should be located on two spuds on the rear of the casing Bearing block

attachment.php
 
I thank you ;)

More importantly for anyone in same predicament it can easily be located back in place once seal off - I guess it was 'stuck' (well attached in a none dubious way) to the guide ring or whatever and slipped off when that was removed.

I'll stick some piccies on later so it's helpful to anyone in same predicament, and some of seal removal and tool for replacement of new one (seeing as no one helped out here :rolleyes:) and it may also prove useful to me in future. May be handy in deepest darkest Africa or somesuch :augie Tinternet want arand when I was a lad doin last un. I remember it was a trial and early morning hair pulling in me kitchen, but somehow still easier on the R80/7

So, you can sleep easy - I know you were worried about me :comfort
 
So I used alot of the stuff here (as concise and low on the paranoia of other info) http://jhau.maliwi.de/mot/r80gs.html#cseal I thank that man :thumb2

I used his tip to remove the old seal (and swore a lot as he too :rolleyes:)

Used wire round the guide ring, wrapped it round a hammer shaft and pulled it off.

I marked up everywhere with lines at each stage to know alignment for reassembly.

Using self tappers and leverage (eventualy actually breaking the washer in the seal allowing it to 'collaspe' inward and come out

Note the oild pump has been off and the red o-ring replaced as it may have been the source of the oil - pic before cover back on for info.
 

Attachments

  • SV105359a.jpg
    SV105359a.jpg
    56.7 KB · Views: 154
  • SV105361a.jpg
    SV105361a.jpg
    71.1 KB · Views: 154
  • SV105346a.jpg
    SV105346a.jpg
    58.7 KB · Views: 155
As on one was forthcoming here :augie regarding dims for a drift / former I had to rely on some think ply to make a circle the size of seal. 101mm

I used this to seat the seal by evenly applying force and then as a 'drift to knock the seal fully home.

You can see the thrush washer back on its peg too (dab of grease as glue) - will have dropped off pegs during removal excercises) Detail showing peg when all off.

PS the plywood though thick still bowed so wouldn't seat the seal totally as the convex side touches.
 

Attachments

  • 4.jpg
    4.jpg
    74.1 KB · Views: 151
  • 1.jpg
    1.jpg
    45 KB · Views: 150
  • 3.jpg
    3.jpg
    63.1 KB · Views: 152
  • 2.jpg
    2.jpg
    54.5 KB · Views: 151
As mentioned :nenau no one gave dims for a drift or fomer so new seal had to go on un-formed (as many mechanics do anyway apperently) and so you have to rely on the guide ring forming the inward facing seal.

Gently gently does it ;)

Using the guide ring to place it using the old screws is possible if you angle grind some washers (to avoid raised portion in centre of ring) and then stick another washer on top and work your way (very gently) on opposing bolts by hand. Though you can see a socket extention,I used only finger pressure to sneak up and try to as evenly as possible invert the seal. You need a the washers as bolts are too long to get ring fully back otherwise.
 

Attachments

  • a.jpg
    a.jpg
    45 KB · Views: 151
  • b.jpg
    b.jpg
    63.5 KB · Views: 154
  • c.jpg
    c.jpg
    69.6 KB · Views: 154
  • d.jpg
    d.jpg
    69.1 KB · Views: 154


Back
Top Bottom