NEW parts from HPN

  • Thread starter Thread starter Litle Shorty
  • Start date Start date
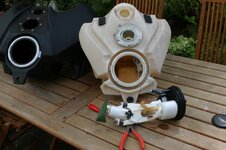
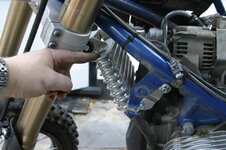
Right now that I've fitted the tank 8 times I can see all the engineering that's gone into it. and what lots of the bits I have left over are for...

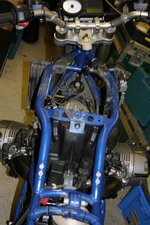
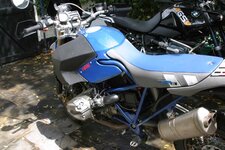
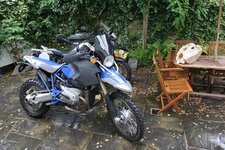
However I'm now going out for ride to see it stays on pictures to follow...

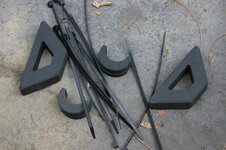
if you get this product you'll need the following

2,4,6,8 mm allen keys

8,10,12 angled ring spanners

T20,25,30, 35, 40 torx drivers both as screw drivers with thin shafts and as ratchet sets with 2 extensions bars again narrow is better about 300mm

Long nose pliers medium and large

Very importan lost bolt retrieval magnet of telescopic arm.

plus a big box ratchets with two sets of bars

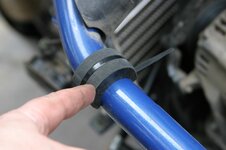
The torque setting I've used for fitting are ft (farking tight) nm (not measured)

Swearing at inanimated objects won't help but it can make you feel better.

Pictures to follow
 
What's the trick?

F me there's a massive box sitting in the living room from HPN, wonder what's in it!

Damn! Any hints on how to get them to ship? I ordered via fax almost 6 months ago, and keep calling once a week or so...I've been told it would be shipped the next day 4 times! I just got an e-mail saying 3 weeks.

I'm working very hard to be polite at this point, but this is getting crazy!

I still haven't been given an order # or info for a wire transfer, but they do have my card info...

Aaron
Seattle, USA

Aaron,

I don't know the trick but my tank is serial number 19 so there's not been many. I got them to send me a bill that's key. Then sent them the money the same day direct to'em, once I had a receipt from the bank saying they had the money. I was in a better position to apply gentle pressure, saying encouring words like where the tank then.... in polite german if you can... see the above and you'll get some hints.
 
HPN to North America

After talking with Bobby at BMW Atlanta he tells me he is a dealer for HPN and HPN will be concentrating their efforts on satisfying dealer orders for North America. This would account for HPN's lack of interest in returning my emails. I've given Bobby my money and he thinks it will be 3 to 6 weeks. There might be one more slot on this latest order so give him a call asap:beerjug: ...

Have a look at the this thread on Adventure rider:

http://www.advrider.com/forums/showthread.php?t=239983
 
Here we go strip the tank off the bike and set about it's insides. You may want to put the ciggis out while doing this outside. the blue cable is really solid and hard to seperate once you've got that appart you can pull the fuel filler with gauge thing out this needs twisting. The other bigger bit has a rubber seal like a sort of gormet this needs to be reseated in the bigger tank and the pump arrangement is lined up and squeezed back in It took serval attemps to get it in straight.
 

Attachments

  • fuel tank insides 2007.jpg
    fuel tank insides 2007.jpg
    101.2 KB · Views: 298
HP with the tank off could not get a good shot of the insides but you need to remove the horn, that's the mountinig point for the new oil cooler best get it out now harder if you leave it till later as I found out. If you look down inside the hole where the tank you;ll see the oil connection. This is a bastad to get at here you need the long bar and torx bit. Once you loosened it remove the bolts with the magnetic tool cos I could not get my fingers down there.

If you don't they'll fall off disappearing deeper into the black hole covered by alternator, you'll swear about as much as I did. Then march to the shed to find a magnetic retrival tool...

Start to disconnect the old oil cooler the cheap sh1t clips come to bits hard to save make sure you have circlips or Jubilee clips about 22 mm you get one in the kit don't waste it.
 

Attachments

  • HP with tank off.jpg
    HP with tank off.jpg
    105.5 KB · Views: 295
There's loads of bits with the tank they all have a purpose however this only become clear once you fitted it all together and have stuff left over.

These bits...

The rounded bits well as I found out once I fitted the tank it RATTLES! which rattled me thos rubber bits get fastened to the top of the frame I guess. the triangular bits no idea... tried them all over the place don't fit anything I could see so put'em back in the box marked up as interesting rubber bits for HP.

There's also a bag of bolts and spacers... they all have different places to go the little grey plastic psacers are the best fit under the petrol cap to space the screws. Worked that out after the affair also in box with rubber things plus about 8 other assorted bolts I've not managed to fit into, onto or with other bits
 

Attachments

  • mystery objects.jpg
    mystery objects.jpg
    115 KB · Views: 297
Stroke of genius once they are in place fit the tank in again, rattel stopped there's another rubber thing already on the bike it'll get in the way later and you'll have to take all to bits again. I won't bother showing it here cos why should I be the only one to struggle...
 

Attachments

  • rubber blocks.jpg
    rubber blocks.jpg
    70.1 KB · Views: 300
just to prove I do own one and you'll need it to refit the oil pipe as my fingers are way too big and the whole thing needs twisting about till it lines upagain gently fix into position there's a good chance it'll want to cross thread as the fitting is at an angle took several go's and then you ahve to remove it all again as you've been dropping cr4p into the hole... and clean it all up

Might be a good idea to block the hole with tissue only thought about that once I finished OOOPS!
 

Attachments

  • lost bolts.jpg
    lost bolts.jpg
    78.3 KB · Views: 295
fit new oil cooler, this took me a while to get right as I was trying to fit it in the same manner as the old one, (dick head) it now fits more like a conventional sports bike to get it in I took the mudguard off again to get better access.

Oh yeah as you can see fitting it without the horn much better however I relocated the horn to what looked a good place, where the old oil filter was central to picture (DOH) bad place it can't be heard when the tank is on as it jams the thing down.... (DOUBLE DOH!)

So I'll be taking it of again soon....
 

Attachments

  • oilfilter new position.jpg
    oilfilter new position.jpg
    102.4 KB · Views: 293
Fit the tank again, you'll get the hang of it after about the 10th go oplus there's a few little connectors and tubes again all good practise.

There nice you can see the horn jammed in (what a tosser!)

Anyway the pipes from the side tanks, well you'll need to taken them off and feed'em behind and over the top of the oil cooler? I guess too short to go any other and reconnect also there's another pipe which then feeds to the main central tank and lowest point.

Keep the packing material very good to kneel on while scrabbling about the engine bay, if you have a central stand much better I don't.

Also better if you could do it in the dry... it's was blowing a a flashing with lighting when I did this... very nice if you like that sort of thing.
 

Attachments

  • fitting the tank.jpg
    fitting the tank.jpg
    115.6 KB · Views: 293
Fitting the side panels, Not sure whats worse standing in the rain, trying to fit the HP on a MX stand which is too tall or fitting the side panels.

Screw into place but there's a sort of rubber band to hold the two in place, Well I now know what it for... took me about an hour to line it up and fit then they flopped about and rattled!!!!!!! ALOT!

so you need to thread this rubber band behin the tank and attach the panels together... That's so gonna break and rattle about. velcro later will fix it there's a goo mounting point.. Velcro everyone's go a plce to stick it!

Oh yeah take the tank back out as you've probabaly trapped the throttle cable, with all the pulling and prodding about... may as well have a look.... You'll only swear later....!
 

Attachments

  • fitting side panels.jpg
    fitting side panels.jpg
    92.6 KB · Views: 369
panels on the check all the connections one last time, still have about 8-10 bolts left over OOPS!

the fuel taps on the front I've left them on... Opened fully then half a turn back to make sure the have some play in'em oh the fuel tank breather pipe needs to be replaced I guess it needs some lemon juice of some professional lube stuff got fed up as it's stuck left it like that for a bit...

Fill with fuel about 27 ish litres hard to say I saved 0ver 10 from old tank and used alot from a Jerrycan I had. leave for a while see if it leaks. Tanks get very warm in the sun and where kinda slow to fill could be the breather... oh yeah the gauge was not working but since going out it seems to have gotten better... Good too cos I had no interest taking it to bits again...
 

Attachments

  • fitted the side panels.jpg
    fitted the side panels.jpg
    116.9 KB · Views: 364
Finished...:beer:

you need lots of tools and some patience with this... the product seems very stable and sturdy and I went out for a play...

Good points nice to ride about and no worries about running out, still very nimble hardly notice the extra weight. looks really smart I think now just need to fix a few other minor issues...

Bad points Fills too slow not sure why...

Minor bad points if your out in the sticks and you need to get it to bits, you'll now need a complete tool kit. with loads of extra bits innit which can be an issue I guess. Pleased as punch I got it all to bits was a reasonable operation and took about 3 hours with a break, shouting, looking for more tools and finding lost bolts.

There's bound to be an easier way however never seen one of these before and had to make a guess at it, try it and then redo it.

would recommend getting one I guess... Hope this some help

I now have a Wunderlich piggy back tank rack for sale will PM people who've already contacted me about it first.

regards

Lo-IQ
 

Attachments

  • finished the fitting.jpg
    finished the fitting.jpg
    114.8 KB · Views: 360
Great write up and plenty of pics :clap :clap

It looks like a great bit of kit... one question: It sounds like there wasn't much in the way of instructions provided. Is that the case?

Cheers :thumb2

Mav
 
Well that's a good point... I did look inside the box 5 times then ripped the envelope off the box which turned out was the invoice and customs thing. Inside the BIG box where 3 other smaller boxes so I open them up and finally looked inside the tank thinking laterally.

The instructions will probably arrive in 5 months time and I'll finally know what all the left over bits are for...

Once you pull it all to appart it's straight forward enough but not having any guide was abit like building an MFI wardrobe in the dark using a spoon.

Also I'll be honest I was tempted to bottle it and get the dealers to fit it, then considered that a defeatist way of thinking and :ymca . Also how would the dealer know what to do without instructions and I'd be paying £45 per hour + for him to scratch his head while his technician stands outside smoking due to all the stress caused and...in wonderment at all the stuff... none of which they had a hand in sourcing.
 
Well done that man:clap :clap

The first tank,and the first set of fitting instructions as well.Are the triangular rubber thingys to stop the tank hitting the framework when it's full,anywhere,somehow,sort of thing.I know these plastic tanks can change shape a bit on hot days when they're full:nenau

I guess after all that,it's staying black then.Looks good:beerjug:
 
I thought that too there's a couple of screw holes but the holes in the triangular are at the wrong angle. could be like an underclinging frame grip thing?...

Then I thought it could be to secure the bottom of the tank to the frame but there's nothing left and and the left over bolts are all too short and or wrong size.

Have left it out all day to see what the tank does in the sun light enclosed space white walls no wind should radiate up to good temp unless it chucks it down... will let you know it does go.


Back
Top Bottom