

Following the lead of other technical gurus. And reminded of the fact that not all of you guys know one end of a spanner from a bog brush, I have, in my own time, prepared this photographic tutorial to enable the softest handed among us to perform this highly technical procedure.
Now, to settle nerves a little, I can assure you that there is no blood or peanut products shown in any of the images.
If you keep your bike outside, you can omit steps 1&2.

First step is to aproach the door, remembering to select the right key. Turn anti clockwise to open

Switch the light on. You will need sufficient illumination for this task.

Take a minute to ponder your task, and maybe 'risk assess' before starting.

Place new part securely on a shelf. Ignore the tool in the picture. This is too technical for you, and may confuse the unwary.

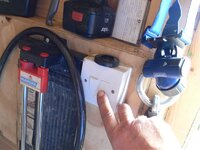
If you have access to tools, select the hexagonal one which fits snugly in the bolt hole at the right hand end of the handlebar. This is the side which the cruise control fits.

Insert tool into hole ensuring a good fit. You might want to wear gloves for protection against blistering of your lily white hands.
Turn tool anti-clockwise until the bolt comes out of the hole.

Pull black thingy off end of handlebar. Warning - this part is heavy. Toes are delicate. Place old part in BRB (bling removal box) for refitting when you sell your bike.

Place new part on the bit where the old part came off.

Refit bolt and tighten in a clockwise direction till it doesnt move any further then put a little more pressure on the tool to prevent loosening whilst in use.

Stand back and admire your handiwork and feel proud that you have done something that doesnt involve computers/pens/paper or assistance.
Next I will show you how to change the clutch plate on your 1150gs.
Now, to settle nerves a little, I can assure you that there is no blood or peanut products shown in any of the images.
If you keep your bike outside, you can omit steps 1&2.
First step is to aproach the door, remembering to select the right key. Turn anti clockwise to open
Switch the light on. You will need sufficient illumination for this task.
Take a minute to ponder your task, and maybe 'risk assess' before starting.
Place new part securely on a shelf. Ignore the tool in the picture. This is too technical for you, and may confuse the unwary.
If you have access to tools, select the hexagonal one which fits snugly in the bolt hole at the right hand end of the handlebar. This is the side which the cruise control fits.
Insert tool into hole ensuring a good fit. You might want to wear gloves for protection against blistering of your lily white hands.
Turn tool anti-clockwise until the bolt comes out of the hole.
Pull black thingy off end of handlebar. Warning - this part is heavy. Toes are delicate. Place old part in BRB (bling removal box) for refitting when you sell your bike.
Place new part on the bit where the old part came off.
Refit bolt and tighten in a clockwise direction till it doesnt move any further then put a little more pressure on the tool to prevent loosening whilst in use.
Stand back and admire your handiwork and feel proud that you have done something that doesnt involve computers/pens/paper or assistance.
Next I will show you how to change the clutch plate on your 1150gs.


 )
)

 best check its still there mate