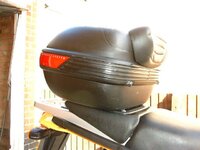
After all the discussions and ideas generated by my original post, I decided to go ahead and make an adaptor plate for my BMW top box, I wanted one which wouldn’t result in the top box overhanging the rear light, but still provide me with a few inches of ‘shuffling’ room for my legs and bum on a long journey, which the standard BMW fitment doesn’t do. I’ve attached a few photos to illustrate, for anyone interested.
The adaptor plate (AP) was made using a 300mm square sheet of 6mm thick aluminium. It was profiled to be roughly the same shape as the plastic mounting plate for the top box, but about 3mm larger all round, purely for aesthetics.
Six holes were drilled through the AP to line up with the fixings through the plastic top cover under the rear seat. These were made to suit M5 screws and were countersunk on the top face.
Spacers were made to sit under the AP at these six points, the centre two being slightly shorter than the outside four to take into account the slight curvature of the plastic top cover. These spacers were then bonded onto the underside of the AP with Araldite, just to ease assembly really.
Angle brackets were made to screw onto the underside of the AP and line up with the two side fixings vacated by the rear grab rail/rack. These are the most important fixings, as they attach directly onto the frame. Although the brackets are screwed to the underside of the AP, I bonded them with Araldite, which made the nuts captive.
http://img.photobucket.com/albums/v653/brhaywood/topboxmount/02.jpg
The top box mounting plate was placed in position on the AP and, using the existing tubular spacers as guides, drilled through to give the position for the fixings. It is important to note that the front four drillings made using the spacers as a guide were at a slight angle, the two rear holes being normal to the AP. These holes were opened out to enable M6 ‘Big-Head’ bonding fasteners, type F2/ST38, to be pressed in from the rear and bonded onto the underside of the AP using Araldite. On the four angled fixings, the protruding part of the fastener was ground off flush with the top surface of the AP.
The AP was cleaned up and sprayed silver, Halford’s ‘Standard Silver’ being an extremely good match for the GS's plastic panels It was screwed on using the six fixings for the plastic top cover under the rear seat and the two fixings through the angle bracket into the frame.
http://img.photobucket.com/albums/v653/brhaywood/topboxmount/03.jpg
The top box mounting plate was screwed directly to the AP, with a couple of black spacers made for the two rear fixings, as they don’t sit right down onto the AP, as do the front four fixings.
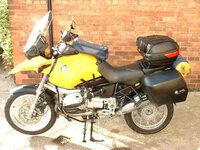
As you can see in the remaining photos, the top box is now 100mm lower and 300mm further forward than the original rear mounting position. I’m sure that the handling will be an improvement, it just remains now to give it a good road test over all terrains to see if it stays put!
http://img.photobucket.com/albums/v653/brhaywood/topboxmount/04.jpg
http://img.photobucket.com/albums/v653/brhaywood/topboxmount/05.jpg
http://img.photobucket.com/albums/v653/brhaywood/topboxmount/06.jpg
http://img.photobucket.com/albums/v653/brhaywood/topboxmount/07.jpg
http://img.photobucket.com/albums/v653/brhaywood/topboxmount/08.jpg
http://img.photobucket.com/albums/v653/brhaywood/topboxmount/09.jpg
http://img.photobucket.com/albums/v653/brhaywood/topboxmount/10.jpg
I’ll let you know.


") )
) ) and its good for all speeds IMHO. I noticed some high speed weave induced by the box in the 'high' position.