Replacing headlight in R100GSPD

Kenny

Trustworthy Scouser AND
Moderator
Moderator
Joined
Jan 6, 2002
Messages
12,651
Reaction score
1,241
Location
Toxteth scouser, made good ..now hiding on Wirral
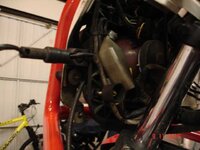
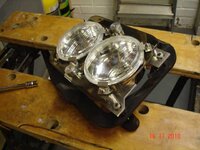
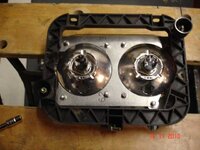
OK..not looked to closely as of yet ( to cold and it is under cover :rolleyes: )..anyhows, have bought a replacement UK headlight to replace the Euro one currently fitted.
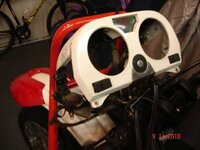
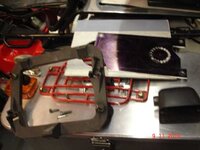
Anyone some pointers to fitting the headlight and the black plastic mount to the bike? Looks like a full fairing removal at first glance.:eek:

:beerjug:
 
Its a right bast of a job someone told me to not bother after getting slashed knuckles and frustated to fooook I would say the same it is a full bar indicator almost everything take off - well thats how I did mine and the refit aint any easier Swap bike for a round lamper :thumb2
 
Just take the LHS off to give you some access then it's reasonably straight forward, did one last Friday!
 
There are three alan screws that hold the black plastic part to the bike, one at the bottom and two from the top.
When you get it out you will need to carefully get the three fixing points off which hold the light unit, like a ball and socket joints, two of which are the headlamp adjusters and the other part of the black plastic part. I sprayed mine with wd40 and trapped something between the light and black plastic and used the screw to wind out from socket.
If I recall you will need to remove speedo and rev counter to get access to top two fixings for the black frame. The indicator end can be removed and the stem left in place(assuming standard) to remove side panel as the light comes out from the side. The small white plastic clips that fit the socket need to removed and put into your new light unit if not with the light.

The above is from memory, when get home I'll double check as I took some pictures.

Hope that helps

::beerjug::beerjug:
 
THanks guys..all appreciated...to cold ( and then wet ) over the next few days, so hopefully will be able to find a place to do the job.

Cobbster, look forward to seeing the pics please :thumb2m

MickDB1 :mooney

:D
 
The one thing that really bugged me on the newer paralever was the fairing. In the end, I totally 'hacked' the fairing to make it a handlebar mount. I think it looks better, and gives me sooooo much easier access for bulb renewal etc

Its now not standard - ho hum

Mick
 
The one thing that really bugged me on the newer paralever was the fairing. In the end, I totally 'hacked' the fairing to make it a handlebar mount. I think it looks better, and gives me sooooo much easier access for bulb renewal etc

Its now not standard - ho hum

Mick

I did something similar to Jills 100. She didn't like the look of the OE set up. I put every thing in a box in the attic and fitted a round light from a 93 Triumph Thunderbird (what a brilliant light :thumb2) and hacked up some SH panels to hold the dash. Since been changed for a Cibi 5" in an Acerbis fairing.:rolleyes: Looks nice though.

Kenny, That square head light is usless. Fit the TT twin jobbie. Much better :thumb2

Alternetively, make sure you if HiD in there. Otherwise you might as well not bother changing to the UK light. :D


Val.
 
HID's are for poofs !! It's an airhead not a 1200 womans bike :rob

I'm keeping it standard...just bought it brand new so it IS going on the bike .. bloody southerners :D You'll be owning a motorhome next !;)

:beerjug:
 
HID's are for poofs !! It's an airhead not a 1200 womans bike :rob

I'm keeping it standard...just bought it brand new so it IS going on the bike .. bloody southerners :D You'll be owning a motorhome next !;)

:beerjug:

And a sidecar :augie


HiD's on her Airhead. The 1200s headlight is so crap it ain't worth wasting the money for a HiD. I just squint :P


Val.
 
When you get it out you will need to carefully get the three fixing points off which hold the light unit, like a ball and socket joints, two of which are the headlamp adjusters and the other part of the black plastic part. I sprayed mine with wd40 and trapped something between the light and black plastic and used the screw to wind out from socket.


I found refitting the ball and socket joints a nightmare: thay are very rigid and snap quite easily. I ended up using a cable tie to hold the top point and inserting the bottom two ball and socket joints so the headlight still adjusts.
 
HID's are for poofs !! It's an airhead not a 1200 womans bike :rob

I'm keeping it standard...just bought it brand new so it IS going on the bike .. bloody southerners :D You'll be owning a motorhome next !;)

:beerjug:

THANK-YOU KENNY!

I have a ladies 1200 AND three Airheads ALL with HID50's from Les Wassall, but then I do ride mine at night quite a bit, but I'm not out casing joints, so I don't mind being seen! But my poof's bikes live inside.:thumb
 
After I swapped my square lamp and pissed about with xenon bulbs etc.
Went to ABW in Manchester and the fitted a HID for about 60 quid
It is bright - very bright - very good
 
There are three alan screws that hold the black plastic part to the bike, one at the bottom and two from the top.
When you get it out you will need to carefully get the three fixing points off which hold the light unit, like a ball and socket joints, two of which are the headlamp adjusters and the other part of the black plastic part. I sprayed mine with wd40 and trapped something between the light and black plastic and used the screw to wind out from socket.
If I recall you will need to remove speedo and rev counter to get access to top two fixings for the black frame. The indicator end can be removed and the stem left in place(assuming standard) to remove side panel as the light comes out from the side. The small white plastic clips that fit the socket need to removed and put into your new light unit if not with the light.

The above is from memory, when get home I'll double check as I took some pictures.

Hope that helps

::beerjug::beerjug:


Here's a few pictures of how I removed light.
1st - This shows the black plastic surround in place that attaches to the bike with the three screws mentioned earlier. I removed side panel, indicator, speedo,rev counter and unclipped wiring loom from surround. I also removed screen as I was modifying other items at the same time. You can see the headlight adjuster for up/down in the fore ground.
2nd - This shows stripped down
3rd - The black plastic part out, you can see the 3 ball sockets that fit into headlight, one is part of black plastic, the two others are for adjustment (up/down & left/right)

Hope this helps, any problems send me a PM.

:beerjug::beerjug:
 

Attachments

  • light.jpg
    light.jpg
    40 KB · Views: 1,359
  • light4.jpg
    light4.jpg
    40.9 KB · Views: 1,419
  • light3.jpg
    light3.jpg
    40.1 KB · Views: 1,339


Back
Top Bottom