Stator needed

Ravenbyrne

Registered user
Joined
Sep 17, 2008
Messages
2,734
Reaction score
0
Location
Ardee, Co. Louth
I suspect that the stator on Geraldines (Spear Ruler) 2010 F650GS twin is fecked. I've replaced the rectifier/regulator but I'm now sure it's the stator.

We head off to Portugal on the 11th of Sept so if anyone has one sitting in there garage I'll be happy to fill your wallet for it.

Cheers
Brian
 
I used Westcountry Windings to rewire mine. They turned it around in 2 days (posted Monday back with me on Wednesday) as I spoke to them and asked if they could rush it through.
 
I used West Country Windings too: better beefed up stator and cheaper than an OEM replacement. It's also really easy to remove and replace yourself.

My burnt out stator:
IMG_3551_zps5406104e.jpg


My new rewound stator:
10675696_10152461321983027_3769199365885853488_n.jpg
 
Any pics of how to do this for future reference. Mines an 08 F800GS but I've only done 13000 relatively easy miles so hopefully will be OK for a bit

Ta
 
Any pics of how to do this for future reference. Mines an 08 F800GS but I've only done 13000 relatively easy miles so hopefully will be OK for a bit

Ta

No pictures, but I had an issue getting the stator to come out of the housing. Had to create a puller which popped it straight off. Oh, it uses M7 bolts inside the stator if you need to build a puller.
 
Any pics of how to do this for future reference. Mines an 08 F800GS but I've only done 13000 relatively easy miles so hopefully will be OK for a bit

Ta

Not a how to but this thread has pics here.

Obviously disconnect the wirings which are behind the panel above rectifier and then its basically taking off the right side engine case cover, there will be some magnetic resistance and the gasket to get past so don't be shy. Then remove the bolts holding the stator to the cover as well as the screws holding the wire down. The screws can be quite tight so use a good screwdriver so you don't naf the screw heads. Replace with new or refurbed stator into the cover, replace gasket and use a bit of high temp silicone gasket sealer around the wiring part of the gasket, then re-install the cover. Put all the bolts in loose and gently cinch them down evenly and finger tight. Then torque them down in the correct sequence to the correct torque values or just 'nip' them up but be careful not to over tighten. Reconnect plugs and route wires (take a photo before if you think you'll forget the routing and you probably will) and your done. The worst part is getting the fiddly connectors undone, just be patient and try not to break any. It really is a piece of piss!

I'll find torques settings and the tightening sequence but as long as you do it gently and evenly going to opposite bolts you're fine, I didn't torque my bolts just used common sense.

Haynes:
Cover bolts 12Nm
Stator bolts 10Nm

B04AB580-32C7-4541-B1AC-C6456F603DAC_zpsqfyxcrgl.jpg
 
Any pics of how to do this for future reference. Mines an 08 F800GS but I've only done 13000 relatively easy miles so hopefully will be OK for a bit

Ta

Bit clearer instructions:

Remove right hand side cover above the rectifier to access wiring connectors and disconnect them, be careful they can be fiddly - try not to break any.
You might find it easier to remove the rectifier completely. Take pictures of the wire routing and connector locations because it can be confusing later when reconnecting and re-routing
You'll probably end up cutting a few cable ties so make sure you have a few replacements.
Remove the front sprocket cover depending on whether you have an aftermarket replacement.
If not already done disconnect the alternator/stator plug by tracing the wire from the engine casing grommet on the back of the cover.
Loosen the right right side engine bolts evenly (ideally in reverse order below) and note the lengths of each bolt and it's location - depending on model sometimes as they might be different lengths.
Gently draw off the engine casing, it will be restrained from the draw of the magnets inside and you'll have to break the gasket seal - there might be a few drops of residual oil.
Discard the gasket and clean up the mating surfaces.
Inside the cover undo the two screws securing the wiring clamp - the screws can be quite tight so use a good screwdriver so you don't naf the screw heads.
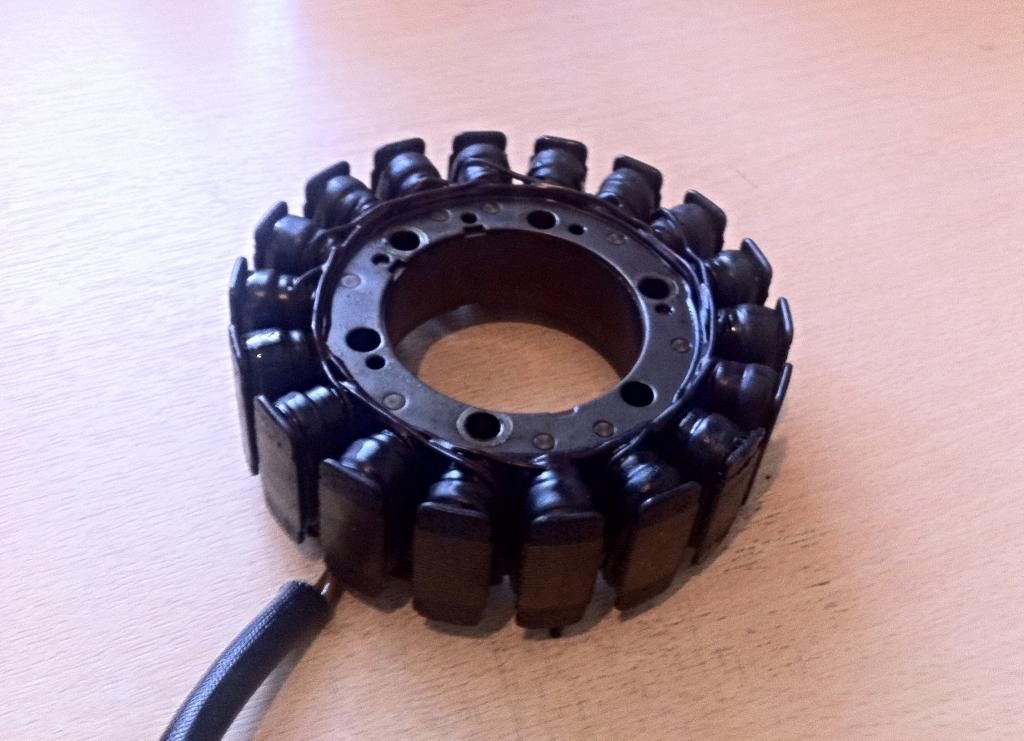
Undo the three hex bolts holding the stator and lift out the stator - you might need a bit of jiggling to get it free but should come out easy. Note the position of the rubber wiring grommet.

Fit the new or refurbed stator into the cover lining up the wiring and grommet and .
Clean the stator bolts and wiring clamp screws and apply a little blue loctite and torque.
Make sure everything is nice and clean, replace the gasket and use a bit of high temp silicone gasket sealer around the wiring gromet, then gently re-install the cover - the magnets will draw the cover on with some force, make sure your gasket hasn't come out.
Tighten all the cover bolts evenly and in the sequence below torquing them to the correct value. They don't need a lot, just a 'nip', be careful not to over tighten if not torquing.
Reconnect plugs and re-route the wiring and reinstall the remaining components and your done.

NB: it's a good idea to replace the rectifier when replacing the stator (it's usually a faulty rectifier that kills the stator) unless you have confirmed that it's ok. The rectifier will have two connectors: a battery and alternator and they are different so you can't get them wrong.

I didn't torque my bolts I just used my judgement - never used a torque wrench.

Haynes:
Cover bolts 12Nm
Stator bolts 10Nm

B04AB580-32C7-4541-B1AC-C6456F603DAC_zpsqfyxcrgl.jpg
 
Thanks for info. Hopefully won't have to do it in my lifetime though. I break things when I work on them and then have to go to a shop anyway!
 
Bit clearer instructions:
Take pictures of the wire routing and connector locations because it can be confusing later when reconnecting and re-routing
You'll probably end up cutting a few cable ties so make sure you have a few replacements.
NOT necessary, because there are 3 (three) phases (groups of coils). You can just change wiring without any problem, they deliver the same amount of voltage!


Back
Top Bottom