I've stripped the thread on the central stud in the rocker cover. I've done search, but no luck, from what I've heard it shouldn't be too difficult to do repair in-situ. How is it done, Helicoil or new stud and drill & tap oversize?


You are using an out of date browser. It may not display this or other websites correctly.
You should upgrade or use an alternative browser.
You should upgrade or use an alternative browser.
Stripped thread, cylinder head.
- Thread starter John Roberts
- Start date
John you can search for Helicoil or recoil M8 x 1.25
There are small kits on E bay for little money and they'll do more than one repair
Easy to use My only tip I use masking tape to cover up either side and prevent swarf from intruding into mechanical places
Specified drill carefully thru hole
Clean swarf
Tap hole for insert
fit insert with tool
and Robert would be your fathers brother!
I've stripped the thread on the central stud in the rocker cover. I've done search, but no luck, from what I've heard it shouldn't be too difficult to do repair in-situ. How is it done, Helicoil or new stud and drill & tap oversize?
bumpmuncher
Registered user
when i managed to strip one of mine. I rode the bike to a local engeneering firm who put a helicoil in in about 5 mins. had to wait a little while for it to cool enough to work on  wouldnt have thought it would have been too dificult to do myself but the repair cost less than getting the kit to do it myself
wouldnt have thought it would have been too dificult to do myself but the repair cost less than getting the kit to do it myself I prefer these on Helicoils
http://www.timesert.com/
I had Helicoils go wrong in the past, never went wrong with time/bigserts.
Just be carefull not to use them on cylinder studs - you need the helicoil there for oil passage.
Miky
http://www.timesert.com/
I had Helicoils go wrong in the past, never went wrong with time/bigserts.
Just be carefull not to use them on cylinder studs - you need the helicoil there for oil passage.
Miky
JR, if you're stuck, I can do a repair for you.
Can you still ride the bike, or can you trailer it? If not, I can run up to you sometime. I'm Wirral side of the Dee.
Timpo.
Can you still ride the bike, or can you trailer it? If not, I can run up to you sometime. I'm Wirral side of the Dee.
Timpo.
That's extremely kind of you Timpo, but there's a chance that a mate of mine may have something suitable (though it's unlikely to be a metric thread,) but failing that I'll drill and tap the head for something just a bit more than the existing then make a new, stepped, stud. The stud doesn't have too hard a life holding the rocker cover in place, mild steel should be fine.JR, if you're stuck, I can do a repair for you.
Can you still ride the bike, or can you trailer it? If not, I can run up to you sometime. I'm Wirral side of the Dee.
Timpo.
Thanks again, and as I've said before, Gee, this place...
PM sent
Central thread in my old 80/7 was stripped for around 7 years and 50k miles..
never leaked and I had no problems whatsoever as the 2 x 10mm nuts are the main sealing clamps..cente bolt is just for show imho
never leaked and I had no problems whatsoever as the 2 x 10mm nuts are the main sealing clamps..cente bolt is just for show imho
- Joined
- Jan 6, 2002
- Messages
- 12,659
- Reaction score
- 1,260
As a great Heath Robinson repair, hold a nut with some long nosed pliers in the hole/gap behind the head, push a threaded bar (with a touch of locktite on ) through the knackered part and into the nut...you can then tighten up as normal. As Proff says, wont leak without this in place anyway

P.S. You gonna write a book about your brake bleeding saga..could be a best seller, more turns and twists than a spy novel and no one could guess the ending
P.S. You gonna write a book about your brake bleeding saga..could be a best seller, more turns and twists than a spy novel and no one could guess the ending
As a great Heath Robinson repair, hold a nut with some long nosed pliers in the hole/gap behind the head, push a threaded bar (with a touch of locktite on ) through the knackered part and into the nut...you can then tighten up as normal. As Proff says, wont leak without this in place anyway
I did this type of repair more than 20 years ago on my R65. Still in place now
One thing not to do is overtighten the two outer nuts on the rocker cover to compensate losing the centre stud. You'll cause the rocker cover to "claw" which "will" cause it to leak.
Simple Repair - although maybe temporary!
I had a similar problem with one of mine, I found the stud didn't go to the bottom of the thread, so I simply replaced the stud with a longer stainless cap screw - in both sides (to match) and just nipped it up.
cheers,
I had a similar problem with one of mine, I found the stud didn't go to the bottom of the thread, so I simply replaced the stud with a longer stainless cap screw - in both sides (to match) and just nipped it up.
cheers,
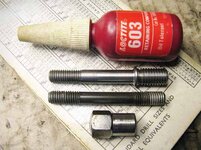
My mate didn't have any Helicoils of anywhere near the right size, so I made a new stud, see photo. I drilled the old damaged threads and retapped to 10mm metric thread. As the hole went through to open air- there is a gap between the base of the rocker box and the actual cylinder head as mentioned in the posts above- I made a shoulder in the new stud to tighten it in position as I didn't have any fresh Loctite, the stuff I do have is old and I believe that its shelf life is a year, maybe two. I did use it since I had it anyway. (Did that make sense?) So I recessed the mouth of the new hole to accommodate this shoulder, about a mm or so.
And then I went for a ride. Well, it's what it's all about, innit?
And then I went for a ride.
Well, it's what it's all about, innit?Attachments
D6
Registered user
http://www.timesert.com/
I had Helicoils go wrong in the past, never went wrong with time/bigserts.
Just be carefull not to use them on cylinder studs - you need the helicoil there for oil passage.
Miky

helicoils are old hat,
rarely used for anything important in my line of work now, timeserts hold better,
helicoils (i think) were designed for cast iron/steel in the tank (military) industry
DevonianScotsman
Registered user
In a feat of pure stupidity, I managed to shear off one of the threads on my left-hand central rocker stud. I set the torque wrench up wrong. 
4k miles later, still no issues - Taking it to the local garage to have a bar welded onto the stub and remove it in the normal fashion. It'll only cost me a beer too.")
4k miles later, still no issues - Taking it to the local garage to have a bar welded onto the stub and remove it in the normal fashion. It'll only cost me a beer too.
I have been asked via PM if I could make someone else a pair of studs like the one above, see post #12. Fine, no problem. His heads are on the bench already, so there will be no difficulty drilling the hole for the new stud, it has to be square with the top of the cylinder head obviously.
I did mine with the head on the bike, but the ideal way would be to do them on the bench without doubt. As I'd just had my engine in bits I couldn't face taking the head off again so with a modicum of care things worked out fine.
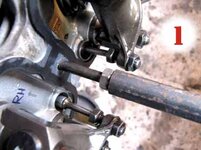
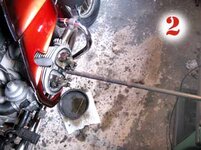
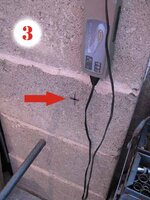
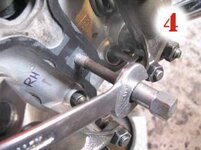
I first of all drilled and tapped a long (600mm??) rod to screw on to the end of the original stud that was beginning to pull out of the head. Photo 1. The drilling and tapping was done in the lathe to make sure that the thread was in-line with the rod. I used this rod to mark on the garage wall where the stud was pointing at (photos 2 & 3) so that the drill could be aligned correctly and the 8.5mm hole drilled squarely in the head before tapping to the next thread size up i.e. M10 X 1.5, to match the new stud. This mark on the wall was then used to line the tap up when cutting the new thread. The old stud had to come out first before drilling so I put on an ordinary 8mm nut on the stud and locked it up against the cap nut and then just unwound it out of the head, photo 4.
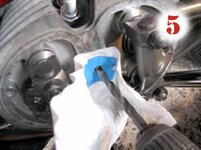
Before drilling I stuck some paper around the hole to stop the swarf from getting into the engine. Photo 5.
There are a couple of photos that I really should have taken, one showing the length of welding rod taped to the body of the drill which helped line it up with the mark on the wall. The other was of the actual tapping of the thread for which I used another rod of 20mm dia. approx (it was a busy day for rods) as an extension for the tap, with the tap wrench on the other end which was then lined up with the mark on the wall to perform the actual tapping operation.
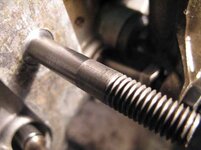
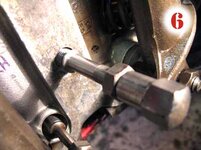
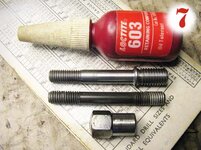
Photo 6 shows the new stud being inserted, again with a spare nut locked against the central cap nut. The last (No. 7) shows the old and the new studs, the old simply has an 8mm thread screwed directly into the alloy of the head which really doesn't leave much leeway for overtightening as can be seen from the other posts on this thread, whereas the new one has a 10mm thread into the head, and also a shoulder to tighten it up against. This shoulder does need a counterbore of a millimetre or so to allow it to seat flush in the head. As for the Loctite, well, that's optional, I happened to have some.
Bugger. It seems that there is a limit of five photos that I can insert in one post, I'll put the last two in another post. Something here I don't understand, Ride-out reports can have dozens??
I did mine with the head on the bike, but the ideal way would be to do them on the bench without doubt. As I'd just had my engine in bits I couldn't face taking the head off again so with a modicum of care things worked out fine.
I first of all drilled and tapped a long (600mm??) rod to screw on to the end of the original stud that was beginning to pull out of the head. Photo 1. The drilling and tapping was done in the lathe to make sure that the thread was in-line with the rod. I used this rod to mark on the garage wall where the stud was pointing at (photos 2 & 3) so that the drill could be aligned correctly and the 8.5mm hole drilled squarely in the head before tapping to the next thread size up i.e. M10 X 1.5, to match the new stud. This mark on the wall was then used to line the tap up when cutting the new thread. The old stud had to come out first before drilling so I put on an ordinary 8mm nut on the stud and locked it up against the cap nut and then just unwound it out of the head, photo 4.
Before drilling I stuck some paper around the hole to stop the swarf from getting into the engine. Photo 5.
There are a couple of photos that I really should have taken, one showing the length of welding rod taped to the body of the drill which helped line it up with the mark on the wall. The other was of the actual tapping of the thread for which I used another rod of 20mm dia. approx (it was a busy day for rods) as an extension for the tap, with the tap wrench on the other end which was then lined up with the mark on the wall to perform the actual tapping operation.
Photo 6 shows the new stud being inserted, again with a spare nut locked against the central cap nut. The last (No. 7) shows the old and the new studs, the old simply has an 8mm thread screwed directly into the alloy of the head which really doesn't leave much leeway for overtightening as can be seen from the other posts on this thread, whereas the new one has a 10mm thread into the head, and also a shoulder to tighten it up against. This shoulder does need a counterbore of a millimetre or so to allow it to seat flush in the head. As for the Loctite, well, that's optional, I happened to have some.
Bugger. It seems that there is a limit of five photos that I can insert in one post, I'll put the last two in another post. Something here I don't understand, Ride-out reports can have dozens??
Attachments
- Joined
- Jan 6, 2002
- Messages
- 12,659
- Reaction score
- 1,260
Blimey 
Does this mean you are riding down with bustupbiker and moi to the Wee-Kend ?
Does this mean you are riding down with bustupbiker and moi to the Wee-Kend ?
bustupbiker
Registered user
Nice job John

Similar threads
- Replies
- 22
- Views
- 1,164