

You are using an out of date browser. It may not display this or other websites correctly.
You should upgrade or use an alternative browser.
You should upgrade or use an alternative browser.
Tartivating my 'new' 1150GS
- Thread starter 621Andy
- Start date

621Andy
Registered user
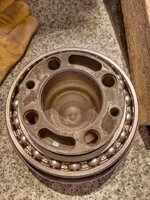
Rear hub was next...I thought about anti rusting the spoke heads, but then thought 'Bugger it, it's Hammerite...'(spotting a theme here by any chance )
)
I put two coats on although more would've been better(but my impatience wouldn't allow it!)
Doesn't look too bad, but time will tell how long it lasts...
)I put two coats on although more would've been better(but my impatience wouldn't allow it!)
Doesn't look too bad, but time will tell how long it lasts...
Attachments
621Andy
Registered user
Wifey's shouting that my dinner is getting cold, and would I mind not pissing about on the bloody forum much longer
") so more later...or tomorrow...or whenever
so more later...or tomorrow...or whenever
so more later...or tomorrow...or wheneverGreat stuff! Thanks for taking the time to document it, as the owner of an 03 1150 GS that is now a little like Trigger’s broom (replaced ECU, TPS, Hall sensor etc etc but in an unplanned way) I admire the fact you are doing it in advance 

Sent from my iPad using Tapatalk


Sent from my iPad using Tapatalk
621Andy
Registered user
Time for a quick update I think...
Back to the Final Drive bearing which eventually turned up- The pinion had been in the freezer for some time since the old bearing had been removed so as soon as I'd checked they'd sent the right bearing I got the blowtorch on it and got it hand-hot, then whipped the pinion out of the freezer(Wifey was out so all this was happening in the kitchen), laid it on the counter and the new bearing dropped on sweet as a nut- Very satisfying to do I'd meant to get the Verniers out and measure the difference between room temp and freezer temp but forgot
Once it was on it was then a case of lobbing it back in the freezer again whilst I fumbled getting the bearing seal into the cover; I warmed the cover and put a smear of grease around the inside. I eventually got the seal in but not without complications.
Then it was just a case of slotting the pinion wheel back into the cover which due to being cold went without a hitch.
The whole caboodle only fits back into the housing in one position due to the mounting bolt positions so impossible to fark up")
I'd smeared everything with gear oil before I slotted it all together; not really necessary but why not...
Now, once I'd fitted the bolts hand tight, I thought I'd better test my torque wrench...It'll say what the settings are in the Haynes
Does it bollocks Apparently you can dismantle the engine down to individual component parts but stripping the FD '...Is beyond the scope of this manual'
  What the actual fuck
Anyway a quick check online(how did we do this before the 'net??) revealed 35nm as the correct setting(if I remember correctly).
Then it was just a case of refitting brake caliper and wheel and job's a good 'un
Back to the Final Drive bearing which eventually turned up- The pinion had been in the freezer for some time since the old bearing had been removed so as soon as I'd checked they'd sent the right bearing I got the blowtorch on it and got it hand-hot, then whipped the pinion out of the freezer(Wifey was out so all this was happening in the kitchen), laid it on the counter and the new bearing dropped on sweet as a nut- Very satisfying to do
I'd meant to get the Verniers out and measure the difference between room temp and freezer temp but forgotOnce it was on it was then a case of lobbing it back in the freezer again whilst I fumbled getting the bearing seal into the cover; I warmed the cover and put a smear of grease around the inside. I eventually got the seal in but not without complications.
Then it was just a case of slotting the pinion wheel back into the cover which due to being cold went without a hitch.
The whole caboodle only fits back into the housing in one position due to the mounting bolt positions so impossible to fark up
I'd smeared everything with gear oil before I slotted it all together; not really necessary but why not...
Now, once I'd fitted the bolts hand tight, I thought I'd better test my torque wrench...It'll say what the settings are in the Haynes
Does it bollocks
Apparently you can dismantle the engine down to individual component parts but stripping the FD '...Is beyond the scope of this manual' What the actual fuckAnyway a quick check online(how did we do this before the 'net??) revealed 35nm as the correct setting(if I remember correctly).
Then it was just a case of refitting brake caliper and wheel and job's a good 'un
Attachments
621Andy
Registered user
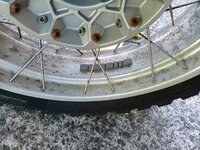
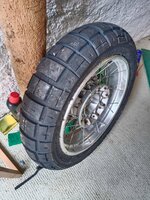
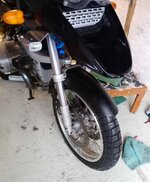
Concurrent to all this I also had the front wheel out to fit the new tyres I'd ordered. The Anakee Wilds that were on the bike when I bought it had plenty of tread left, but were going to be a bit 'interesting' on the Autobahns so again after a few hours on the 'net I ordered a set of Pirelli Scorpion Rally STRs(catchy names tyres have these days) would still look tasty but be a bit more suitable...
As I couldn't ride the bike, both wheels had to come off when the call came that they were ready...Easy in theory but would it all fall on its arse Actually, no, it doesn't but just to be sure I'd added a couple of straps from the bars up to the roof beams in my garage!
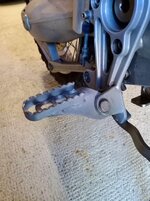
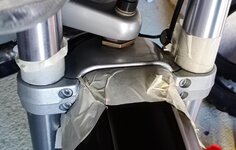
Whilst the wheel was out I tidied the front end up a bit with Smoothrite and WD40... The lower fork clamp was starting to get a bit furry around the mudguard so the small wire brush took the worst of it off and SMoothrite did the rest.
) would still look tasty but be a bit more suitable...As I couldn't ride the bike, both wheels had to come off when the call came that they were ready...Easy in theory but would it all fall on its arse
Actually, no, it doesn't but just to be sure I'd added a couple of straps from the bars up to the roof beams in my garage!Whilst the wheel was out I tidied the front end up a bit with Smoothrite and WD40... The lower fork clamp was starting to get a bit furry around the mudguard so the small wire brush took the worst of it off and SMoothrite did the rest.
Attachments


621Andy
Registered user
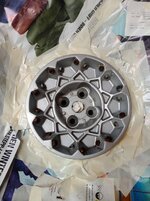
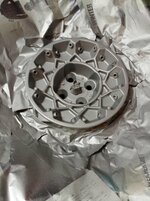
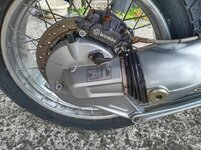
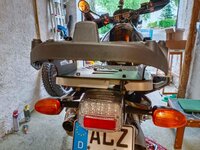
Out of sequence shot of the back wheel in and caliper on with Smoothrited bolts and filler plug. A new bleed nipple jobby ought to be the next thing on the list...
BTW you can see it's not a GS rear drive as there're no mountings for the hugger/mudguard thingy
BTW you can see it's not a GS rear drive as there're no mountings for the hugger/mudguard thingy
Attachments
621Andy
Registered user

621Andy
Registered user
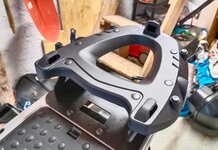
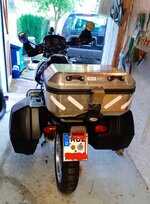
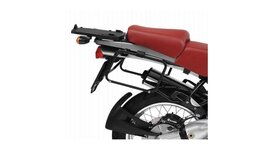
I had my Givi Trekker Dolomiti topbox on my KTM and wanted to fit it to the BM, however I couldn't really see how the adapter plate would fit so ended up buying a made to measure jobby from Givi; What a bloody monstrosity I can see the logic of strengthening the old rack as it needs to sit further back, but does it really have to sit 5' off the ground
It does the job though and was fairly straightforward to fit...providing you follow the instructions to the letter
The eagle eyed amongst you will note that my original rack has a chunk missing out of it, but doesn't seem to affect the strength...
I can see the logic of strengthening the old rack as it needs to sit further back, but does it really have to sit 5' off the groundIt does the job though and was fairly straightforward to fit...providing you follow the instructions to the letter
The eagle eyed amongst you will note that my original rack has a chunk missing out of it, but doesn't seem to affect the strength...
Attachments
621Andy
Registered user
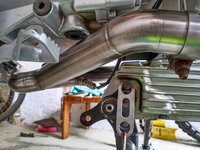
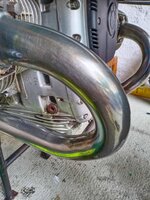
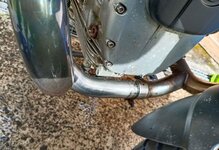
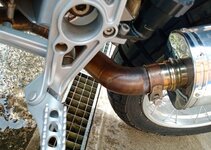
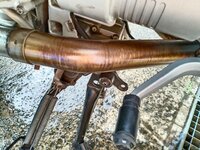
The zorst down pipes were next... I'd tentatively tried some generic bog cleaner that we had in the bathroom but that didn't seem to touch them such that Harpic is meant to
A check of ingredients however revealed that 10% Hydrochloric acid is the magic ingredient in Harpic supermegaturdshifter. A lot of toilet cleaners don't have this. Harpic isn't easily available nearby so it was a case of reading all the packaging to find out what did contain the evil stuff*
Eventually found something that should do the job, so got kitted up with my gynaecologist's gloves and goggles and set to work; WOW! it certainly makes a difference on the brown stuff(on the exhausts not the contents of the lav- Well I suspect it's pretty good at that too ) but didn't touch the blueing on the headers. Half hour with a scouring pad and this stufff and they were transformed. Wifey's gardening watering can rinsed them off...
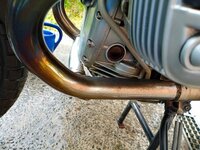
I then set to work with Autosol to get them looking better. I was quite impressed... However since I've now done 150km on them they've lost their shine already but at least they're still steel coloured rather than rust coloured.
I didn't take any actual exhaust specific 'before' piccies, but a scroll through he previous posts will give you some idea. You can see the difference in the first pic, comparing left and right pipes though
* By the way, Hydrochloric acid in German is 'Salzsäure'...just in case you need to know; Mine of useless information, me
A check of ingredients however revealed that 10% Hydrochloric acid is the magic ingredient in Harpic supermegaturdshifter. A lot of toilet cleaners don't have this. Harpic isn't easily available nearby so it was a case of reading all the packaging to find out what did contain the evil stuff*
Eventually found something that should do the job, so got kitted up with my gynaecologist's gloves and goggles and set to work; WOW! it certainly makes a difference on the brown stuff(on the exhausts not the contents of the lav- Well I suspect it's pretty good at that too
) but didn't touch the blueing on the headers. Half hour with a scouring pad and this stufff and they were transformed. Wifey's gardening watering can rinsed them off...I then set to work with Autosol to get them looking better. I was quite impressed... However since I've now done 150km on them they've lost their shine already
but at least they're still steel coloured rather than rust coloured.I didn't take any actual exhaust specific 'before' piccies, but a scroll through he previous posts will give you some idea. You can see the difference in the first pic, comparing left and right pipes though
* By the way, Hydrochloric acid in German is 'Salzsäure'...just in case you need to know; Mine of useless information, me
Attachments

Nice work.
I had my Givi Trekker Dolomiti topbox on my KTM and wanted to fit it to the BM, however I couldn't really see how the adapter plate would fit so ended up buying a made to measure jobby from Givi; What a bloody monstrosity
Good thread and great timing for me as I have just collected a 2003 R1150GS last week and some of the preventative maintenance you have done is very useful to see.
But this post is spookily timely as I have just yesterday received the same Givi top box plate to also fit my Dolimiti box and my first reaction was "how f?cking heavy", so I weighed it, 3.3 kilos, that is nuts. So I was undecided whether to fit it but I think I will now return in and try and fit a universal plate which I have in stock.
You are doing a nice job of sprucing your bike up.
Carnt you just bold the top box rack plate on to the original rack save the 5 inch rise.?Not see damaged rack then.
Great thread,thanks for posting 
I have the original design Givi top box plate with a Maxia box on it on my 1150, and have always thought it must make it pretty much impossible for Average Speed Cameras to get a clear reading of the plate
I have the original design Givi top box plate with a Maxia box on it on my 1150, and have always thought it must make it pretty much impossible for Average Speed Cameras to get a clear reading of the plate
621Andy
Registered user
Carnt you just bold the top box rack plate on to the original rack save the 5 inch rise.?Not see damaged rack then.
Possibly, but the kit comes with strengthening bars that fit underneath and at the same time move the rack backwards as the BMW rack is too small for the adapter plate. I actually wanted to fit my universal plate from my KTM but couldn't get the nice covers off the bolts the Givi thoughtfully provide, and gave up after a half-arsed attempt and fitted the one that came in the kit.
Attachments
621Andy
Registered user
Anyway, on with the story...
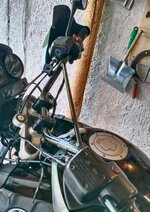
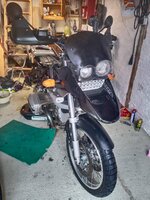
The bars and stands were all looking a bit tatty with surface rust showing through in places. I don't have any Smoothrite spray in black and anyway it would have been difficult to spray everything in-situ.
I tried to remove the bars but as there are wires running through them(& elecktrickery is not high on my skills list) I decided that with some judicious masking and cable-tie removal it would be possible. As the stands weren't too bad and the main stand would need to come off at some point anyway to replace the O-rings and lube it, I left them in place too.
It doesn't look too bad(if you squint and look in the opposite direction) but better than rust...
The bars and stands were all looking a bit tatty with surface rust showing through in places. I don't have any Smoothrite spray in black and anyway it would have been difficult to spray everything in-situ.
I tried to remove the bars but as there are wires running through them(& elecktrickery is not high on my skills list
) I decided that with some judicious masking and cable-tie removal it would be possible. As the stands weren't too bad and the main stand would need to come off at some point anyway to replace the O-rings and lube it, I left them in place too.It doesn't look too bad(if you squint and look in the opposite direction) but better than rust...
Attachments
621Andy
Registered user
621Andy
Registered user
621Andy
Registered user
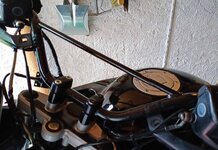
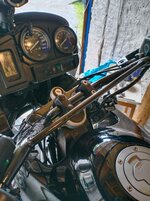
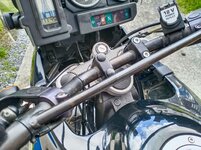
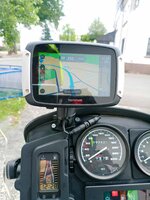
Whilst the bike was nude, I'd decided to 'hard-wire' the navi. I could've cut into the bike wiring and taken a feed from somewhere in the instrument/handlebar cluster but as the wiring is 20 years old and largely original I prefer to run a live feed from the battery.
This seemed fairly straightforward and I set about plumbing it in including an inline fuse near the battery. I got it all wired in, and cable-tied in place, and fired up the ignition....Sod all Buggerybastardbollocks! So I tried working out where the problem lay. I'd used a length of newish but used cable attached to a brand new fuse holder(& new fuse). There was a tiny section of wire that looked like it had been crushed so guessed that was where the problem was, so cut the wire with the idea to put in connectors...I then thought I'd test it again and there was power getting through both sections of wire, so as an afterthought I tested the section with the fuse holder-Nowt! The bloody fuse holder was shagged I did change the fuse with the same result... So I had a perfectly serviceable cable now in two bits and a U/S fuse holder...
In the end I bought a new length of wire and a different (better - as it now uses the same fuses as the bike) type of holder and rewired everything back in with more success. It does mean that it's permanently live but at least it's fuse protected...
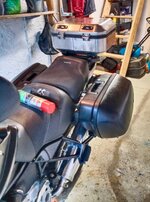
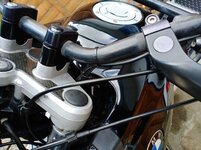
The Ram mount was already fitted to the instrument panel and is supported by two holes in the coaming cover(more on this later...) that have a cable tie running through them that wraps around the holder. It works reasonably well but wobbles a bit at motorway speeds. The previous owner had his Touratwat phone holder mounted on it. He offered it to me but my phone didn't fit and I had no plans to use it so let him keep it; With hindsight I should've kept it and stuck it on eBay, but it was too much hassle, especially as I've had some big hassles recently with stuff not getting delivered and pissy buyers...
This seemed fairly straightforward and I set about plumbing it in including an inline fuse near the battery. I got it all wired in, and cable-tied in place, and fired up the ignition....Sod all
Buggerybastardbollocks! So I tried working out where the problem lay. I'd used a length of newish but used cable attached to a brand new fuse holder(& new fuse). There was a tiny section of wire that looked like it had been crushed so guessed that was where the problem was, so cut the wire with the idea to put in connectors...I then thought I'd test it again and there was power getting through both sections of wire, so as an afterthought I tested the section with the fuse holder-Nowt! The bloody fuse holder was shagged I did change the fuse with the same result... So I had a perfectly serviceable cable now in two bits and a U/S fuse holder...In the end I bought a new length of wire and a different (better - as it now uses the same fuses as the bike) type of holder and rewired everything back in with more success. It does mean that it's permanently live but at least it's fuse protected...
The Ram mount was already fitted to the instrument panel and is supported by two holes in the coaming cover(more on this later...) that have a cable tie running through them that wraps around the holder. It works reasonably well but wobbles a bit at motorway speeds. The previous owner had his Touratwat phone holder mounted on it. He offered it to me but my phone didn't fit and I had no plans to use it so let him keep it; With hindsight I should've kept it and stuck it on eBay, but it was too much hassle, especially as I've had some big hassles recently with stuff not getting delivered and pissy buyers...
Attachments
621Andy
Registered user
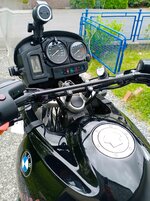
As the screen and coaming cover were off anyway, I thought I'd repaint the cover as in my opinion it looks bloody stupid being in a completely different colour to the rest of the bike. However I did wonder whether there'd be glare issues with it reflecting in the screen if I painted it gloss black, so I did it in satin black instead. It's not a bad job and I think it improves the looks a bit
Attachments

Similar threads
- Replies
- 163
- Views
- 10,895