


You are using an out of date browser. It may not display this or other websites correctly.
You should upgrade or use an alternative browser.
You should upgrade or use an alternative browser.
Winglet installation.
- Thread starter Chris Terry
- Start date


Chris Terry
Registered user
Thanks.
My kit of parts has steel bushes not plastic as discribed. Everbody says "do not over tighten", in engineering this normally means "use the torque setting"??. Mmmmmmm so if there is no torque for these screws they cannot be over tightened?? (if you follow me)
 .
. So if they crack it can't be my fault, and should be replaced under the gaurantee.


I fitted them to my 05 along with power outlets on both sides - the full size outlet meant ofsetting the winglet but I still found a suitable position.
Re. tightening suggest you use a dolop of threadlock ("dolop" - technical term to indicate using sufficient quantity of a viscous substance in an appropriate place)
Re. tightening suggest you use a dolop of threadlock ("dolop" - technical term to indicate using sufficient quantity of a viscous substance in an appropriate place)
Billywhizz
Registered user
I've just fitted them to my 09 model. The thread above is full of all the major hints but it's dead easy to drill up from the bottom - just put the steering on full lock so you can see the bracket under the wings. You'll be able to get a smallish pistol drill in there easily.
Just one other hint....someone suggested doing this by drilling a pilot hole from underneath first, then opening the hole out by drilling down from above. If you do this, you need to get the pilot bang in the middle of the hole in the bracket. If you don't, then you'll be drilling the bracket when you open the hole out from above, or the drill will find it's way to line up with hole leaving you with an oval - hope this makes sense. I just drilled a full sized hole from the bottom with no problem - just make sure you've got a sharp drill bit and take it easy - plastic like this won't shatter or split unless you're really cackhanded.
The other thing I did was to ease the captive nuts open with a screwdriver before mounting them - mine were a bit tight and if you force them on and get them in the wrong place they're a right pain to move.
It's one of those jobs that looks like it could end in tears but is really easy....
Don't know about torque values but you get a feel for these things, there's quite a few surfaces to pull together before you get into trouble.
Just one other hint....someone suggested doing this by drilling a pilot hole from underneath first, then opening the hole out by drilling down from above. If you do this, you need to get the pilot bang in the middle of the hole in the bracket. If you don't, then you'll be drilling the bracket when you open the hole out from above, or the drill will find it's way to line up with hole leaving you with an oval - hope this makes sense. I just drilled a full sized hole from the bottom with no problem - just make sure you've got a sharp drill bit and take it easy - plastic like this won't shatter or split unless you're really cackhanded.
The other thing I did was to ease the captive nuts open with a screwdriver before mounting them - mine were a bit tight and if you force them on and get them in the wrong place they're a right pain to move.
It's one of those jobs that looks like it could end in tears but is really easy....
Don't know about torque values but you get a feel for these things, there's quite a few surfaces to pull together before you get into trouble.

. Mmmmmmm so if there is no torque for these screws they cannot be over tightened?? (if you follow me)
So if they crack it can't be my fault, and should be replaced under the gaurantee.
If they crack it actually will be your fault because you overtightened them.
If you`re incapable of judging how tight to make a fastener in this sort of application then you shouldn`t be doing the job and may be better advised to go back to playing with your Lego bricks.
And you claim to be a Project Engineer,too.
What the feck is it with so many of the 1200 lot ???

Chris Terry
Registered user
If they crack it actually will be your fault because you overtightened them.
If you`re incapable of judging how tight to make a fastener in this sort of application then you shouldn`t be doing the job and may be better advised to go back to playing with your Lego bricks.
And you claim to be a Project Engineer,too.
What the feck is it with so many of the 1200 lot ???
You sound like one of those helpful chaps who
"knows all & knows Fcuk all"

I don't suppose you know what a torque wrench is, let alone a torque setting.
Wind your neck in and play with your Russian tricycle until you can afford a descent (2 wheeled) bike.


footloose
Guest
You sound like one of those helpful chaps who
"knows all & knows Fcuk all"
I don't suppose you know what a torque wrench is, let alone a torque setting.
Wind your neck in and play with your Russian tricycle until you can afford a descent (2 wheeled) bike.
Tarka could have been a little less confrontational in his comments but your reply does you no credit.
Tarka is right in his comments, Chris Terry doesn't sound very comfortable with the winglets install which really is very simple to someone with a little tool experience. Perhaps a little more research would have avoided the need for this thread.

Thanks.
My kit of parts has steel bushes not plastic as discribed. Everbody says "do not over tighten", in engineering this normally means "use the torque setting"??. Mmmmmmm so if there is no torque for these screws they cannot be over tightened?? (if you follow me)
So if they crack it can't be my fault, and should be replaced under the gaurantee.
There should be 2 plastic washers, to sandwich the winglet.... just nip the nut so its tight , use nyloc nuts so they won't come undone... if you haven't got any plastic washers I'd source some

Chris Terry
Registered user
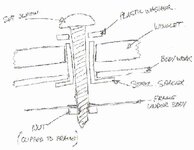
The BMW Winglets came with the parts in my drawing. The drawing shows the assembly recommended by the CW guy. I have looked at the components and the only way is the CW way. Unless we have missed something. Your suggested assembly method seems to ignore my BMW kit of parts?There should be 2 plastic washers, to sandwich the winglet.... just nip the nut so its tight , use nyloc nuts so they won't come undone... if you haven't got any plastic washers I'd source some
4 Captive nuts, 4 Top hat section stainless steel spacer, 4 plastic washers, 4 Torex set screws, 2 Winglets.
did'nt yours come with the same bits as mine?

E. Buygum
Registered user
The BMW Winglets came with the parts in my drawing. The drawing shows the assembly recommended by the CW guy. I have looked at the components and the only way is the CW way. Unless we have missed something. Your suggested assembly method seems to ignore my BMW kit of parts?
4 Captive nuts, 4 Top hat section stainless steel spacer, 4 plastic washers, 4 Torex set screws, 2 Winglets.
did'nt yours come with the same bits as mine?
Your diagram is exactly how I fitted mine...right or not they have been fine for 2 years. It seems to be consistent with:
http://www.realoem.com/bmw/showparts.do?model=0380&mospid=51731&btnr=46_1033&hg=46&fg=55
I'm not sure about torque settings...I just did it by feel. No cracking and they haven't flown off...perhaps this make me eligible to join the elite group of 11xx riders?
Chris Terry
Registered user
Cheers, at least I don't have to change them.Your diagram is exactly how I fitted mine...right or not they have been fine for 2 years. It seems to be consistent with:
http://www.realoem.com/bmw/showparts.do?model=0380&mospid=51731&btnr=46_1033&hg=46&fg=55
I'm not sure about torque settings...I just did it by feel. No cracking and they haven't flown off...perhaps this make me eligible to join the elite group of 11xx riders?


Nothing goes under the body work, its all on the top.
These are on a 2010 gsa,
Don't think it matters if the bush goes in from the top with the washer on the bottom or the other way round with the bush in from the bottom and the plastic washer on the top.

These are on a 2010 gsa,
Don't think it matters if the bush goes in from the top with the washer on the bottom or the other way round with the bush in from the bottom and the plastic washer on the top.
Chris Terry
Registered user
Thanks, but this does not agree with http://www.realoem.com/bmw/showparts.do?model=0380&mospid=51731&btnr=46_1033&hg=46&fg=55Nothing goes under the body work, its all on the top.
These are on a 2010 gsa,
Don't think it matters if the bush goes in from the top with the washer on the bottom or the other way round with the bush in from the bottom and the plastic washer on the top.
or CW (BMW Dealer).
This thread is almost as good as the one about oil.

Chris Terry
Registered user
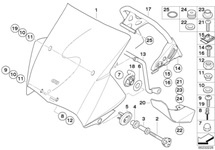
your looking at the older 2008 setup,
parts on the 2010 model look like this,
21 Fillister head screw M5X20SI 4 06 32 7 657 966
22 Flat washer 4 46 61 2 308 594
23 Flange sleeve, steel 4 46 63 7 724 481
24 Grommet 2 46 63 7 709 435
2 Winglets (with 4 holes)
4 Screws
4 Washers
4 Flange sleeve, steels
2 Grommits
Which lucky Winglet holes get get the rubber Grommits ?


diagram
any chance of the R1200GSA Screen diagram...please..
your looking at the older 2008 setup,
parts on the 2010 model look like this,
21 Fillister head screw M5X20SI 4 06 32 7 657 966
22 Flat washer 4 46 61 2 308 594
23 Flange sleeve, steel 4 46 63 7 724 481
24 Grommet 2 46 63 7 709 435
any chance of the R1200GSA Screen diagram...please..
Two  grommets per winglet.
One in each hole.
grommets per winglet.One in each hole.
Chris Terry
Registered user
I'm not trying to be thick or prolong this thread but....my kit of parts are the same as the one you listed (only 2 rubber grommets). CW Dorchester tell me that the rubber Grommets are not usedTwo
One in each hole.
. Also they advised me to install the Winglets as per my drawing at the top of the thread. There seems to be no correct BMW way of assembly, but everybody has an idea of how they should go. There is a couple of ambiguous part list drawings but no definitive assembly instructions. I can see why they all seem to "crack after a while" (CW quote).
Mines are the way they came from the factory, should think they know how it goes together.
The metal bush is the correct length for the grommet, to hold it firm without over compresing the rubber.
You can nip up the screw with the worry of breaking the winglet.
Rubber gromets were not used on earlier models as the metal bush was then made of plastic and used a plastic washer to hold the winglet in place.
The problem with that was it was possible to overtighten the screws and squash the plastic bush and end up cracking the plastic.
There is no way that the metal bush goes under the bodywork.
Why would you not use the grommets?
The metal bush is the correct length for the grommet, to hold it firm without over compresing the rubber.
You can nip up the screw with the worry of breaking the winglet.
Rubber gromets were not used on earlier models as the metal bush was then made of plastic and used a plastic washer to hold the winglet in place.
The problem with that was it was possible to overtighten the screws and squash the plastic bush and end up cracking the plastic.
There is no way that the metal bush goes under the bodywork.
Why would you not use the grommets?

Similar threads
- Replies
- 4
- Views
- 201

- Replies
- 3
- Views
- 466

- Replies
- 3
- Views
- 113

- Replies
- 6
- Views
- 1,624

- Replies
- 47
- Views
- 2,899