Hi all,
Bit of backstory first.
I finished rebuilding an absolutely dire condition ST1100 Pan last year and have been happily bimbling about on it, but I needed something else to fill the hole on my workbench.
So….earlier this year I picked up this!

I’ll speed-run the first-glance condition of it:
-parked up in a garage in about 15 years ago with 29k miles on her.
-engine turned over ok but it ‘wouldn’t start’
-the paint is falling off the engine
-rims are heavily pitted and the hubs are a mess
-wiring loom sheath is utterly rotten (someone at BMW needs retrospectively sacking for whatever decision led to this stuff being used)


Oh, and mice have eaten a lot of the rubber bits, like the grips. You can literally see the teeth marks…..

All fixable though!
Good points….
-29k miles, HPI clear
-tank is beautiful (and the best colour) along with the rest of the plastic bar a couple of marks
-Remus can and Y piece along with the original
-full service history with every single receipt going back to new as far as I can see
Now, I have hundreds of reference photos over the last few months. I’ve not sat still…. I’ll give you the very abbreviated version of what’s been going on.
First job (after a wash) was to get it running to see how far into the engine I may need to go. Again, long story short, the fuel pump was seized solid. The tank is actually mint inside and out, but the pump was just full of corrosion, With that replaced, a new filter, new QR couplings and fresh fuel, plugs and an oil change, she started right up. I balanced the TB’s with my old mercury gauges and she ticks over like a sewing machine. No smoke, no rattles. Even the ancient data tool alarm/immobiliser worked…this is all good!
Cosmetically, besides the plastics and tank, she’s far from mint. Good job this isn’t my first resto-rodeo (restodeo?)
I started off intending to simply clean and spray up the engine, a quick cosmetic tidy up all round and i’d be out on her in August.
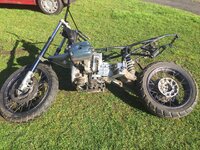
So, over the next few months (fitting in stolen moments in the garage around work/family life) I snap the first bolt I tried removing (its ultimately fine), continue to strip the front end out, front swing arm off, fight with the exhaust system (I won the battle but the stud-war may yet be won by her in the end - they’re nasty and could let go on rebuild) and expose the engine. Strip off the paint….there’s a lot of corrosion, but I chase it back with a brass brush wherever I can right up to the headstock main frame. Drop the oil out and pop out the sight glass because the area round it was a cheesy mess. Beak and oil cooler off to get behind the pipe (which needs respraying anyway).
Then, yesterday, I stand back with a brew and realise this isn’t going to be a quick resto. If I’m in this far, it may as well keep going. It’s my third 1150, and I’ve regretted selling the others, so could this be a keeper? If so, I want it to be as mint, near-showroom condition as I can.
I know where this leads.
That brings me up to today, when I’ve just finished taking off the top yoke, switch gear, master cylinders and headstock ‘frame’. This is where I’m up to.


The black markings on the engine cover are simply where I need to put a better finish on the alloy before I prime it all.
I’ve decided to go pretty-much all in. There isn’t much to spend to be honest. I’m probably going to need a new pair of shock absorbers (front and rear), and the wheels rebuilding with resprayed hubs and new spokes, two new tyres, and various seals, cosmetic bolts and about a thousand cable ties (is that a BMW thing?) but, besides that, it’s surprisingly solid.
I figured it was about time I had a central thread. I’ve had some great help and advice regarding a few of the jobs I’ve already tackled but if I’m going in deeper I’m definitely going to need the collective keen eyes and advice of this parish to keep things on track.
So, my first question at this point is this…
What’s the procedure for removing the rear subframe? Can I simply remove all the ancillary gubbins (servo unit, wiring harness, foot rest mounts etc) then unbolt the subframe in the bike’s current….configuration…. Or do I need the front end present with the wheel strapped to the bench to take the subframe off and/or a jack under the gearbox to support the rear of the engine when the shock is removed?
I really don’t want the whole thing collapsing in the middle…..
Any and all advice gratefully received!
Cheers
Mike
Bit of backstory first.
I finished rebuilding an absolutely dire condition ST1100 Pan last year and have been happily bimbling about on it, but I needed something else to fill the hole on my workbench.
So….earlier this year I picked up this!
I’ll speed-run the first-glance condition of it:
-parked up in a garage in about 15 years ago with 29k miles on her.
-engine turned over ok but it ‘wouldn’t start’
-the paint is falling off the engine
-rims are heavily pitted and the hubs are a mess
-wiring loom sheath is utterly rotten (someone at BMW needs retrospectively sacking for whatever decision led to this stuff being used)
Oh, and mice have eaten a lot of the rubber bits, like the grips. You can literally see the teeth marks…..
All fixable though!
Good points….
-29k miles, HPI clear
-tank is beautiful (and the best colour) along with the rest of the plastic bar a couple of marks
-Remus can and Y piece along with the original
-full service history with every single receipt going back to new as far as I can see
Now, I have hundreds of reference photos over the last few months. I’ve not sat still…. I’ll give you the very abbreviated version of what’s been going on.
First job (after a wash) was to get it running to see how far into the engine I may need to go. Again, long story short, the fuel pump was seized solid. The tank is actually mint inside and out, but the pump was just full of corrosion, With that replaced, a new filter, new QR couplings and fresh fuel, plugs and an oil change, she started right up. I balanced the TB’s with my old mercury gauges and she ticks over like a sewing machine. No smoke, no rattles. Even the ancient data tool alarm/immobiliser worked…this is all good!
Cosmetically, besides the plastics and tank, she’s far from mint. Good job this isn’t my first resto-rodeo (restodeo?)
I started off intending to simply clean and spray up the engine, a quick cosmetic tidy up all round and i’d be out on her in August.
So, over the next few months (fitting in stolen moments in the garage around work/family life) I snap the first bolt I tried removing (its ultimately fine), continue to strip the front end out, front swing arm off, fight with the exhaust system (I won the battle but the stud-war may yet be won by her in the end - they’re nasty and could let go on rebuild) and expose the engine. Strip off the paint….there’s a lot of corrosion, but I chase it back with a brass brush wherever I can right up to the headstock main frame. Drop the oil out and pop out the sight glass because the area round it was a cheesy mess. Beak and oil cooler off to get behind the pipe (which needs respraying anyway).
Then, yesterday, I stand back with a brew and realise this isn’t going to be a quick resto. If I’m in this far, it may as well keep going. It’s my third 1150, and I’ve regretted selling the others, so could this be a keeper? If so, I want it to be as mint, near-showroom condition as I can.
I know where this leads.
That brings me up to today, when I’ve just finished taking off the top yoke, switch gear, master cylinders and headstock ‘frame’. This is where I’m up to.
The black markings on the engine cover are simply where I need to put a better finish on the alloy before I prime it all.
I’ve decided to go pretty-much all in. There isn’t much to spend to be honest. I’m probably going to need a new pair of shock absorbers (front and rear), and the wheels rebuilding with resprayed hubs and new spokes, two new tyres, and various seals, cosmetic bolts and about a thousand cable ties (is that a BMW thing?) but, besides that, it’s surprisingly solid.
I figured it was about time I had a central thread. I’ve had some great help and advice regarding a few of the jobs I’ve already tackled but if I’m going in deeper I’m definitely going to need the collective keen eyes and advice of this parish to keep things on track.
So, my first question at this point is this…
What’s the procedure for removing the rear subframe? Can I simply remove all the ancillary gubbins (servo unit, wiring harness, foot rest mounts etc) then unbolt the subframe in the bike’s current….configuration…. Or do I need the front end present with the wheel strapped to the bench to take the subframe off and/or a jack under the gearbox to support the rear of the engine when the shock is removed?
I really don’t want the whole thing collapsing in the middle…..
Any and all advice gratefully received!
Cheers
Mike
Last edited:
")