I'm posting this in response to the number of times I've been asked about the finish on my TT Zegas.
The following works on any flat surfaces so it should be ok on other makes too.
First of all I should acknowledge that the intellectual rights belong to Uncle Albert.

Basically the finish is 'sticky-backed plastic' in the finest Blue Peter tradition. In this case the stuff is the same used for vehicle graphics. It's got an average life expectancy according to the supplier of about five years. My Zegas have been covered in this stuff for about 18 months and 18,000 miles. It's not peeled off and looks almost as good as new plus it does offer protection from road salt and oxidisation.
It's easy to apply, easy to replace if damaged and there is a comprehensive range of colours to suit most tastes (even Tarka's I suspect ). The supplier lists reflective stuff if that's what you require (website link to follow).
Today I received a second-hand Zegatop topbox purchased from Keith22 so decided to record the process for anyone interested.
Even with new panniers it's best to clean the surfaces to ensure the covering goes on easily and that it will stay put. It's more important with used panniers to remove adhesive from stickers, oxidisation and polish etc.

I use acetone. It takes off most of the accumulated road dirt and if you sniff it it gives you a nice buzz (don't do it really!).

You will need some sharp scissors, a decent craft or Stanley knife and a good straight-edge.
Cut an over-sized sheet of the covering.

It only needs to be an inch or so bigger than the panel to be covered.
Peel back about two inches of the backing paper and fold it back on itself.

Avoid letting the sticky side make contact with itself. It will separate but it will crease and stretch.
Lay the exposed sticky side over one edge of the pannier surface to be covered and work from the middle towards the edges gently smoothing it with your fingers.

Don't worry about minor bubbles at this stage.
Using your fingers smooth the covering from side to side.

You should find that the waxed backing will slide away from the adhesive side as you slide your fingers across the outer surface at first but as you go further with the side to side action, the amount of waxed backing paper will become too much to 'push' out of the way.

With your free hand, gently guide and pull the waxed backing away from the covering as you work your other hand side to side.

It goes on quite easily.
You may end up with some small bubbles under the covering.

Don't worry too much. These can be 'chased' to an edge with your finger-nail. Don't use anything too hard to do this. It will mark the covering. If you really want to get rid of big bubbles that won't move, use a pin, prick a small hole and push the air out with your nail.
There isn't really any need to do this because the bubbles will disappear once the sun gets on the panniers or if you have a hot-air gun (a hair dryer might do), play a very gentle low heat over the area and watch the bubbles shrink away.

Take your straight-edge and knife.
On Zegas the trimming of the top and bottom is easy because there is a nice defined egde.
Make sure that the covering is right into the rim at the top and run the blade at 45 degrees along the seam.
On the outside corner edges, rather than go over the curved corners (that causes the covering to buckle, stretch and wrinkle), I run the knife along the straight-edge leaving about half an inch of bare ali.
Around the lock latches you just have to be careful and have a very sharp blade point.
If you are any good at wallpapering, it's a bit like doing around the light and plug switches!
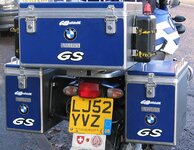
All finished.

I think you can see from the newly finished topbox that the panniers have lasted well considering they've not been re-covered.

Don't press too hard with the knife. It will leave a slight cut in the ali surface but this isn't visible until the covering is removed. At that time a little attention with a fine-grit wet & dry will remove the cut.
The covering accepts most paint polishes I've tried so you don't have to worry about polish leaving marks.
I got the covering from here http://www.shop.grafityp.co.uk go to the vinyls link.
There are gloss and satin finishes. The stuff comes in a 10 metre roll (enough to do about three full sets of panniers and topboxes) and costs about £25 depending on the quality you decide to go for.
The following works on any flat surfaces so it should be ok on other makes too.
First of all I should acknowledge that the intellectual rights belong to Uncle Albert.
Basically the finish is 'sticky-backed plastic' in the finest Blue Peter tradition. In this case the stuff is the same used for vehicle graphics. It's got an average life expectancy according to the supplier of about five years. My Zegas have been covered in this stuff for about 18 months and 18,000 miles. It's not peeled off and looks almost as good as new plus it does offer protection from road salt and oxidisation.
It's easy to apply, easy to replace if damaged and there is a comprehensive range of colours to suit most tastes (even Tarka's I suspect
). The supplier lists reflective stuff if that's what you require (website link to follow).Today I received a second-hand Zegatop topbox purchased from Keith22
so decided to record the process for anyone interested.Even with new panniers it's best to clean the surfaces to ensure the covering goes on easily and that it will stay put. It's more important with used panniers to remove adhesive from stickers, oxidisation and polish etc.
I use acetone. It takes off most of the accumulated road dirt and if you sniff it it gives you a nice buzz (don't do it really!).
You will need some sharp scissors, a decent craft or Stanley knife and a good straight-edge.
Cut an over-sized sheet of the covering.
It only needs to be an inch or so bigger than the panel to be covered.
Peel back about two inches of the backing paper and fold it back on itself.
Avoid letting the sticky side make contact with itself. It will separate but it will crease and stretch.
Lay the exposed sticky side over one edge of the pannier surface to be covered and work from the middle towards the edges gently smoothing it with your fingers.
Don't worry about minor bubbles at this stage.
Using your fingers smooth the covering from side to side.
You should find that the waxed backing will slide away from the adhesive side as you slide your fingers across the outer surface at first but as you go further with the side to side action, the amount of waxed backing paper will become too much to 'push' out of the way.
With your free hand, gently guide and pull the waxed backing away from the covering as you work your other hand side to side.
It goes on quite easily.
You may end up with some small bubbles under the covering.
Don't worry too much. These can be 'chased' to an edge with your finger-nail. Don't use anything too hard to do this. It will mark the covering. If you really want to get rid of big bubbles that won't move, use a pin, prick a small hole and push the air out with your nail.
There isn't really any need to do this because the bubbles will disappear once the sun gets on the panniers or if you have a hot-air gun (a hair dryer might do), play a very gentle low heat over the area and watch the bubbles shrink away.
Take your straight-edge and knife.
On Zegas the trimming of the top and bottom is easy because there is a nice defined egde.
Make sure that the covering is right into the rim at the top and run the blade at 45 degrees along the seam.
On the outside corner edges, rather than go over the curved corners (that causes the covering to buckle, stretch and wrinkle), I run the knife along the straight-edge leaving about half an inch of bare ali.
Around the lock latches you just have to be careful and have a very sharp blade point.
If you are any good at wallpapering, it's a bit like doing around the light and plug switches!
All finished.
I think you can see from the newly finished topbox that the panniers have lasted well considering they've not been re-covered.
Don't press too hard with the knife. It will leave a slight cut in the ali surface but this isn't visible until the covering is removed. At that time a little attention with a fine-grit wet & dry will remove the cut.
The covering accepts most paint polishes I've tried so you don't have to worry about polish leaving marks.
I got the covering from here http://www.shop.grafityp.co.uk go to the vinyls link.
There are gloss and satin finishes. The stuff comes in a 10 metre roll (enough to do about three full sets of panniers and topboxes) and costs about £25 depending on the quality you decide to go for.
")