This will hopefully be a useful guide for anyone needing to remove the beak on an 1150GSA, for example if you need to replace an oil cooler pipe......
First up, it is not as bad as it looks you just need to be methodical so here goes....
1. Remove the yellow glass from the indicators and carefuly disconnect the spade terminals on each. It does not seem to matter which way round you put the spades back so don't worry too much.
2. Remove the spotlights if fitted.
3. Remove the screen and the console cover.
4. Remove the headlight cover, undo the three studs holding the headlights in place and use a large flathead screwdriver to carefully lift the headlight unit off the adjustment ball (bottom right, white plastic as you look into the headlights). Disconnect the wires from the headlights and put them somewhere safe.
5. Disconnect the console (one bolt and two prongs in white rubber washers) and rest it gently on the handlebars. Don't try to disconnect anything from the console itself, that path leads to perdition.
6. There are two torx bolts under where the back of the headlights used to be, undo them.
7. There are two torx bolts next to the indicator units, undo them.
8. Have a cuppa and calm your nerves. Buy a newspaper, referrably a broadsheet and a pack of imperial mints. Ideally do this on a Sunday.
9. There are two torx bolts holding the beak to the plastic frame that holds the headlights and console (at 90 degrees to the orientation of the bike, deeply recessed on one side). If you are lucky they will simply undo. If you are unlucky some f**king prick has put thread lock on the bolds and the brass inserts in the plastic of the beak are now twisting, stopping you from removing the bloody thing.
10. Have another cuppa and a sneaky fag even though you gave up years ago.
11. Try Clamping the plastic to grip the plastic onto the brass inserts.
12. That won't work.
13. Call a mate who will advise you to buy a Jap bike next time.
14. Have a coffee and trawl UKGSer until you find this post.
15. Relax, it'll all be OK.
16. Undo the indicator units by undoing the large nut on the inside. Pull the wires through and tuck them behind the forks.
17. Shoogle (wiggle) the beak a little and gently open the beak so it pops off the brass insert on one side. Do the same on the other side and the beak will come off.
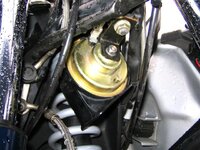
18. The oil cooler is now exposed. Undo one of the pipe clamps and pop a pipe off and the plastic headlight/console unit comes free.
19. Have another cuppa and sneaky fag. Call your mate back and tell him to stick his rice burner up his fundament.
20. Realise that to remove the pipe you need to drain the sump. To drain the sump you need to remove the sump guard. The deck is covered is sh1t but fortunately you have a newspaper to hand (see step 8), remove the sump guard (six bolts, two biggies four wee). Undo the sump bolt and watch as your oil pishes everywhere (unless you have a container to hand). DO NOT keep your helmet to hand. They leak.
22. Remove the front crash bar and lower half of the crash bar on the LHS of the bike (for the oil cooler outlet pipe removal).
23. Remove the six bolts from the alternator cover plate/oil cooler holding plate.
24. Undo the banjo bolt at the bottom of the oil cooler pipe.
25. The pipe needs to go up first, a bit of juggling then it will come out going downwards.
26. Clean up all removed components. Braise the pipe if there are any cracks. Paint it with black enamel. Feel smug. It won't last.
27. Remove the torx screw and brass inserts from the bike frame and use a thread cutter to remove any threadlock from the inside of the inserts. Carefully glue them back into the beak. Gorrilla glue is ideal.
28. Your mate will turn up at this point on his bike, try to look calm amidst the chaos around you. Also, you will need his help to get the beak back on as someone needs to hold it while the other puts ths bolts in. Try not to piss him off.
The refit is the reverse of the removal. Be liberal with copperslip, count your bolts back in and make sure the right ones go in the right place.
Have an imperial mint to cover up your fag breath (see step 8). Light a small bonfire, burn your oil soaked newspaper and your filthy copy of the Haynes manual (with foreword by Roald Dahl and The Brothers Grim with commentary on the importance of the modern fairy tale).
Job done.


")
 .
.
")