Cylinder head cover leaking

mpgscott

Well-known member
UKGSer Subscriber
Joined
Feb 12, 2014
Messages
1,313
Reaction score
189
Location
Isle of Scalpay, Western Isles
2011 R1200GS

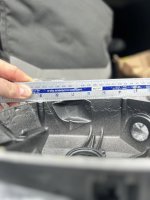
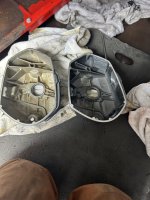
Before Xmas as I knew I would need to replace my cylinder head covers due to one being badly pitted.

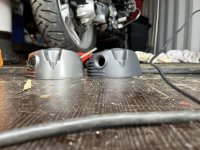
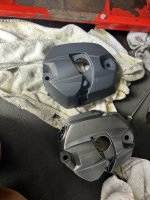
So got a set on eBay, they arrived and looked to be reworked originals.

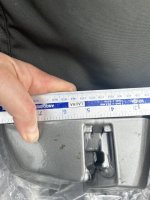
Face seals all look good checked and no distortion.

Cleaned the gaskets and faces on engine and new covers.

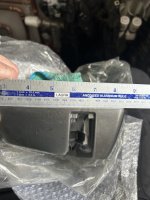
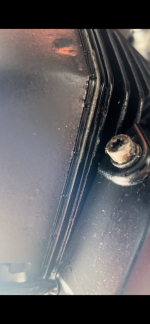
Left hand one bone dry after running upto temp. Right hand one just seeping at the bottom. When I push on this cover you can just see the gasket very slightly move.

So took it off applied some gasket seat the type that never hade d by loctite.

Still a very slight leak.

Anyone else had any such trouble?

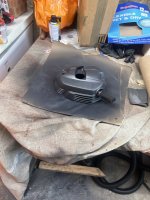
I might have to go back to the original pitted one which is a shame as these look good.

Any thoughts appreciated

Cheers
Mark
 
I've seen these covers on the bay - a pair for a great price - and I've considered getting them. But I've also read stories in here of them leaking...

I think theoneandonly has the logical answer, which is to get them flat.

In the absence of a decent sized surface plate, a piece of plate glass or even your stone kitchen worktop (when no one is looking ) work some fine wet & dry paper (800 upwards I guess). If you mark the matting face with pen beforehand, you'll see the low spots and where you have to reach. It'll be slow work. Just be patient and use water.

Sent from my SM-S908B using Tapatalk
Thanks guys, I will get this one off and do as you suggest
 
Well old cover BACK on and surfaces cleaned and no leaking.

I’m wondering if the gaskets need replacing also, however fact that original doesn’t leak I suppose answers my question.

This cover doesn’t look like a knock off, it’s stamped up as bmw inside and looks to have been powder coated.

On a piece of glass it looks perfectly flat. Wonder if it’s been taken down too much and is not too thin as a whole?

Very odd..
 
Can you clean the mating face, cover in marker pen, then, onto a sheet of clean paper, gently cycle it around a few times. This might reveal any high/low spots.

Any dents/nicks in the surface of the mating face?

Sent from my SM-S908B using Tapatalk
 
No leaks or Oil leaks? Can't tell

Sent from my SM-S908B using Tapatalk
Typo, iPad clumsy fingers of mine, sorry, no leaks on the old scabby covers.

Will do some of the tests suggested and see what I can find out. I’m just wondering if by chance they have already been taken down to clean the edge during the overhaul and now they are just too thin? Cant see a new seal taking up if it is..

Might just look at a replacement and maybe paint, shame these do look nice in the darker grey colour
 
Found the problem, thanks for the pointers folks.

Used a ruler and checked top all nice and level but bottom bows out in middle. So I will try sanding it down.

Thanks
 
Found the problem, thanks for the pointers folks.

Used a ruler and checked top all nice and level but bottom bows out in middle. So I will try sanding it down.

Thanks
Great you found the culprit!

It's a large surface area (don't know how deep the bow in the face is) so it'll be slow. Perhaps start with 320 grit to get it flat a little more quickly (240 if you're feeling brave). Then just work up through the grades - would think 800 is sufficient...

I'm watching this because new covers are still on my list...

Sent from my SM-S908B using Tapatalk
 
I will
Great you found the culprit!

It's a large surface area (don't know how deep the bow in the face is) so it'll be slow. Perhaps start with 320 grit to get it flat a little more quickly (240 if you're feeling brave). Then just work up through the grades - would think 800 is sufficient...

I'm watching this because new covers are still on my list...

Sent from my SM-S908B using Tapatalk
It’s difficult to show it but top edge perfect lower edge the important one has a raised piece in middle hopefully this shows it.

Second image show how much it’s out.
 

Attachments

  • IMG_9315.jpeg
    IMG_9315.jpeg
    123 KB · Views: 56
  • IMG_9320.jpeg
    IMG_9320.jpeg
    212 KB · Views: 53
That's quite a bit...any access to a miller? That would be the ultimate way to solve it - would take longer setting it up than milling it!

Sent from my SM-S908B using Tapatalk
 
That's quite a bit...any access to a miller? That would be the ultimate way to solve it - would take longer setting it up than milling it!

Sent from my SM-S908B using Tapatalk
I’m through in Aberdeen this week and have taken it with me, was thinking the same see if I could get it machined
 
Great you found the culprit!

It's a large surface area (don't know how deep the bow in the face is) so it'll be slow. Perhaps start with 320 grit to get it flat a little more quickly (240 if you're feeling brave). Then just work up through the grades - would think 800 is sufficient...

I'm watching this because new covers are still on my list...

Sent from my SM-S908B using Tapatalk
Well no joy, I opted for painstakingly wet sanding, started at 320 then 600 then finished with 1200.

Got it good and level all around, checked on flat surface with torch inside the cover which worked well and allowed me to do it in stages.

However when on the bike it’s like rocking so as if too much is off and the entire cover is now too thin. If I put them both on level the old one definitely sits higher.

So temporarily have painted the old one.

On the look for a set of genuine ones..
 

Attachments

  • IMG_9485.jpeg
    IMG_9485.jpeg
    144.1 KB · Views: 35
  • IMG_9491.jpeg
    IMG_9491.jpeg
    193.7 KB · Views: 33
Well no joy, I opted for painstakingly wet sanding, started at 320 then 600 then finished with 1200.

Got it good and level all around, checked on flat surface with torch inside the cover which worked well and allowed me to do it in stages.

However when on the bike it’s like rocking so as if too much is off and the entire cover is now too thin. If I put them both on level the old one definitely sits higher.

So temporarily have painted the old one.

On the look for a set of genuine ones..
Only just seen your post.

But...how about grinding 1-2mm of the end of the cover bolts. I'm wondering if they bottoming out and it's just that holding it off (not enough pressure onto the gasket)?

Can't see why they wouldn't fit

Sent from my SM-S908B using Tapatalk
 
Only just seen your post.

But...how about grinding 1-2mm of the end of the cover bolts. I'm wondering if they bottoming out and it's just that holding it off (not enough pressure onto the gasket)?

Can't see why they wouldn't fit

Sent from my SM-S908B using Tapatalk
Good idea, I will take a look at that..

Yes it’s rocking, so securing bolts tight and push at top of cover and you can see it rock and squeeze the gasket at the top. I will do some measuring.

Cheers
Mark
 
Well took again last night, the new cover is rocking very slightly. If I remove the spark plug rubber seal it fits perfect nice and snug. However with it installed and then the cover it just won’t seal.

Put the old cover on and it’s perfect.

Size wise they look exactly the same and measure the same. Internals look identical.

There are a couple of images I’ve taken from a video showing the difference, new one you can see oil start to seep.

I’m thinking of taking down slightly the circular ridge that the spark plug seal sits against

Doing my head in now..
 

Attachments

  • IMG_9518.jpeg
    IMG_9518.jpeg
    238.9 KB · Views: 23
  • IMG_9522.png
    IMG_9522.png
    605.5 KB · Views: 24
  • IMG_9523.png
    IMG_9523.png
    585.4 KB · Views: 26
  • IMG_9512.jpeg
    IMG_9512.jpeg
    208.1 KB · Views: 26
  • IMG_9510.jpeg
    IMG_9510.jpeg
    198.4 KB · Views: 31
It's hard to be sure looking at the pics, but on the replacement cover, the internal rebate setting the sparkplug aperture looks smaller than the original?


Sent from my SM-S908B using Tapatalk


Back
Top Bottom